12 Days of Christmas--Day 3!
/Hi friends! How have you been enjoying the blog hop so far? I have you have been inspired and if you have not added these bundles to your cart yet, you will be soon! There is still plenty of holiday crafting time left and baking season is really just beginning which is why I wanted to share an idea for an easy way to dress up a holiday treat.

I do love baking all throughout the year but there is something special about holiday baking. I love to participate in bake exchanges as its a fun way to get new ideas and share a recipe you love. I also enjoy making things and packaging them up cute to share with a co-worker, friend, stampin customers and my kids.
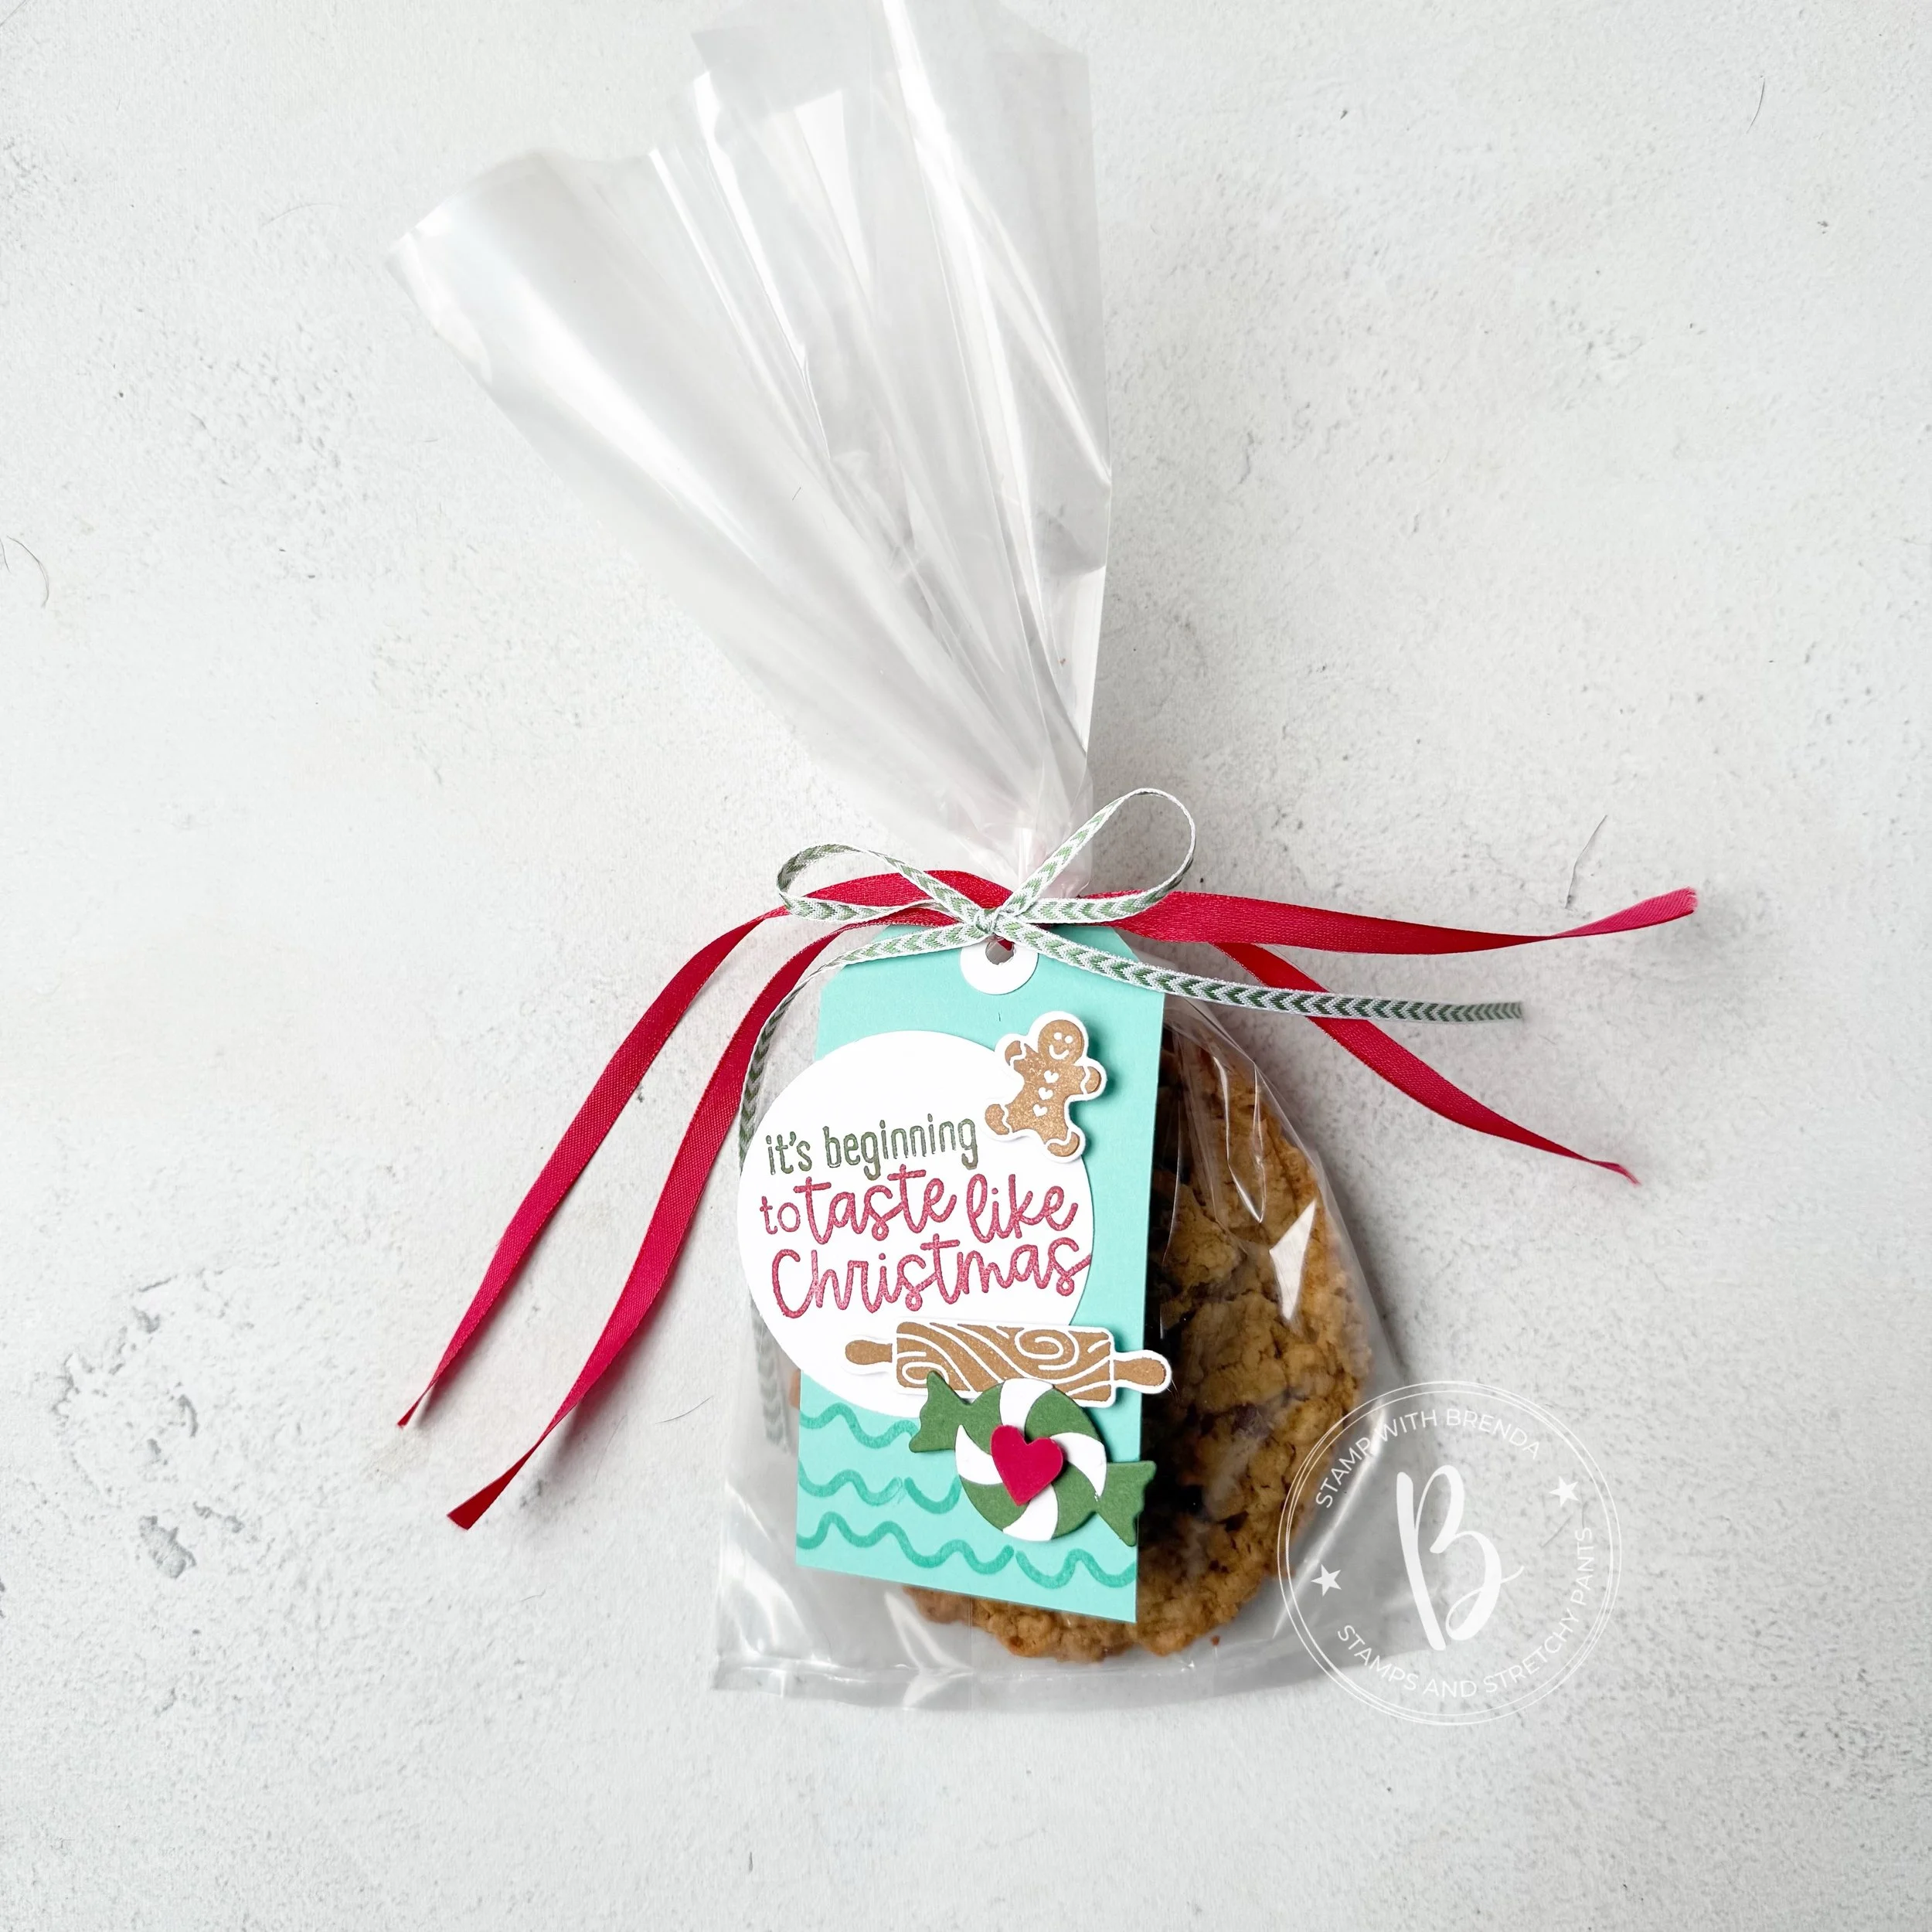
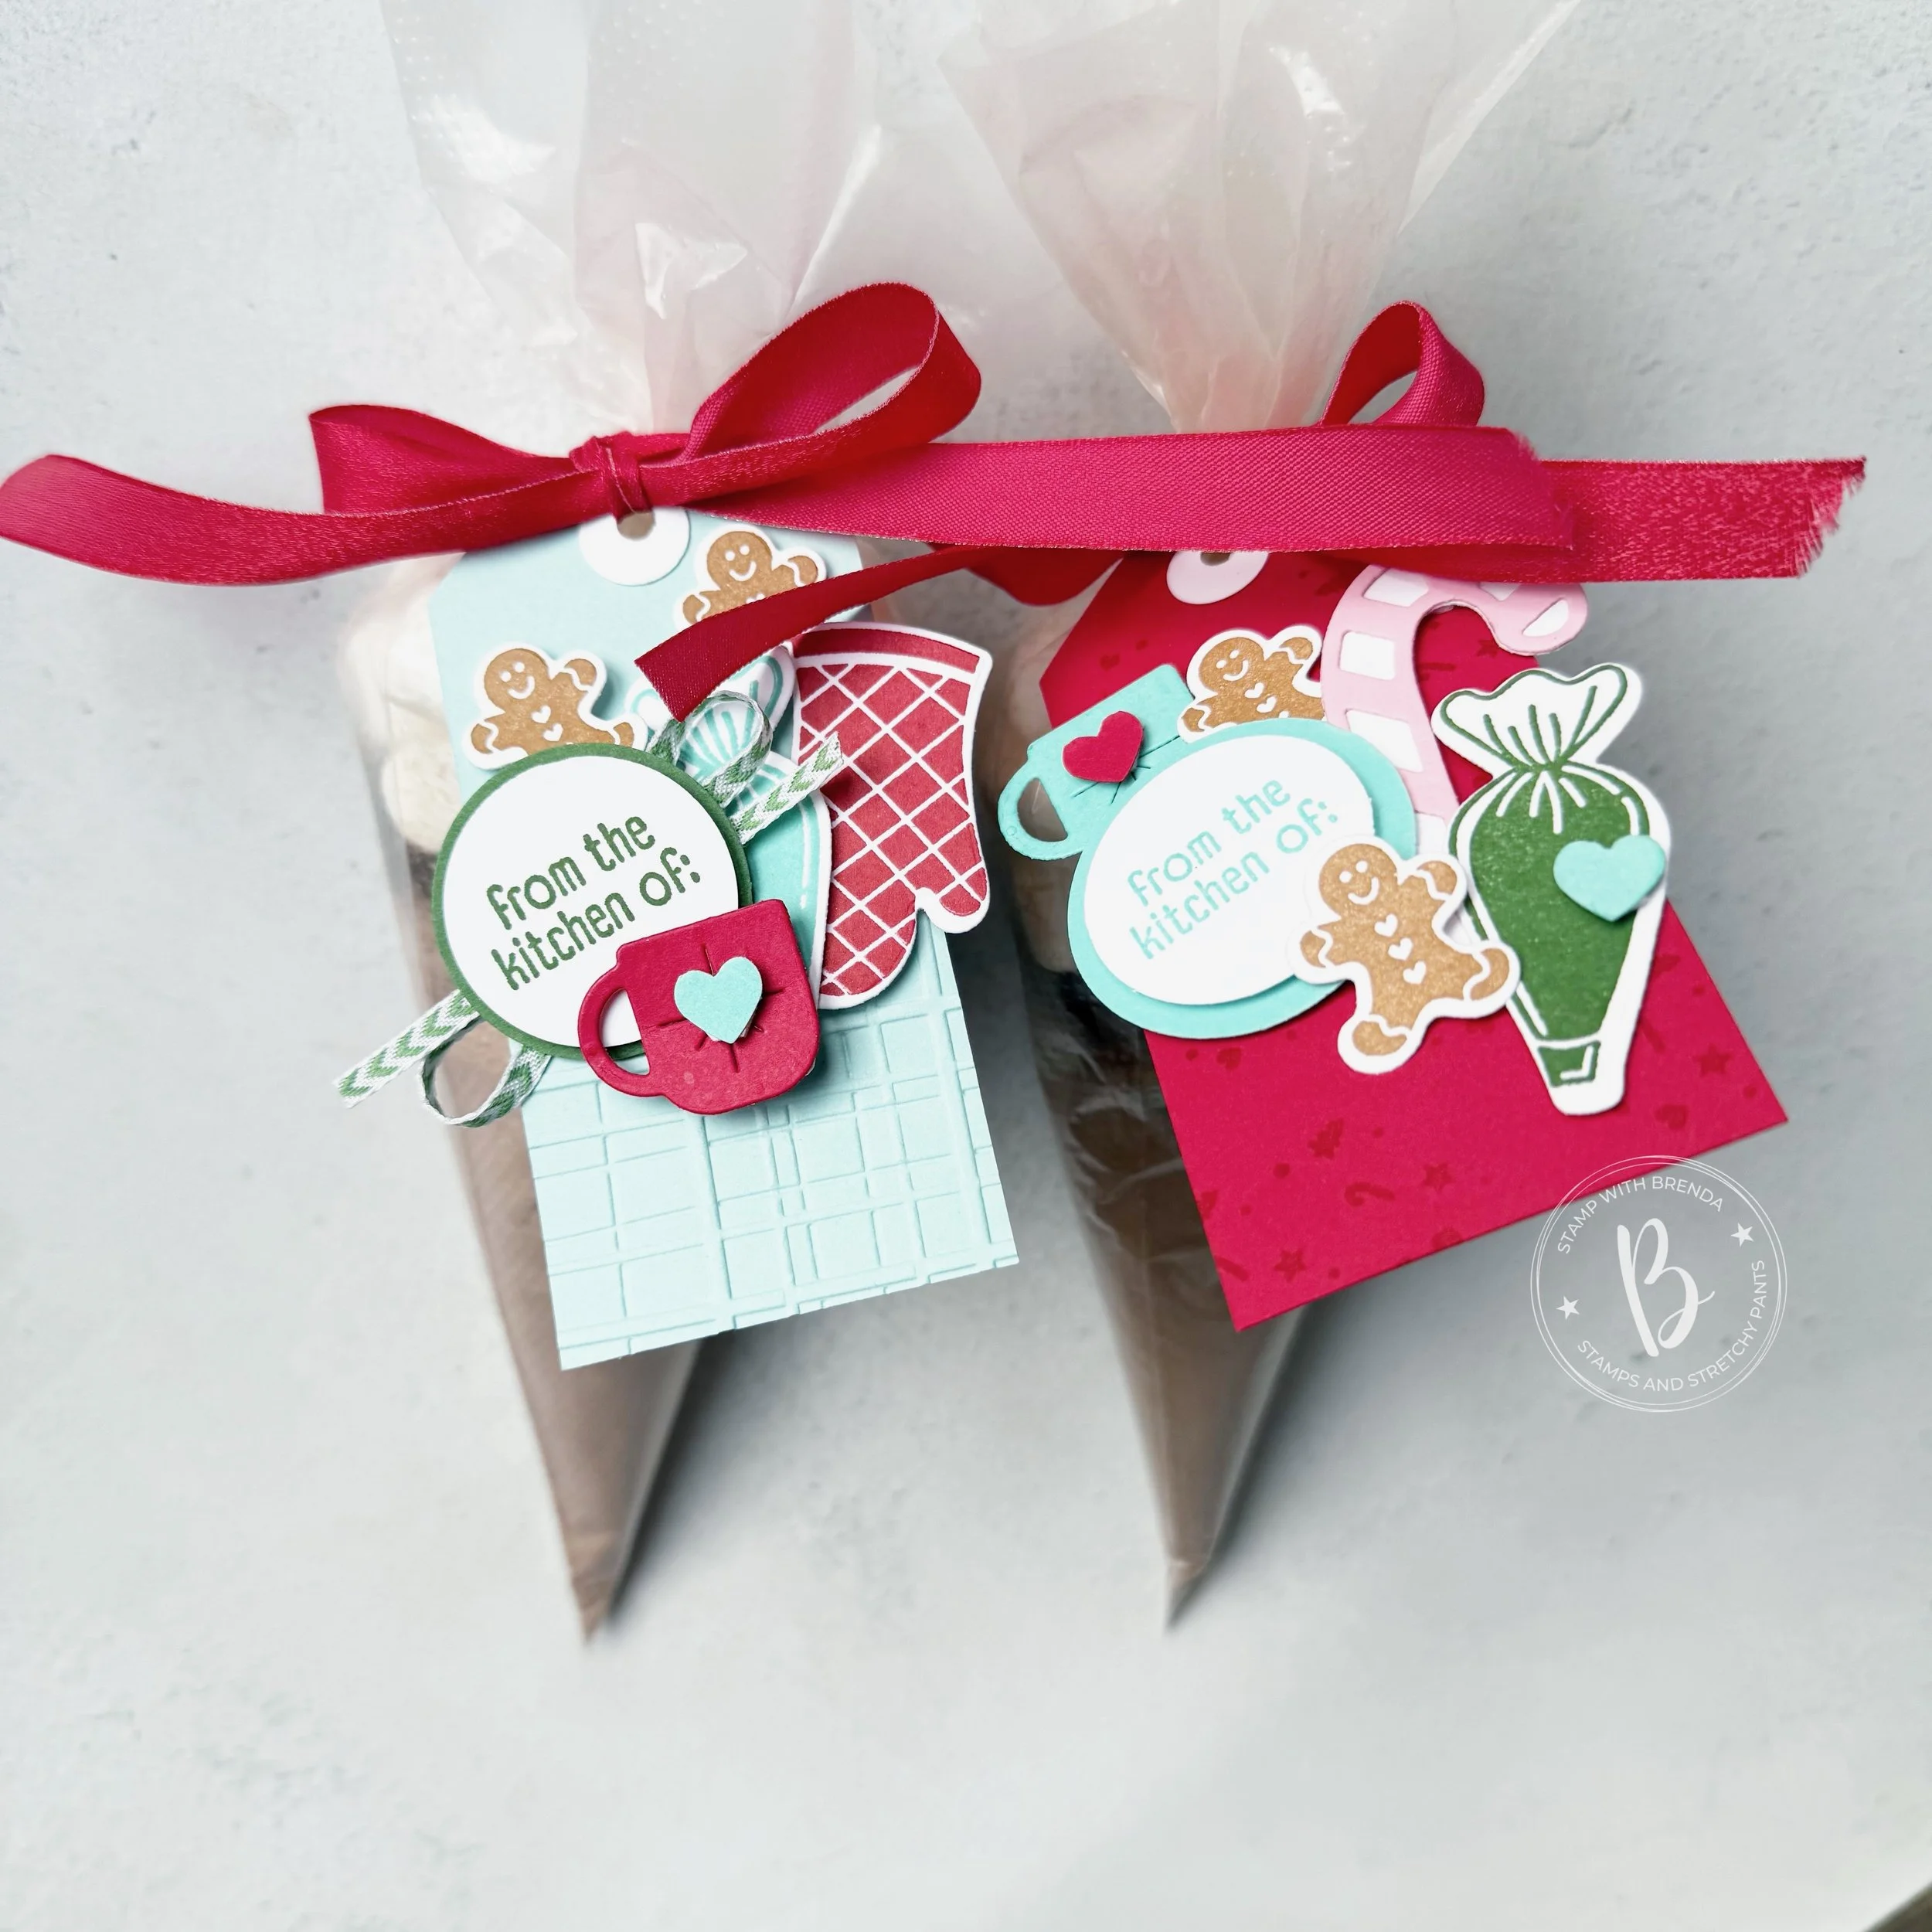
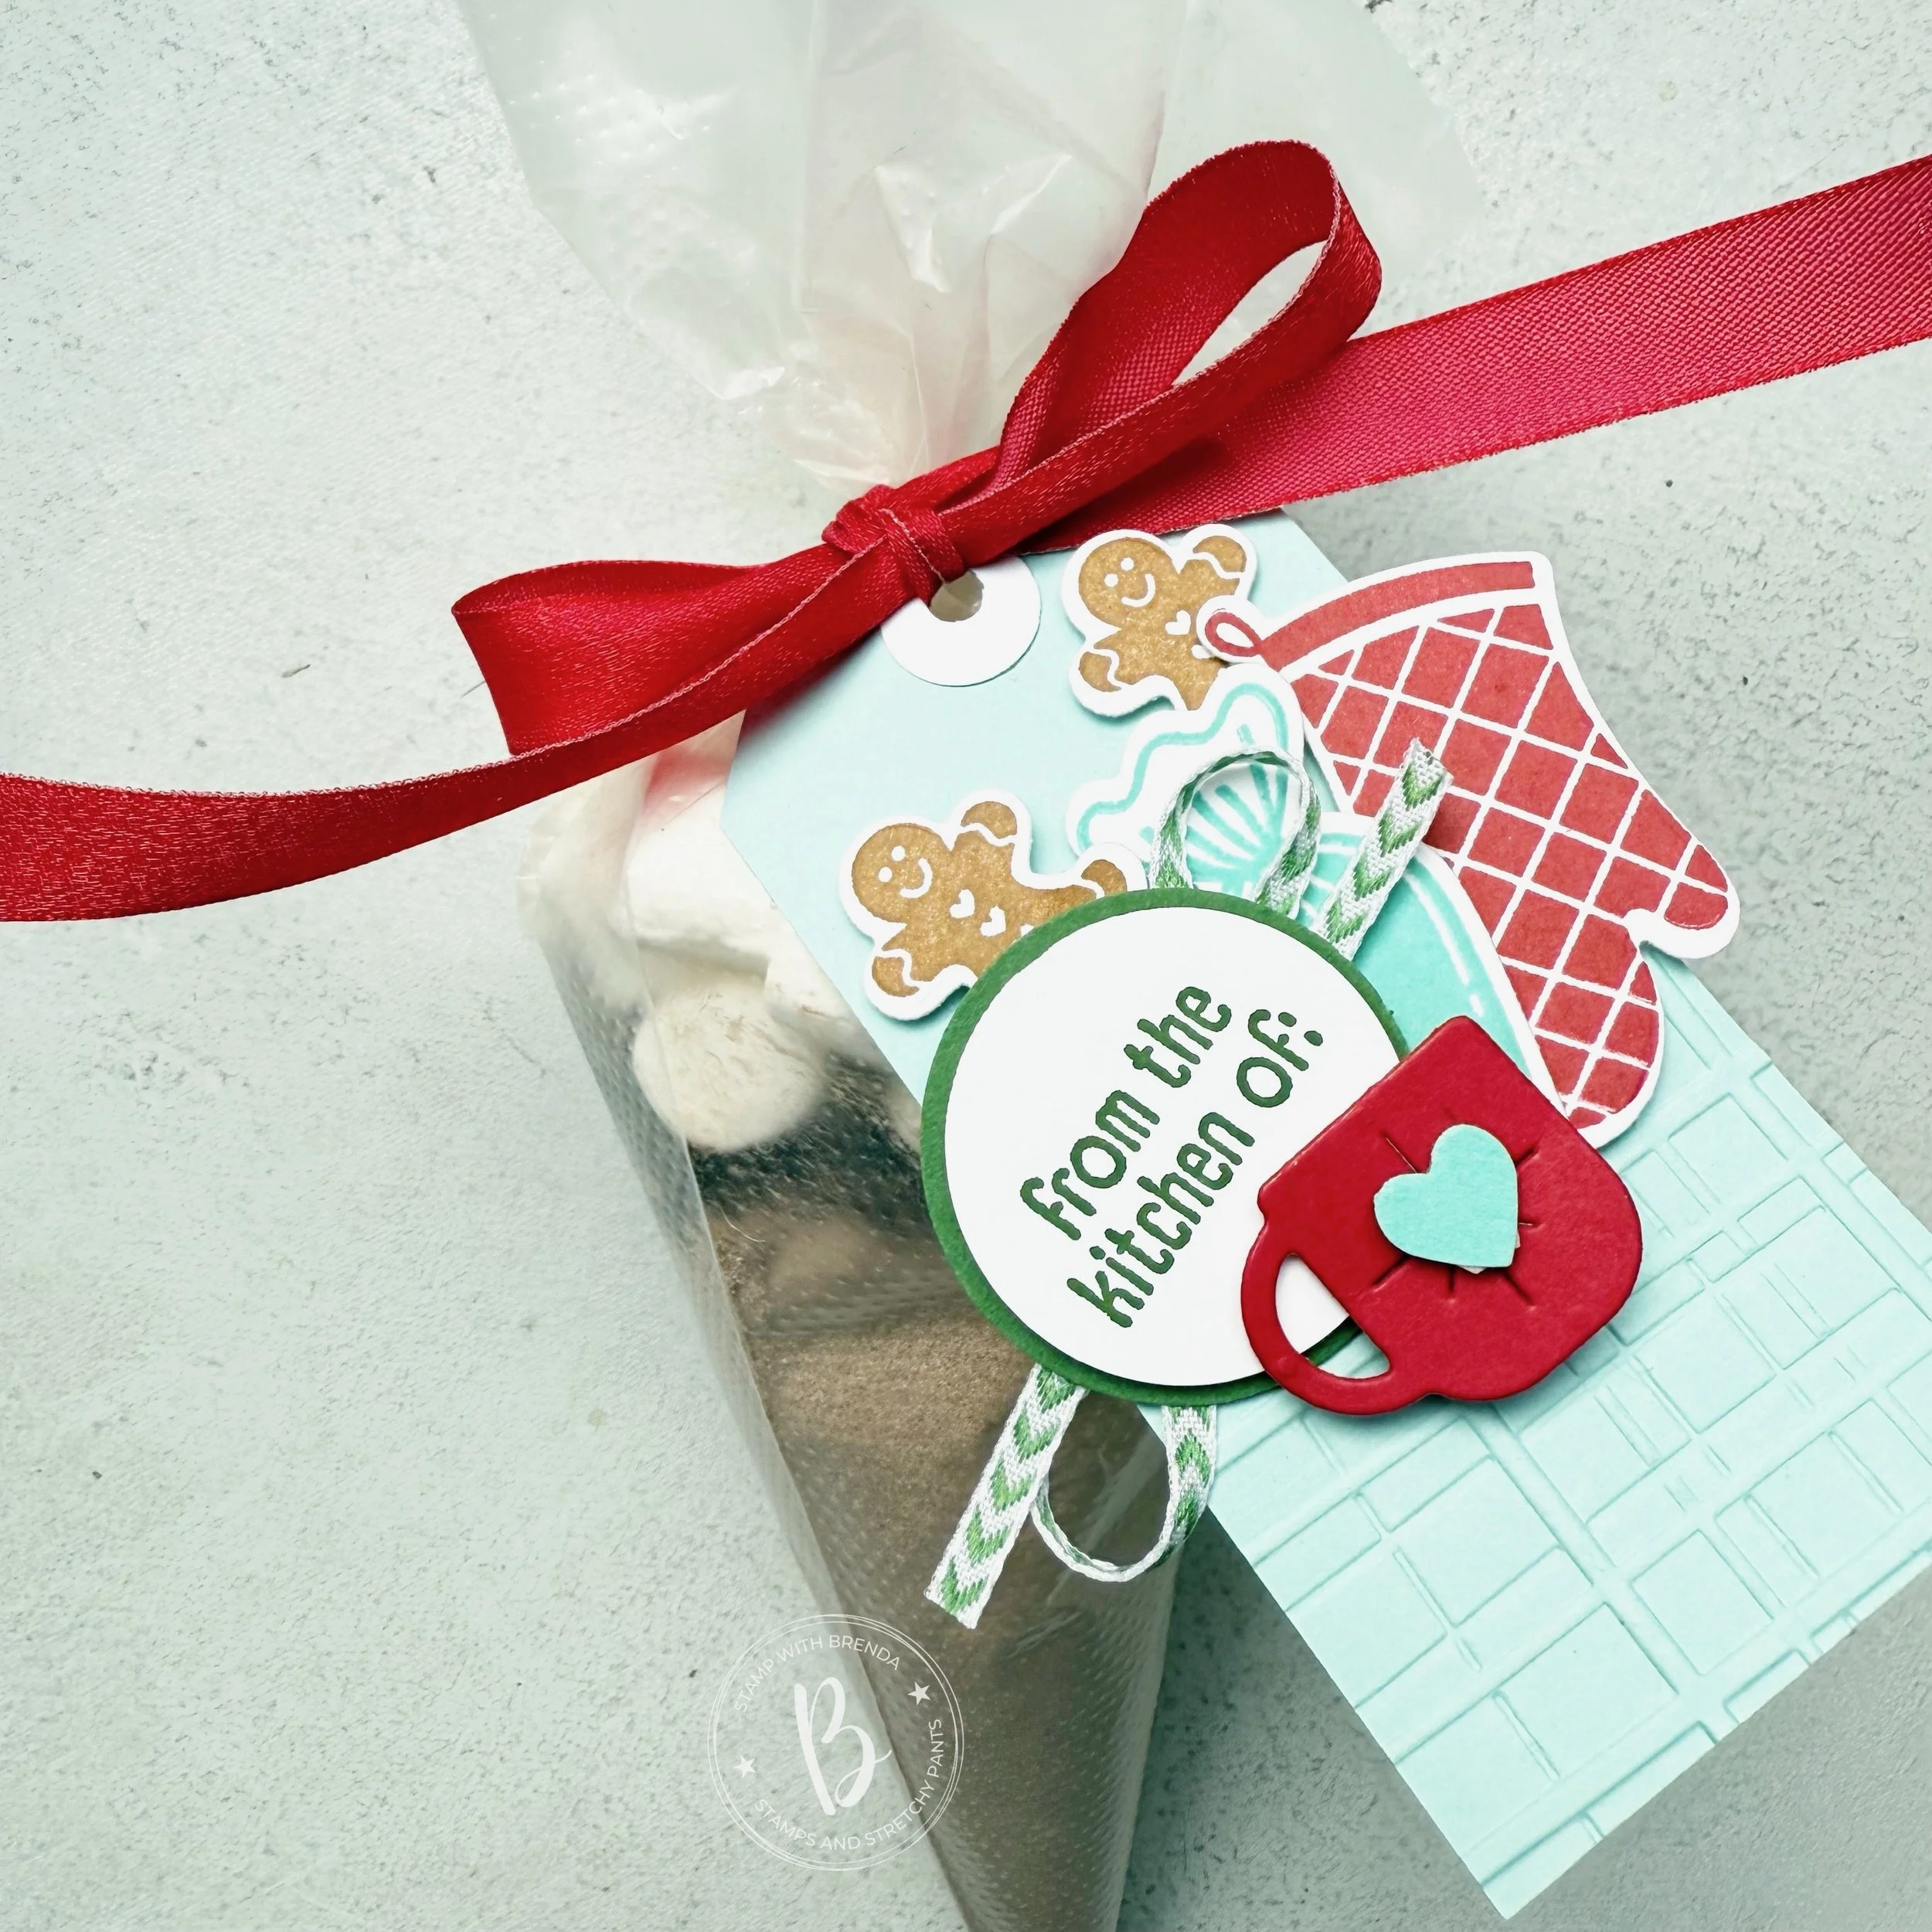
My kids have really been enjoying cookies lately and so I wanted to create a fun tag that you could use to package up individual cookies or a stack of cookies in a cello bag.
TOP TIP: Did you know I have a recipe section on my blog as well? Check my Lifestyle Tab and Brenda’s Favorite recipes to see some of my family's favorites!

I made my own tag by cutting a piece of Coastal Cabana into 2 1/4 x 4 inches and stamped the squiggles along the bottom from the Gingerbread Man stamp set is the same color. I attached the tag through a piece of Real Red Shiny Ribbon. I cut the ribbon in half so that it wasn’t as thick. I tied into a knot on the cookie bag and left the tails of the ribbon to float free. The Garden Green & White Chevron ribbon was added over the hole on the tag to act as another bow. Sometimes I find this easier than trying to get my original ribbon to cooperate!
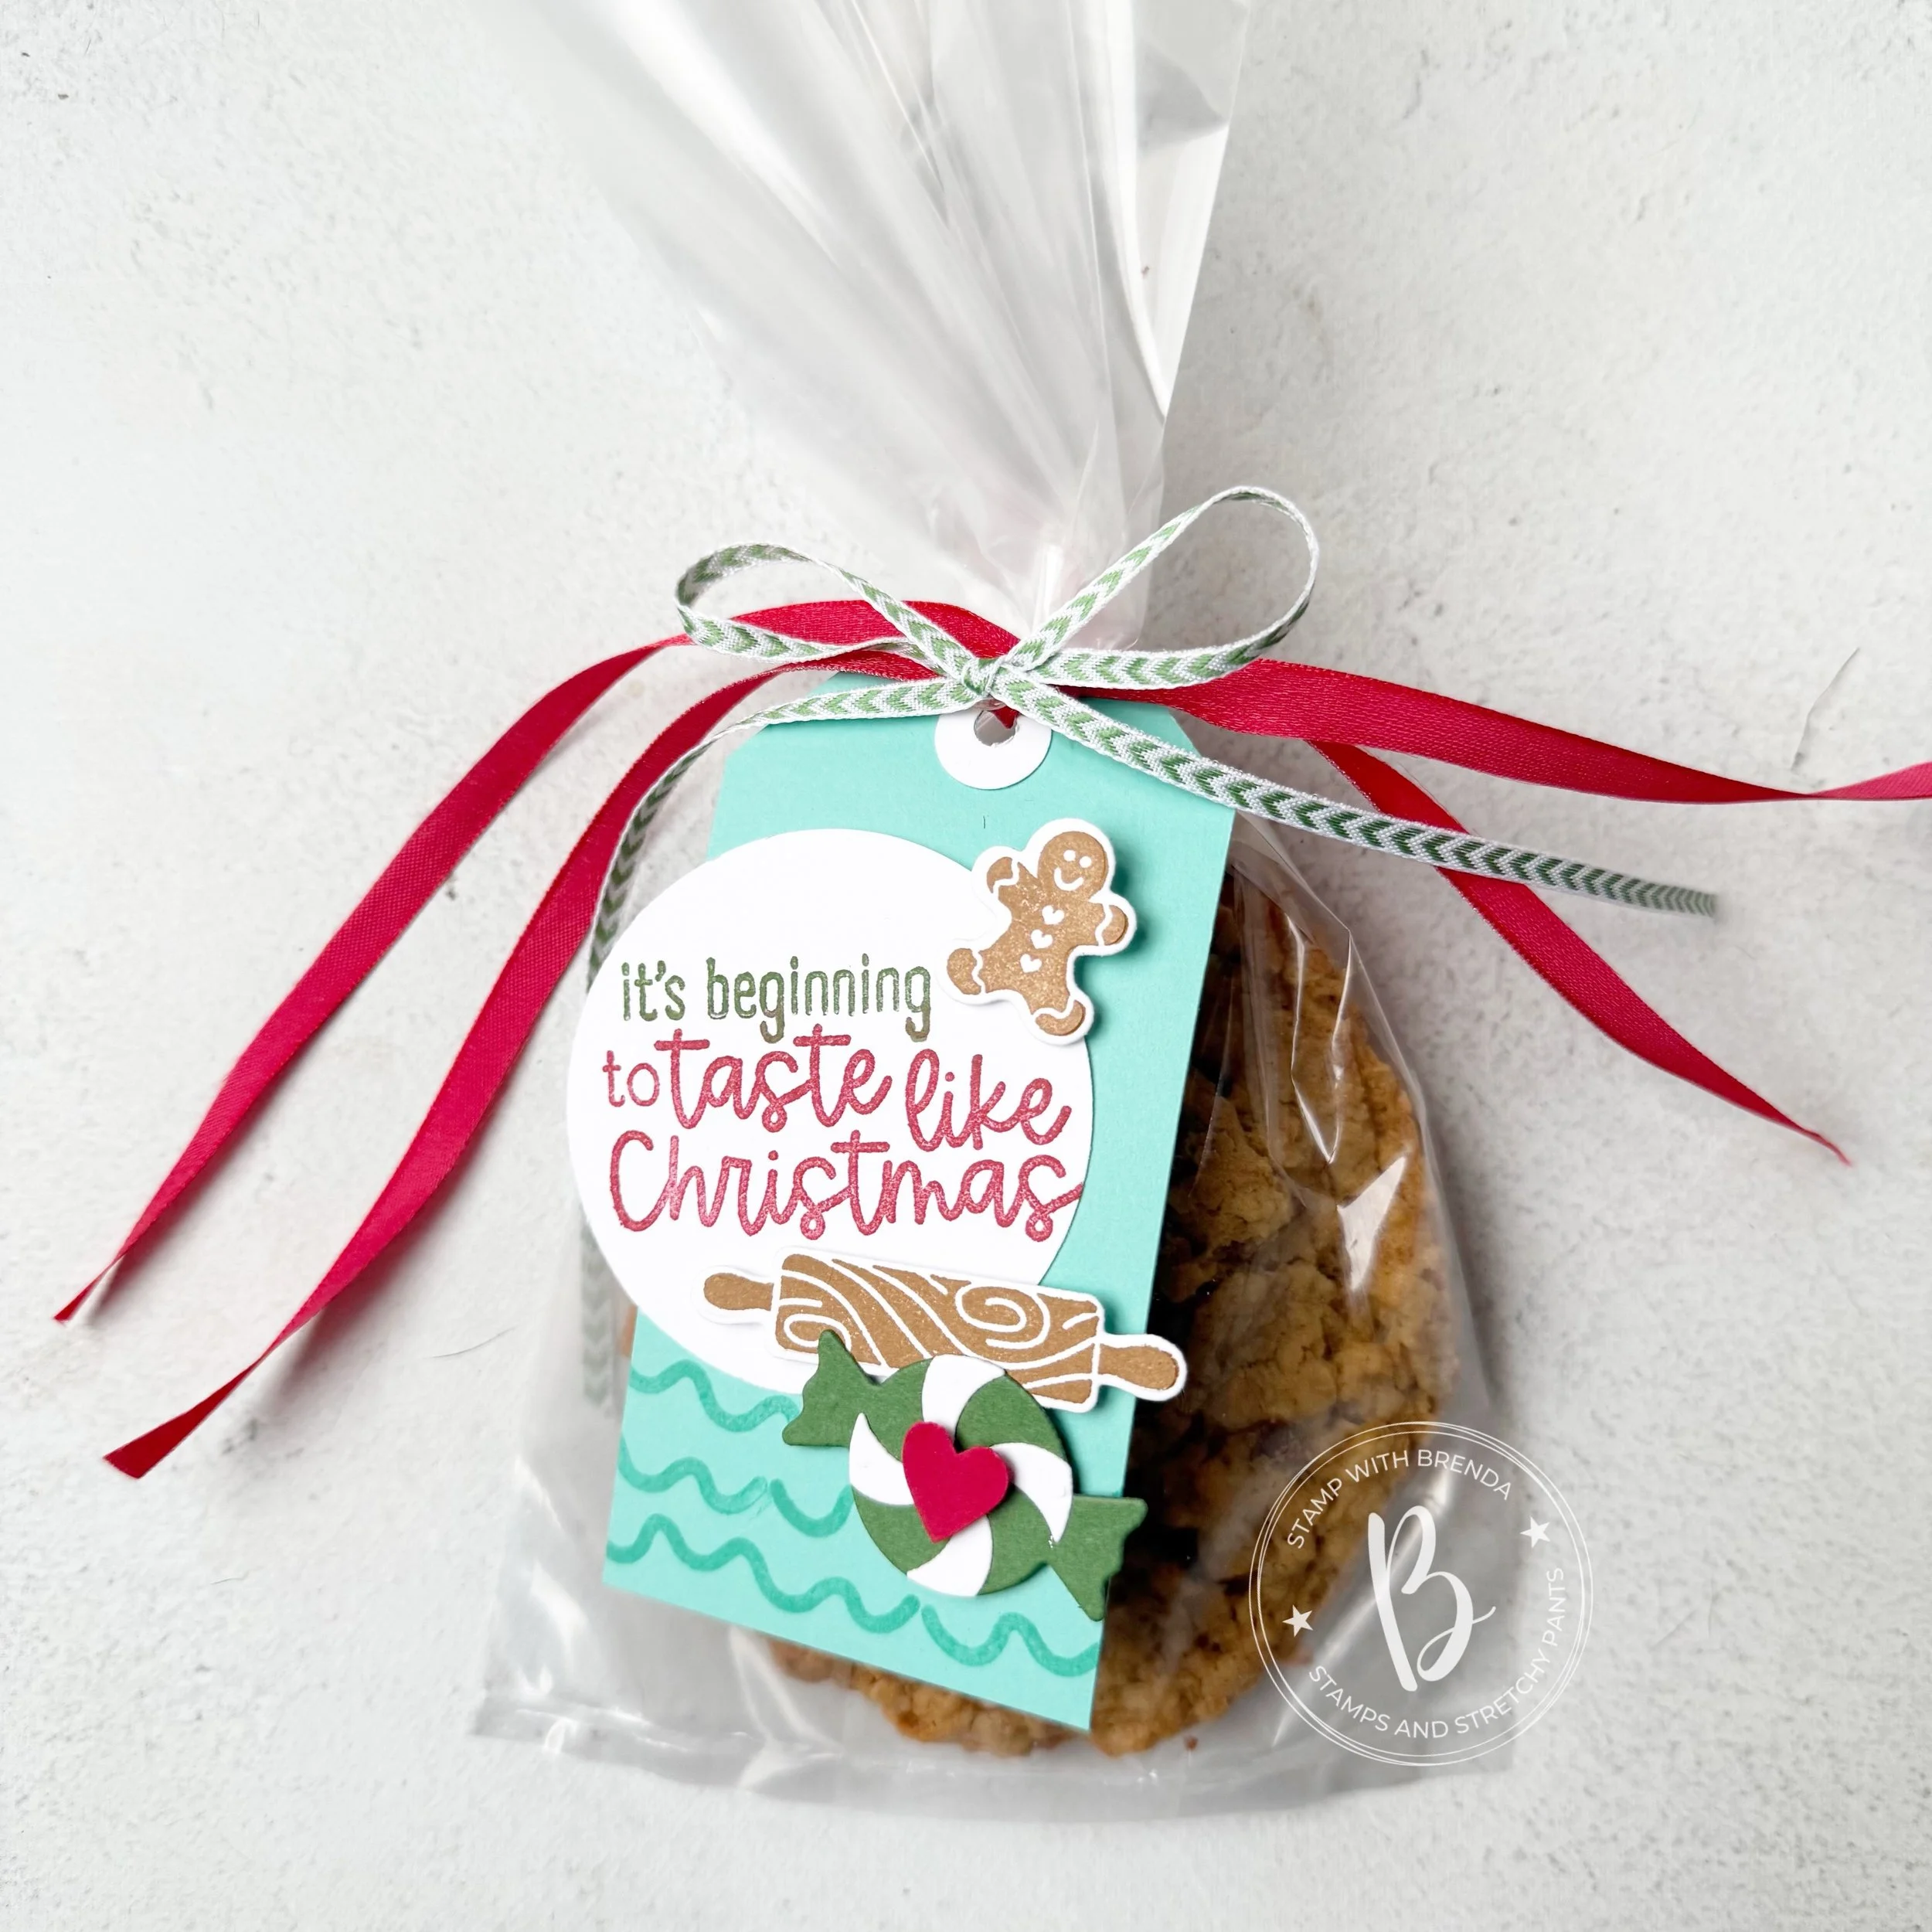
The sentiment is from the Homemade Treats stamp set and because its quite large, I needed to use the 2 3/8 circle punch. I used the Stampin’ Write markers (RIP) in Real Red and Garden Green on the sentiment.
The little gingerbread man and rolling pin are from the same stamp set and are stamped using Pecan Pie ink. The adorable candy die cut is from the Gingerbread Man die set. The mini heart is from the Bee Builder Punch.

I think adding an handmade tag to your holiday baking is such a special extra touch. I plan to have a stack made and ready to go for the holidays for when I want to leave an unexpected treat for someone on their desk!
Please consider shopping with. me if you are in Canada and need some crafty supplies as it helps me continue to love what I do!
Treat Bag Tag Supplies
Product List![Homemade Treats Bundle (English) [ 166017 ]](https://assets1.tamsnetwork.com/images/EC042017NF/166017s.jpg "Homemade Treats Bundle (English) [ 166017 ]")
![Gingerbread Man Bundle (English) [ 165785 ]](https://assets1.tamsnetwork.com/images/EC042017NF/165785s.jpg "Gingerbread Man Bundle (English) [ 165785 ]")
![2 3/8" (6 Cm) Circle Punch [ 161354 ]](https://assets1.tamsnetwork.com/images/EC042017NF/161354s.jpg "2 3/8\" (6 Cm) Circle Punch [ 161354 ]")
![Bee Builder Punch [ 162553 ]](https://assets1.tamsnetwork.com/images/EC042017NF/162553s.jpg "Bee Builder Punch [ 162553 ]")
![Regals Stampin' Write Markers [ 161699 ]](https://assets1.tamsnetwork.com/images/EC042017NF/161699s.jpg "Regals Stampin' Write Markers [ 161699 ]")
![Coastal Cabana Classic Stampin' Pad [ 147097 ]](https://assets1.tamsnetwork.com/images/EC042017NF/147097s.jpg "Coastal Cabana Classic Stampin' Pad [ 147097 ]")
![Pecan Pie Classic Stampin' Pad [ 161665 ]](https://assets1.tamsnetwork.com/images/EC042017NF/161665s.jpg "Pecan Pie Classic Stampin' Pad [ 161665 ]")
![Real Red 1/2" (1.3 Cm) Shiny Ribbon [ 165876 ]](https://assets1.tamsnetwork.com/images/EC042017NF/165876s.jpg "Real Red 1/2\" (1.3 Cm) Shiny Ribbon [ 165876 ]")
![Coastal Cabana 8-1/2" X 11" Cardstock [ 131297 ]](https://assets1.tamsnetwork.com/images/EC042017NF/131297s.jpg "Coastal Cabana 8-1/2\" X 11\" Cardstock [ 131297 ]")
![Basic White 8 1/2" X 11" Cardstock [ 166780 ]](https://assets1.tamsnetwork.com/images/EC042017NF/166780s.jpg "Basic White 8 1/2\" X 11\" Cardstock [ 166780 ]")
![Garden Green 8-1/2" X 11" Cardstock [ 102584 ]](https://assets1.tamsnetwork.com/images/EC042017NF/102584s.jpg "Garden Green 8-1/2\" X 11\" Cardstock [ 102584 ]")
![Real Red 8-1/2" X 11" Cardstock [ 102482 ]](https://assets1.tamsnetwork.com/images/EC042017NF/102482s.jpg "Real Red 8-1/2\" X 11\" Cardstock [ 102482 ]")
Click below to hop on over to Mel’s Inky Fingers to see what she is sharing today!
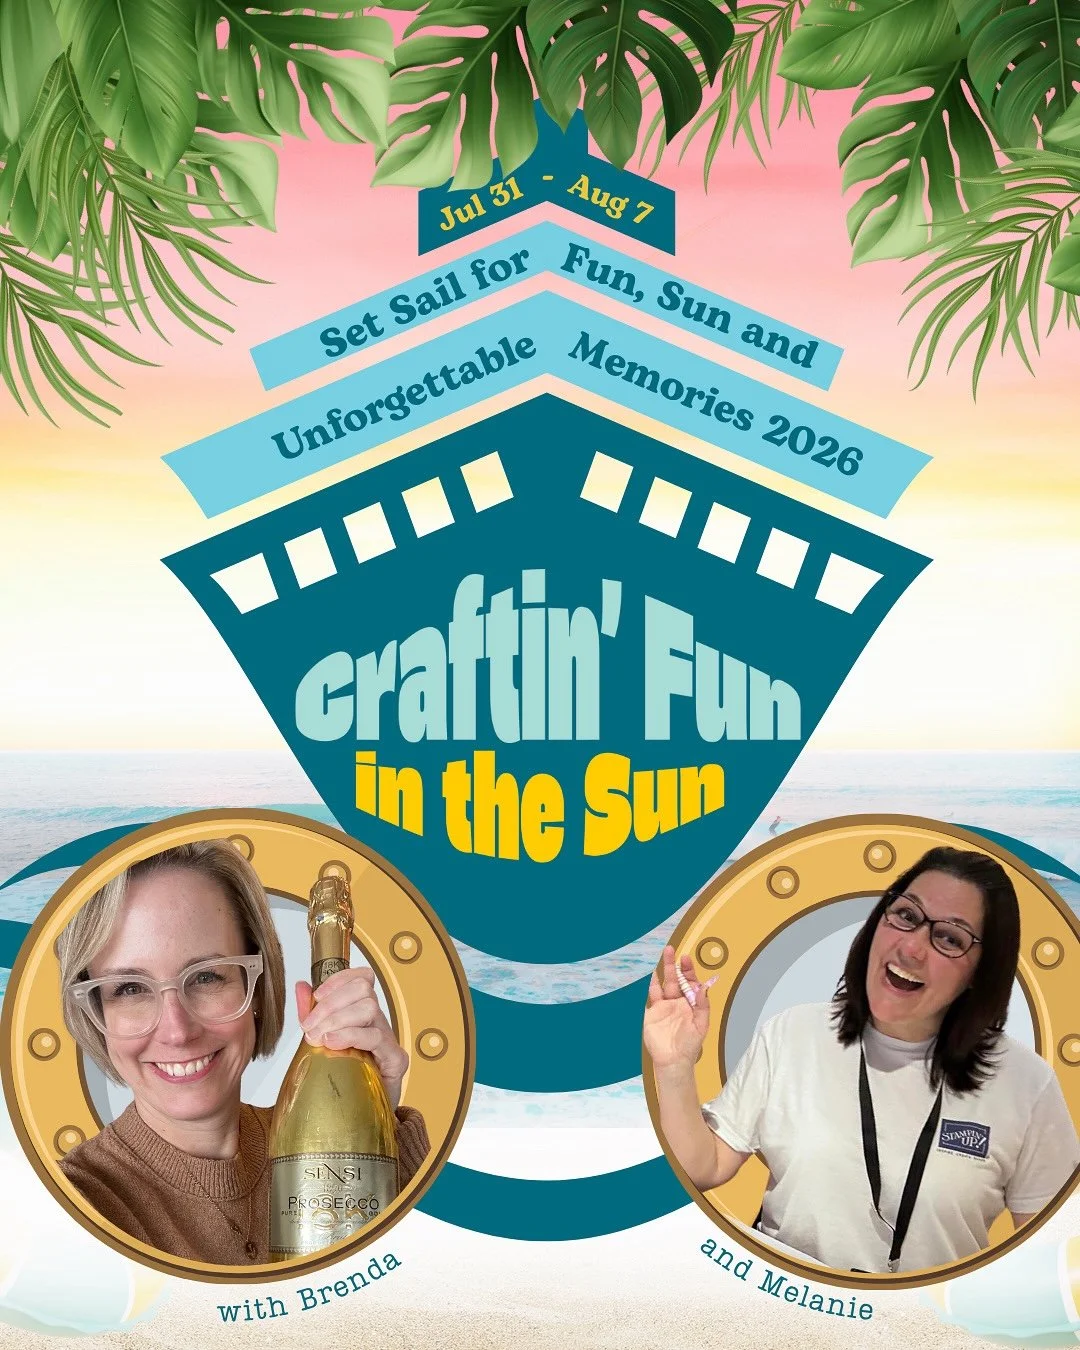
And if you want more crafting fun in the new year, consider joining Melanie and I on our inaugural Crafting Fun in the Sun Cruise!


![Forever Plaid 3 D Embossing Folder [ 164049 ]](https://assets1.tamsnetwork.com/images/EC042017NF/164049s.jpg "Forever Plaid 3 D Embossing Folder [ 164049 ]")
![Garden Green 1/8" (3.2 Mm) Chevron Ribbon [ 167212 ]](https://assets1.tamsnetwork.com/images/EC042017NF/167212s.jpg "Garden Green 1/8\" (3.2 Mm) Chevron Ribbon [ 167212 ]")
![Pretty In Pink 8 1/2" X 11" Cardstock [ 163793 ]](https://assets1.tamsnetwork.com/images/EC042017NF/163793s.jpg "Pretty In Pink 8 1/2\" X 11\" Cardstock [ 163793 ]")
![Real Red Classic Stampin' Pad [ 147084 ]](https://assets1.tamsnetwork.com/images/EC042017NF/147084s.jpg "Real Red Classic Stampin' Pad [ 147084 ]")
![Garden Green Classic Stampin' Pad [ 147089 ]](https://assets1.tamsnetwork.com/images/EC042017NF/147089s.jpg "Garden Green Classic Stampin' Pad [ 147089 ]")

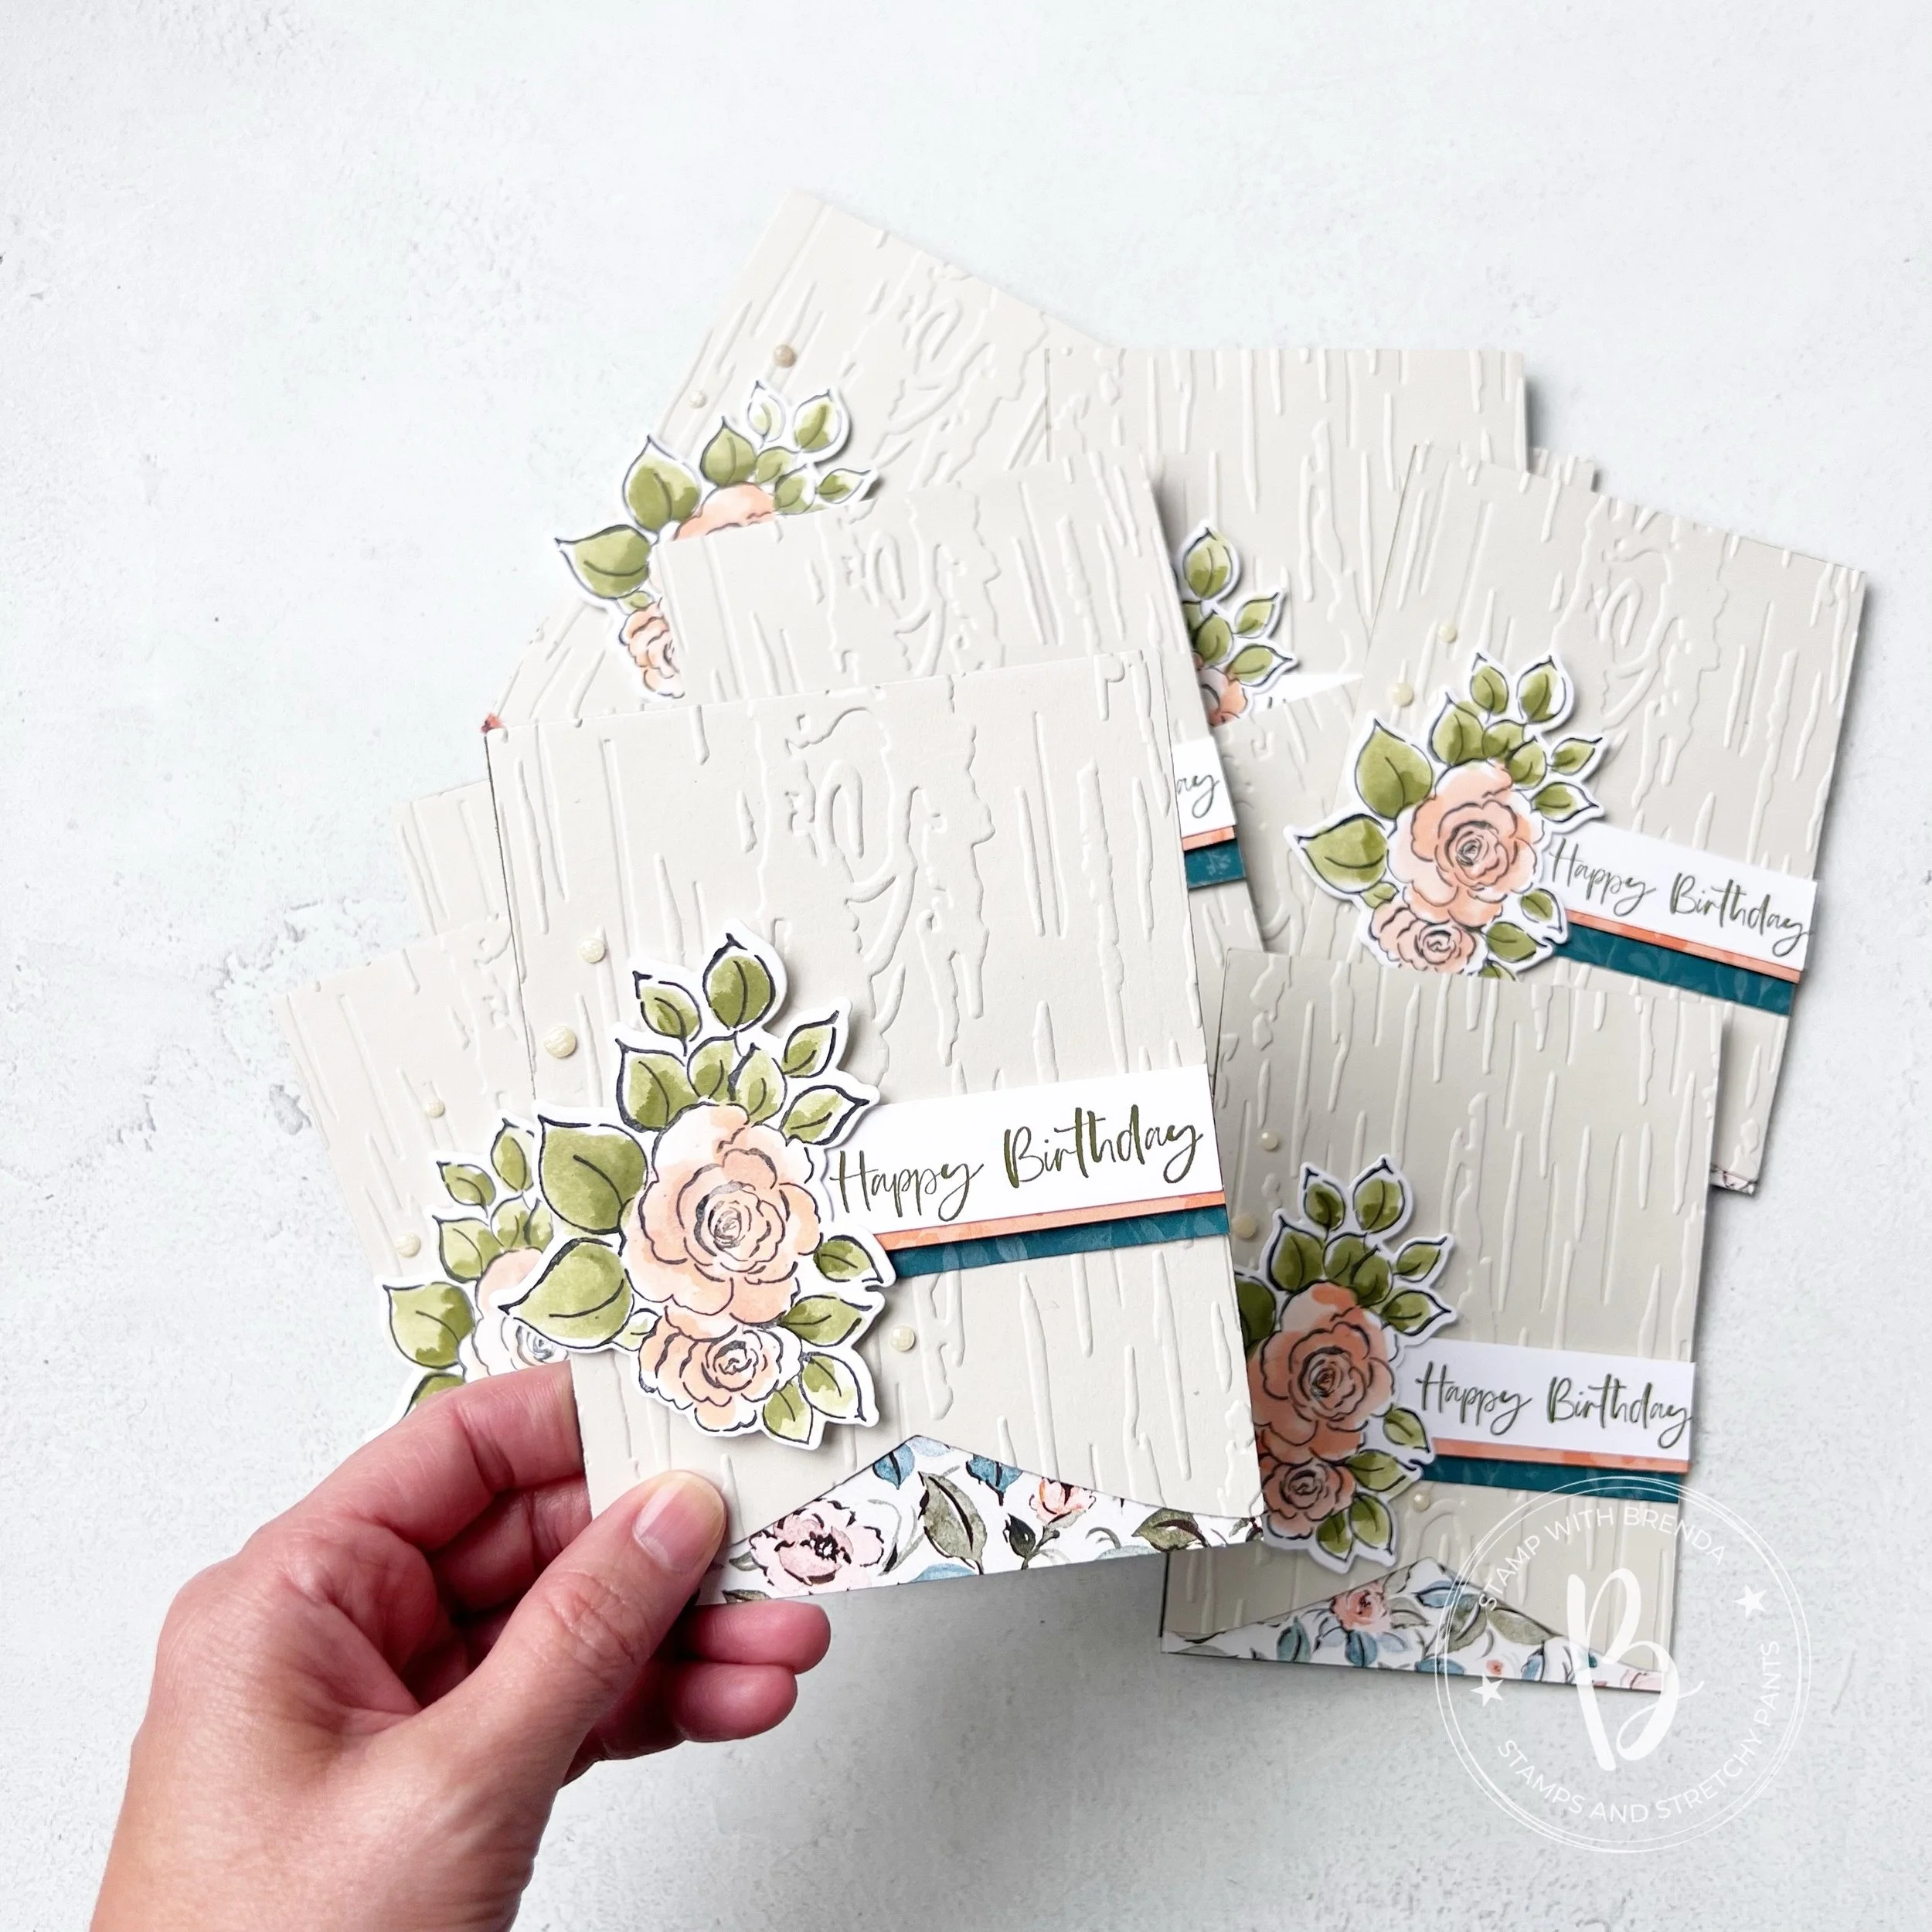
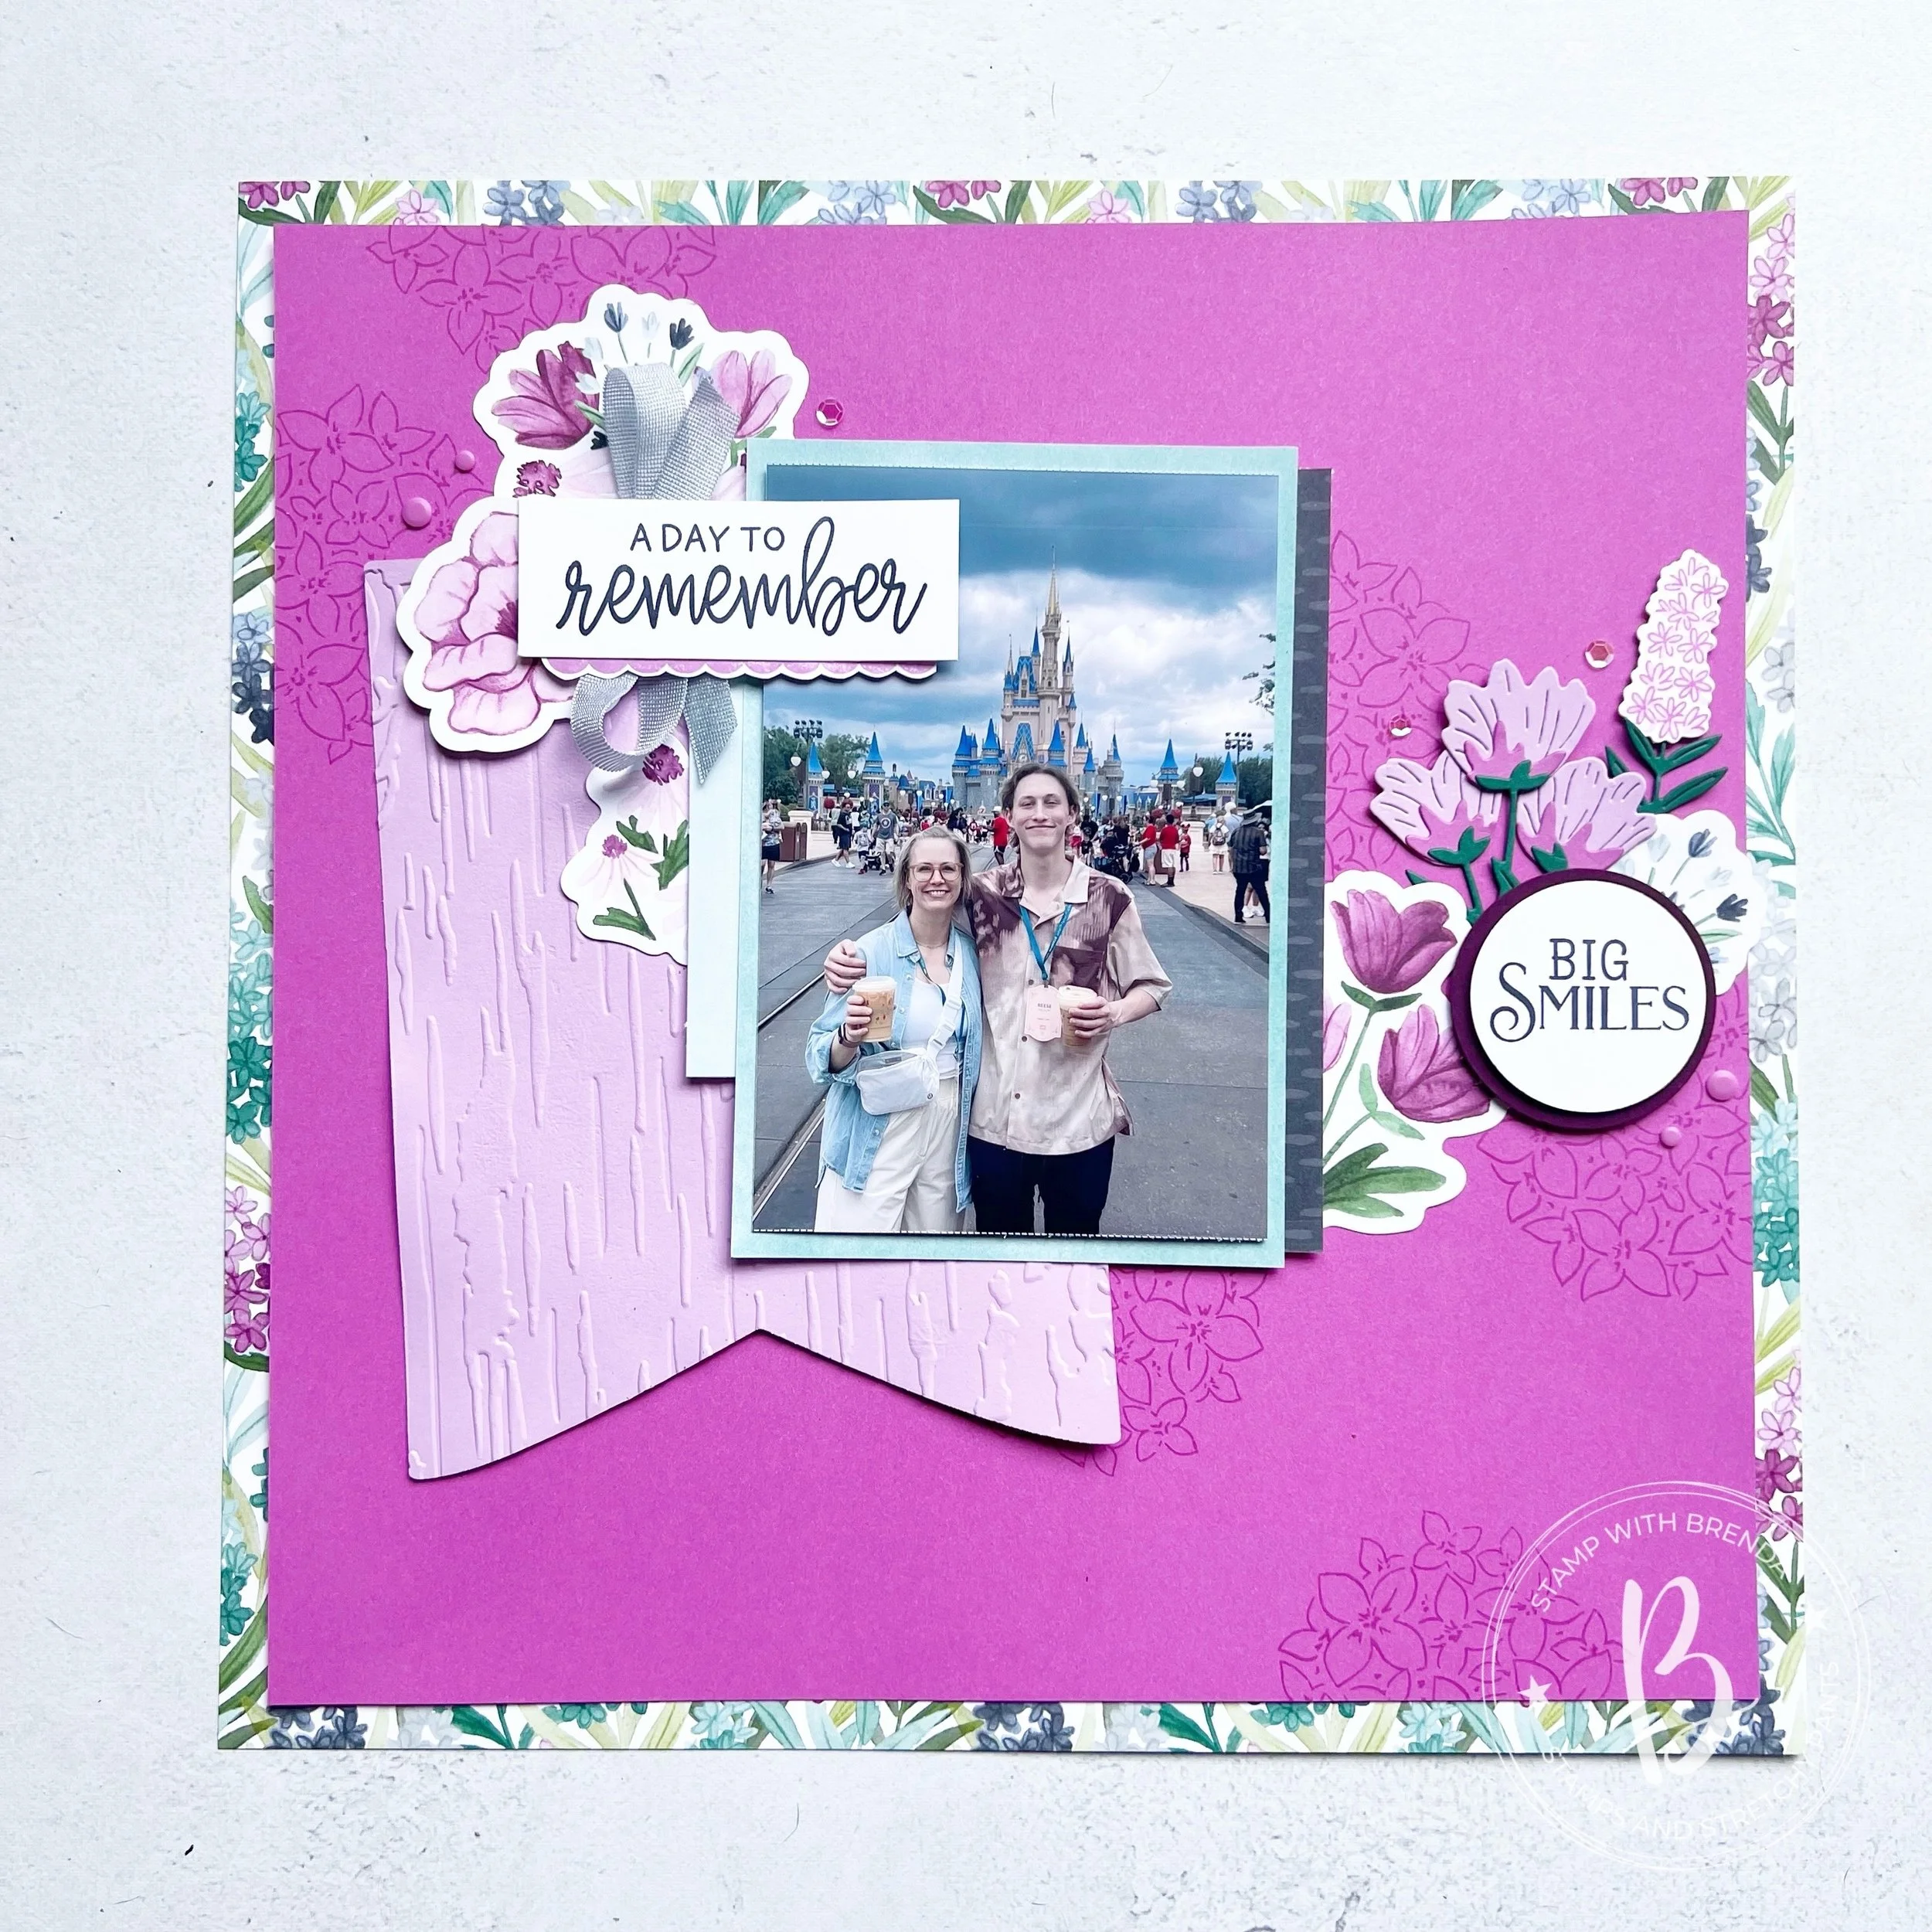
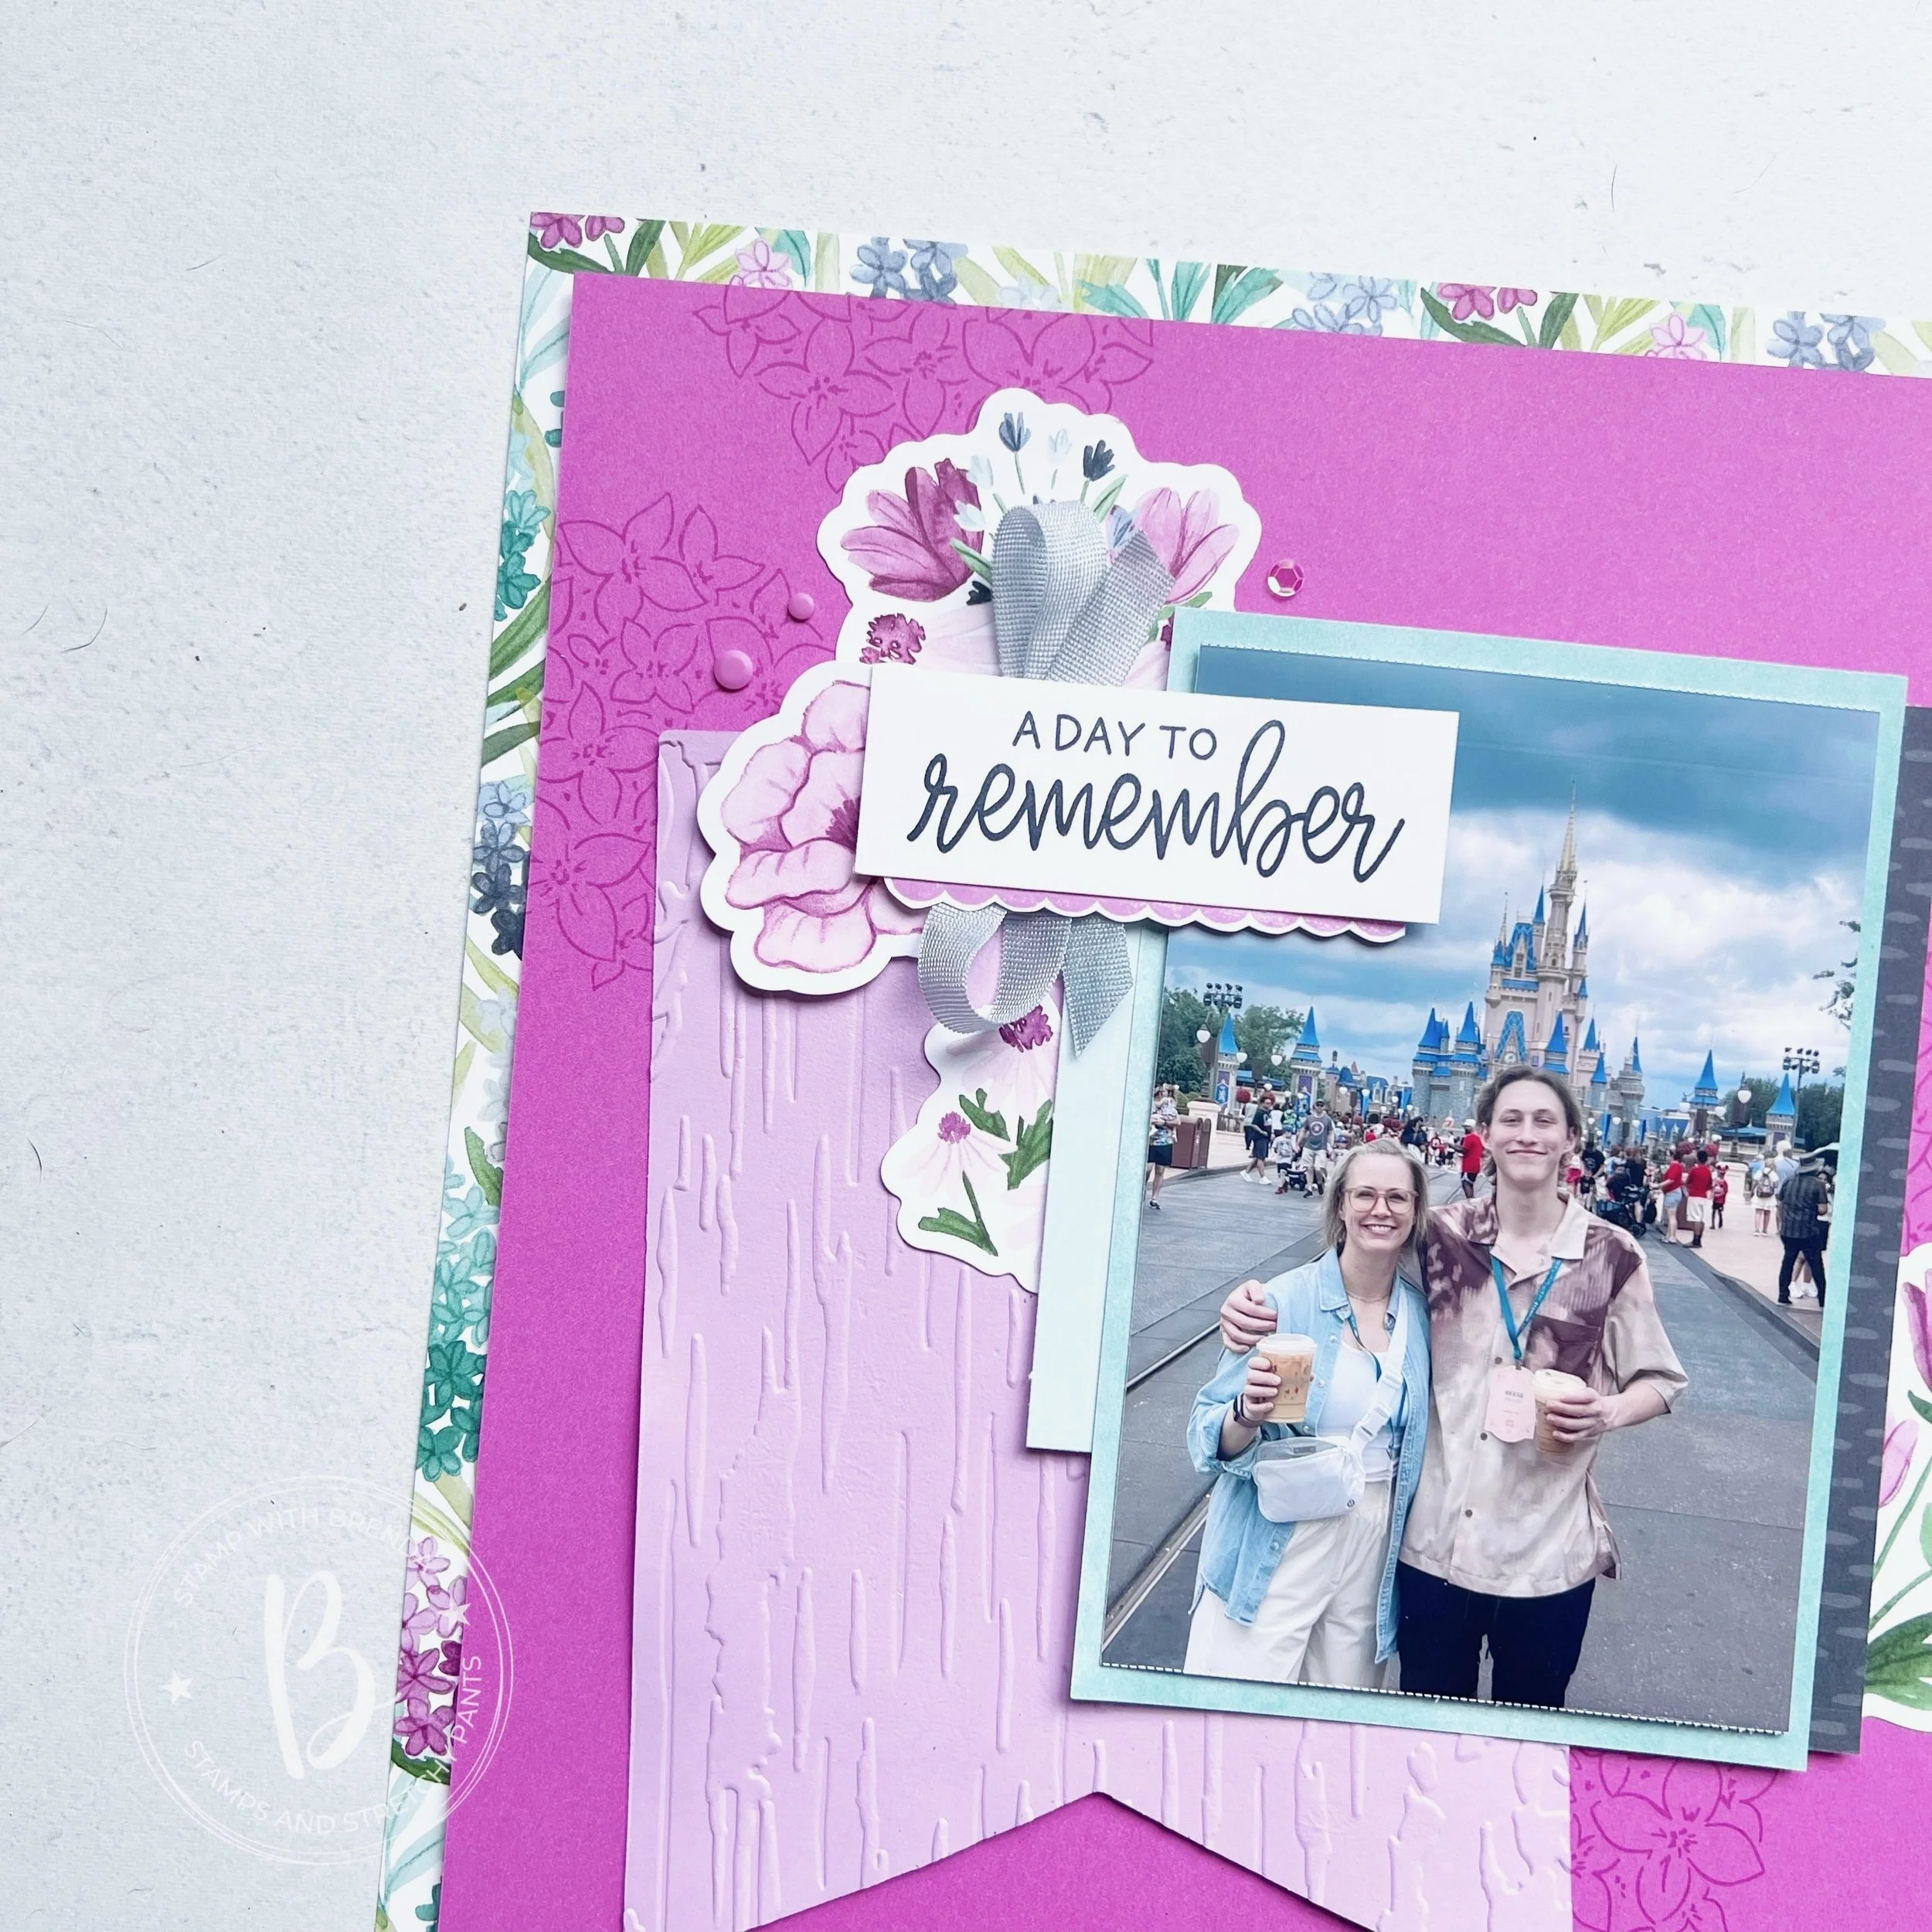
![Charming Day Bundle (English) [ 166136 ]](https://assets1.tamsnetwork.com/images/EC042017NF/166136s.jpg "Charming Day Bundle (English) [ 166136 ]")
![Party Banners Dies [ 165264 ]](https://assets1.tamsnetwork.com/images/EC042017NF/165264s.jpg "Party Banners Dies [ 165264 ]")
![Birch Wood 3 D Embossing Folder [ 164069 ]](https://assets1.tamsnetwork.com/images/EC042017NF/164069s.jpg "Birch Wood 3 D Embossing Folder [ 164069 ]")
![Floral Charm 12" X 12" (30.5 X 30.5 Cm) Designer Series Paper [ 166125 ]](https://assets1.tamsnetwork.com/images/EC042017NF/166125s.jpg "Floral Charm 12\" X 12\" (30.5 X 30.5 Cm) Designer Series Paper [ 166125 ]")
![Basic Beige 8 1/2" X 11" Cardstock [ 164511 ]](https://assets1.tamsnetwork.com/images/EC042017NF/164511s.jpg "Basic Beige 8 1/2\" X 11\" Cardstock [ 164511 ]")
![Neutral Matte Dots [ 165561 ]](https://assets1.tamsnetwork.com/images/EC042017NF/165561s.jpg "Neutral Matte Dots [ 165561 ]")
![Clear Wink Of Stella Glitter Brush [ 141897 ]](https://assets1.tamsnetwork.com/images/EC042017NF/141897s.jpg "Clear Wink Of Stella Glitter Brush [ 141897 ]")
![Water Painters [ 151298 ]](https://assets1.tamsnetwork.com/images/EC042017NF/151298s.jpg "Water Painters [ 151298 ]")
![Tuxedo Black Memento Ink Pad [ 132708 ]](https://assets1.tamsnetwork.com/images/EC042017NF/132708s.jpg "Tuxedo Black Memento Ink Pad [ 132708 ]")
![Old Olive Classic Stampin' Pad [ 147090 ]](https://assets1.tamsnetwork.com/images/EC042017NF/147090s.jpg "Old Olive Classic Stampin' Pad [ 147090 ]")
![Petal Pink Classic Stampin' Pad [ 147108 ]](https://assets1.tamsnetwork.com/images/EC042017NF/147108s.jpg "Petal Pink Classic Stampin' Pad [ 147108 ]")
![Calypso Coral Classic Stampin' Pad [ 147101 ]](https://assets1.tamsnetwork.com/images/EC042017NF/147101s.jpg "Calypso Coral Classic Stampin' Pad [ 147101 ]")
![Mossy Meadow Classic Stampin' Pad [ 147111 ]](https://assets1.tamsnetwork.com/images/EC042017NF/147111s.jpg "Mossy Meadow Classic Stampin' Pad [ 147111 ]")
![Memories In Bloom Scrapbooking Workshop Kit (English) [ 166713 ]](https://assets1.tamsnetwork.com/images/EC042017NF/166713s.jpg "Memories In Bloom Scrapbooking Workshop Kit (English) [ 166713 ]")
![Pretty Florals Bundle [ 165179 ]](https://assets1.tamsnetwork.com/images/EC042017NF/165179s.jpg "Pretty Florals Bundle [ 165179 ]")
![Storybook Life Photopolymer Stamp Set (English) [ 166635 ]](https://assets1.tamsnetwork.com/images/EC042017NF/166635s.jpg "Storybook Life Photopolymer Stamp Set (English) [ 166635 ]")
![Thankful Garden Photopolymer Stamp Set (English) [ 165526 ]](https://assets1.tamsnetwork.com/images/EC042017NF/165526s.jpg "Thankful Garden Photopolymer Stamp Set (English) [ 165526 ]")
![Petunia Pop 12" X 12" (30.5 X 30.5 Cm) Two Tone Cardstock [ 166690 ]](https://assets1.tamsnetwork.com/images/EC042017NF/166690s.jpg "Petunia Pop 12\" X 12\" (30.5 X 30.5 Cm) Two Tone Cardstock [ 166690 ]")
![Blackberry Bliss 8-1/2" X 11" Cardstock [ 133675 ]](https://assets1.tamsnetwork.com/images/EC042017NF/133675s.jpg "Blackberry Bliss 8-1/2\" X 11\" Cardstock [ 133675 ]")
![Fresh Freesia 8 1/2" X 11" Cardstock [ 155613 ]](https://assets1.tamsnetwork.com/images/EC042017NF/155613s.jpg "Fresh Freesia 8 1/2\" X 11\" Cardstock [ 155613 ]")
![Cloud Cover 3/8" (1 Cm) Faux Linen Ribbon [ 165271 ]](https://assets1.tamsnetwork.com/images/EC042017NF/165271s.jpg "Cloud Cover 3/8\" (1 Cm) Faux Linen Ribbon [ 165271 ]")
![Petunia Pop Classic Stampin Pad [ 163811 ]](https://assets1.tamsnetwork.com/images/EC042017NF/163811s.jpg "Petunia Pop Classic Stampin Pad [ 163811 ]")
![Secret Sea Classic Stampin' Pad [ 165285 ]](https://assets1.tamsnetwork.com/images/EC042017NF/165285s.jpg "Secret Sea Classic Stampin' Pad [ 165285 ]")


![Thankful Garden Bundle (English) [ 165534 ]](https://assets1.tamsnetwork.com/images/EC042017NF/165534s.jpg "Thankful Garden Bundle (English) [ 165534 ]")
![Meant To Bee Dies [ 166582 ]](https://assets1.tamsnetwork.com/images/EC042017NF/166582s.jpg "Meant To Bee Dies [ 166582 ]")
![Beautiful Butterflies Photopolymer Stamp Set (English) [ 164608 ]](https://assets1.tamsnetwork.com/images/EC042017NF/164608s.jpg "Beautiful Butterflies Photopolymer Stamp Set (English) [ 164608 ]")
![White Willow 12" X 12" (30.5 X 30.5 Cm) Cardstock [ 166703 ]](https://assets1.tamsnetwork.com/images/EC042017NF/166703s.jpg "White Willow 12\" X 12\" (30.5 X 30.5 Cm) Cardstock [ 166703 ]")
![Petunia Pop 8 1/2" X 11" Cardstock [ 163801 ]](https://assets1.tamsnetwork.com/images/EC042017NF/163801s.jpg "Petunia Pop 8 1/2\" X 11\" Cardstock [ 163801 ]")
![Soft Sea Foam 8-1/2" X 11" Cardstock [ 146988 ]](https://assets1.tamsnetwork.com/images/EC042017NF/146988s.jpg "Soft Sea Foam 8-1/2\" X 11\" Cardstock [ 146988 ]")
![Lost Lagoon 8-1/2" X 11" Cardstock [ 133679 ]](https://assets1.tamsnetwork.com/images/EC042017NF/133679s.jpg "Lost Lagoon 8-1/2\" X 11\" Cardstock [ 133679 ]")
![Petunia Pop Stampin’ Blends Combo Pack [ 163828 ]](https://assets1.tamsnetwork.com/images/EC042017NF/163828s.jpg "Petunia Pop Stampin’ Blends Combo Pack [ 163828 ]")
![Fresh Freesia Stampin' Blends Combo Pack [ 155518 ]](https://assets1.tamsnetwork.com/images/EC042017NF/155518s.jpg "Fresh Freesia Stampin' Blends Combo Pack [ 155518 ]")
![Soft Sea Foam Stampin' Blends Combo Pack [ 154902 ]](https://assets1.tamsnetwork.com/images/EC042017NF/154902s.jpg "Soft Sea Foam Stampin' Blends Combo Pack [ 154902 ]")
![2024–2026 In Color™ Stampin' Write Markers [ 163829 ]](https://assets1.tamsnetwork.com/images/EC042017NF/163829s.jpg "2024–2026 In Color™ Stampin' Write Markers [ 163829 ]")
![Subtles Stampin' Write Markers [ 161698 ]](https://assets1.tamsnetwork.com/images/EC042017NF/161698s.jpg "Subtles Stampin' Write Markers [ 161698 ]")


