Create with Connie and Mary--All In Colors, All in ONE!

This week we are challenged to create a project that incorporates all 5 of our new In Colors onto one project! I actually love doing this and often create cards and scrapbook pages with this design theme.

21SUSatHopWelcome.png

Our new In Colors are just so fantastic as they look awesome together as a group and they work so well to complement our existing colors. So it was not hard to create with them!

final 33.jpg

I used the Banners Pick a Punch to create the banners or flags along the left edge in the following colors: Evening Evergreen, Fresh Freesia, Soft Succulent, Pale Papaya and Polished Pink.

I cut a panel of Basic White card stock to layer overtop and pop up with Dimensionals. For the background I stamped the floral image from the Art in Bloom stamp set in Whisper White Craft Ink and embossed it with white embossing powder.

final (4) 16.jpg

The sentiment is from the Flowers of Friendship stamp set and is stamped in Polished Pink ink and punched with a 2 inch circle (or you can use the Layering Circle Dies) and also popped up with Dimensionals.

Finally I added a couple clear circles from the Silver & Clear Epoxy Essentials which added a nice detail without distracting from the crisp clean background.

You can go BACK to see what Melissa designed this week or keep going along with the hop and see what Connie has created. I hope you are enjoying these new In Colors as much as we all are!

Around the World On Wednesday--Fancy Folds!

Welcome friends! So happy to be back with this crew this month, especially because our design theme is ‘Fancy Folds’ and I always love the challenge of creating one! While my design skills might be strong, math is not my forte! So while the ‘Fancy Fold’ looks amazing, it is not complicated and is something that can be replicated!

91442295_10216484369808661_2887014979863576576_n.jpg

As soon as I saw the Pansy Patch Bundle and coordinating Pansy Petals DSP I knew I wanted to try making a Pop Up Box card again. It has been a while but I was familiar with this card style and I could envision a bunch of flowers popping out of a box. You could recreate this project using any of our amazing flower dies.

final 28.jpg

What made this project extra awesome was that I was able to cut all of the flowers from the Designer Series Paper with the coordinating dies! I love when Stampin’ Up! developes amazing product coordination!

The sentiment is stamped in Calypso Coral ink from the Pansy Patch stamp set and punched into a 2 inch circle.

final 26.jpg

What makes this Pop Up Box card so great is that it folds or squishes flat so you can send it in an envelope. When the recipient opens it it will pop open into the box shape. It is also a really adorable project to have on display in your craft room. And, extra bonus, you can make two cards from one 8 1/2 x 11 piece of card stock.

final 29.jpg
 

To create the Pop Up Box card cut your card stock to 4 1/4 x 8 1/2. Score on the long side at 2, 4, 6 and 8. On the short side score at 2 1/4. On the 2 inch side, trim away a small portion from the 1/2 inch section to create a flap. This is how your will seal the box shut.

You can see from this angle there is no bottom to this project.

The flaps can be decorated. I decided to add a layer of Crumb Cake card stock to the two side flaps that I ran through the Dots folder from the Checks & Dots set.

final 32.jpg

As you can see the back ‘flap’ is not folded, you leave it standing straight to create a back to the project. I added some DSP from the Pansy Petals to this back panel measuring just under 2 inches by 3 inches.

On the bottom of the box I also added the same DSP.

Now let’s talk about the inside! To anchor the pansies you will need two things—Window Sheets, cut into teeny tiny strips and two pieces of coordinating card stock, in this case, Crumb Cake, cut to .5 x 3 inches scored on each end at .5. You will then use Glue Dots to anchor each little tab to the inside of the box.

The strips of Window Sheet are used to attach to these card stock anchors and the flowers. You can cut them to different heights to create a floral arrangement.

final 31.jpg

I hope this project inspires you to try creating your own Pop Up Box card. You can search Pinterest for inspiration or a visual for the directions, there is a lot out there!

Next up is Tricia Butts, I can’t wait to see what she has designed as a ‘Fancy Fold’ for us this month!


Create with Connie and Mary-Favorite NEW In Color!

I don’t even KNOW if its possible to pick just one color…so I am going to go with the first color I chose to create a scrapbook layout! Obviously that color was really speaking to me and I have to say I LOVE how it turned out. I hope it inspires you too!

21DesignTeamBadge.png

I am also curious to see if the Design team has similar favorites or if we have quite the spread! Its always so fun to see each week how we incorporate the challenge!

final (4) 15.jpg

The base of my page is the new Evening Evergreen and I just love it! It is such a nice rich green that looks fantastic with these lighter colors. I added interest and texture to my page by just punching a bunch of 1 inch circles and adhering them flat to the layout. This is a great way to add a design element without any background stamping.
I used the flowers from the True Love Designer Series Paper and colored them in with a variety of Stampin’ Blends.

final (1) 19.jpg

Evening Evergreen is such a nice base to showcase some brighter colors and make them really pop on your page. Here is stamped the sentiment with Fresh Freesia ink on the coordinating card stock. The sentiment is from the Color & Contour stamp set. Flowers in Calypso Coral, Polished Pink and Fresh Freesia look so awesome on this rich dark background. The leaves are colored with the new Soft Succulent Stampin’ Blend.

final (2) 16.jpg

These flowers are colored with the Pale Papaya Stampin’ Blends. I brought in a Pale Papaya photo mat and some of the new Pale Papaya and White Ribbon too. It is such a lovely color that really fills a gap in our standard color offering.

final (6) 8.jpg

You will notice in my paper crafting that I like to create little areas of interest on my pages. Typically on photos or up in the top corners of my pages.

This view gives you a sample of each of these! I love to add sentiments or phrases onto my pages to help bring my feelings about the content to life. Stampin’ Up! has no shortage of amazing stamp sets to help us in our design.

final (4) 15.jpg

If you have not pulled out this luscious green to play with yet, I really encourage you to do so. It is quite distinct when paired up with some of our current greens and as you can see it really does make a stunning backdrop for this scrapbook layout.

I can’t wait to see what the rest of team has chose as their Favorite New In Color! You can go BACK to see what Melissa’s choice is or NEXT to see what Connie has selected! Please feel free to leave a comment. Its always nice to get feedback!

Color Fusers--May 2021 Blog Hop!

Hello friends and welcome to MAY the official month of spring! Things are starting to grow and poke through the dead that claims most of the year here in Edmonton where I live! The sun is shining for longer and longer every day. Its fantastic!
I love the Color Fusers Combo that we have for you this month! This combo is bright and happy and new I wanted to make a scrapbook page…wait, I ALWAYS want to make a scrapbook page! Cards come in second place!

05_2021 Graphic.jpg

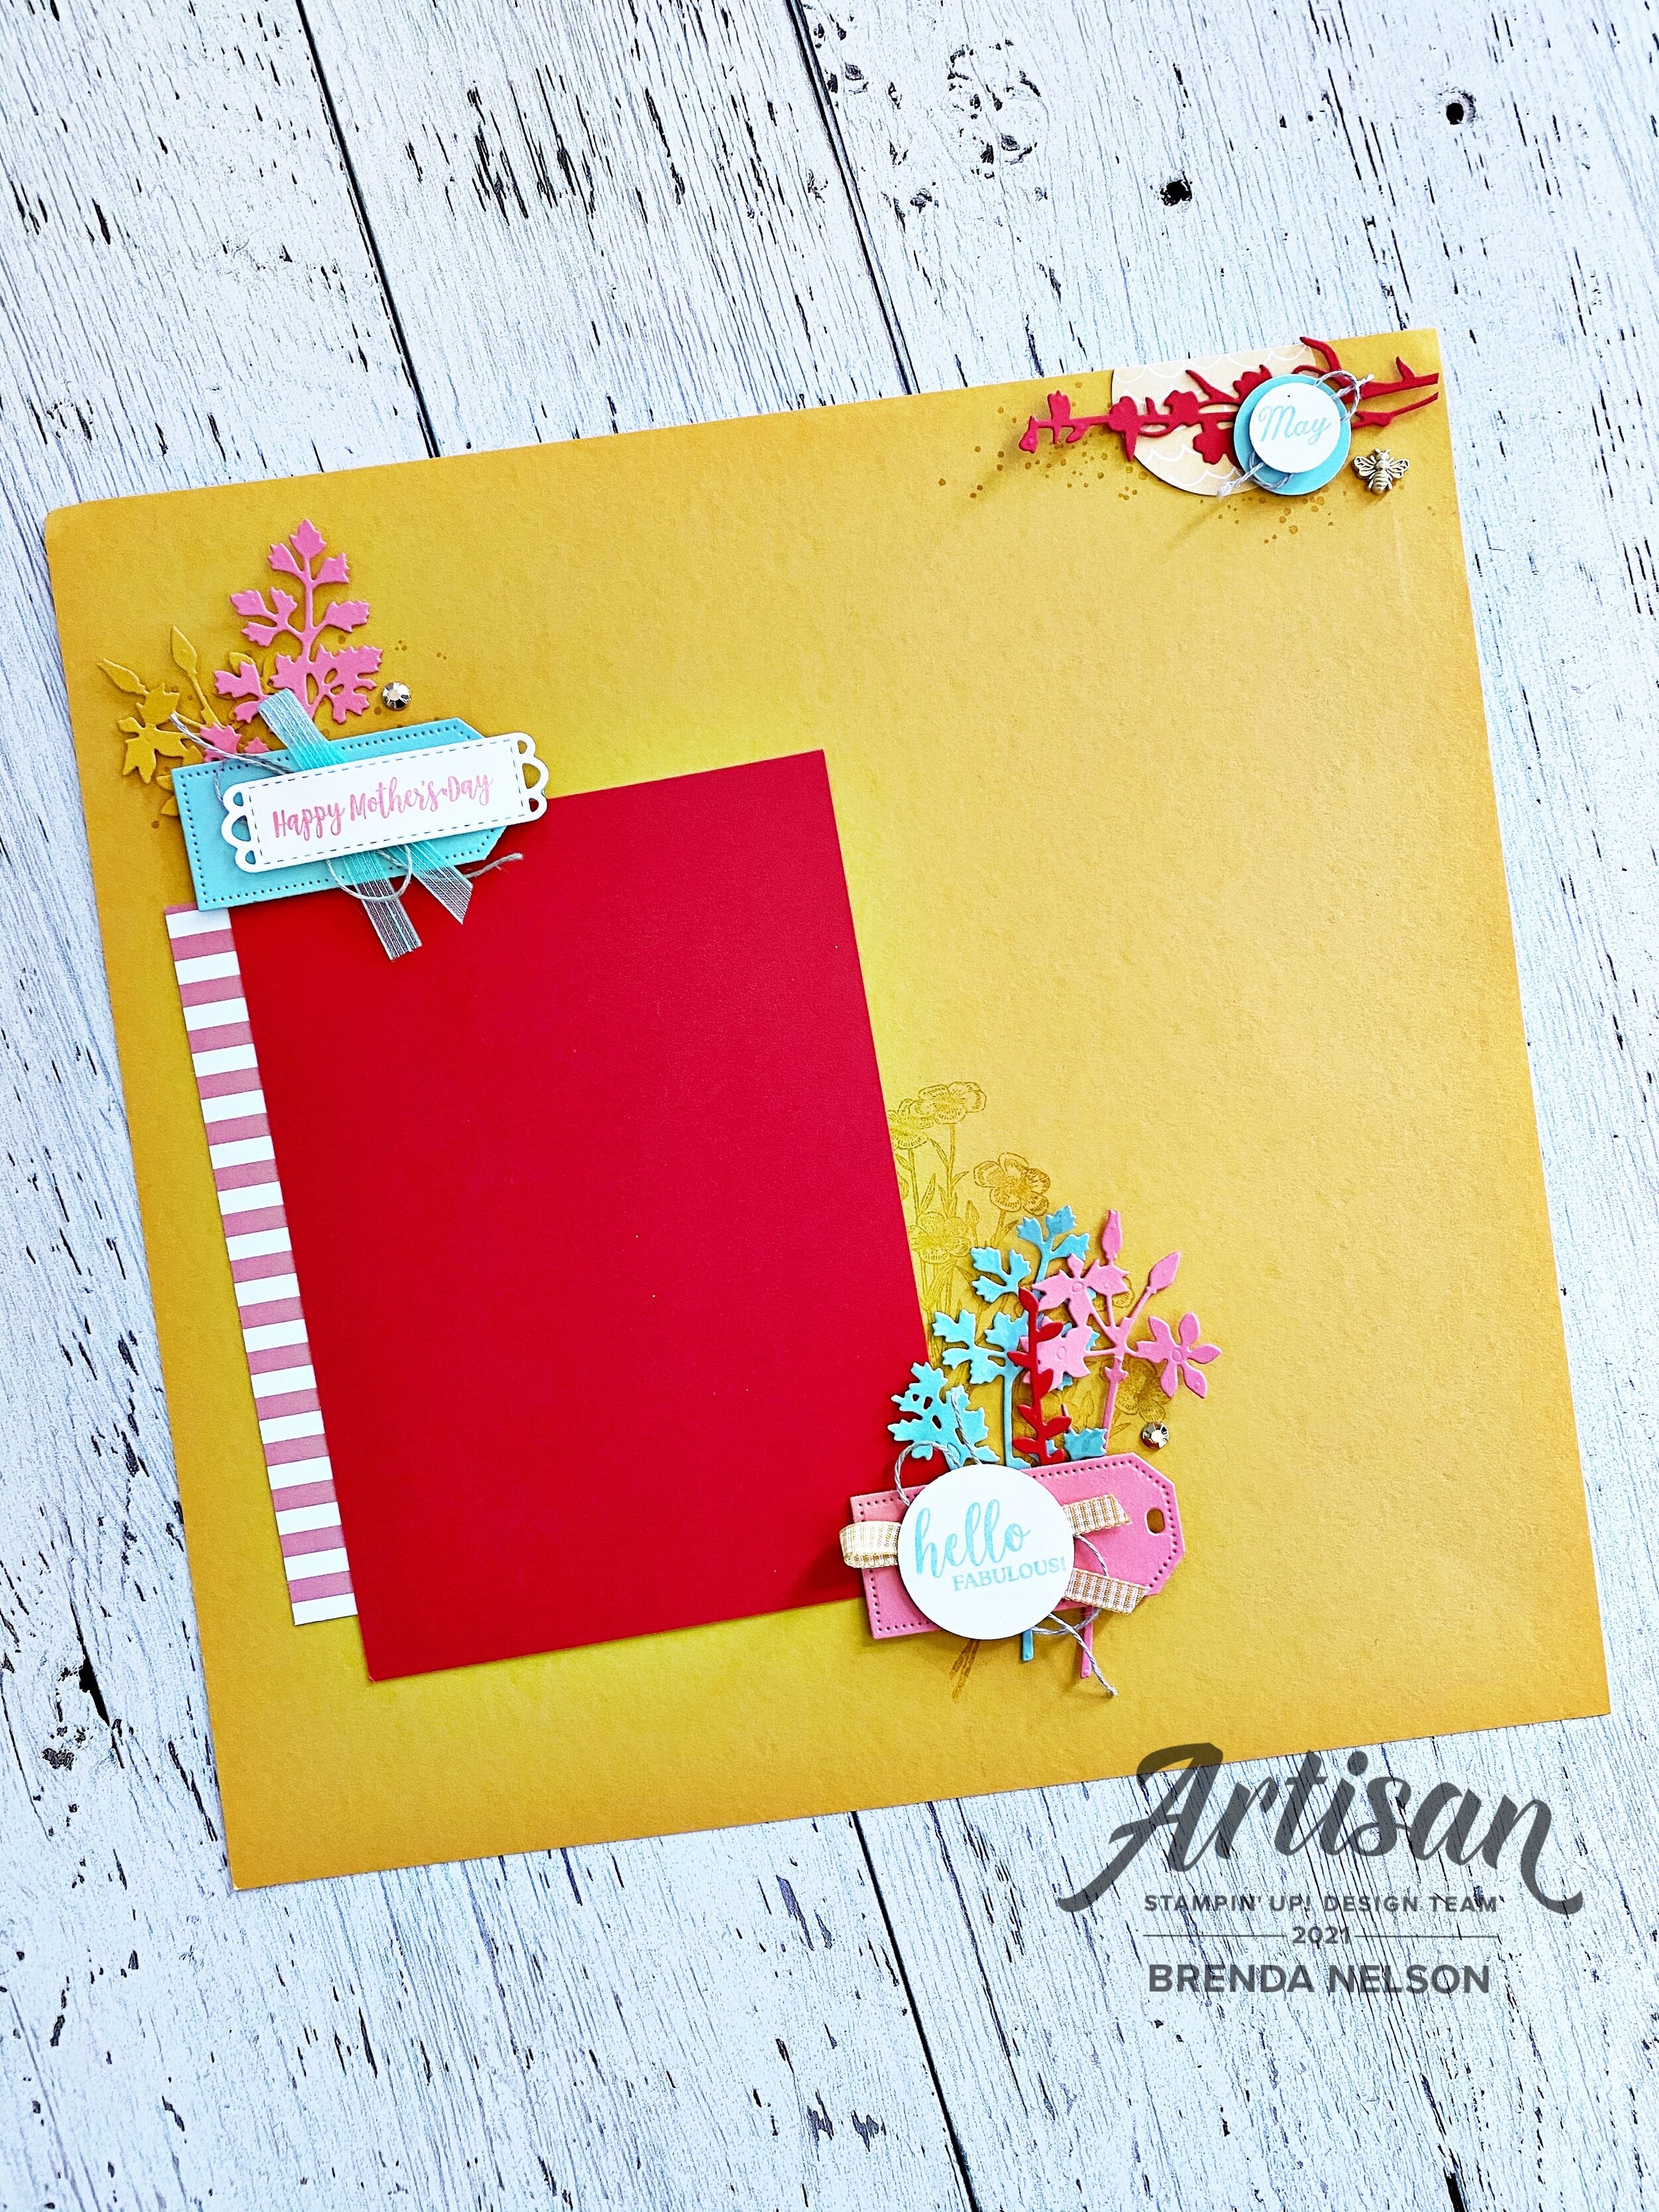
I started my page with a base of Bumblebee—-it is such a gorgeous yellow! I decided on the theme of Mother’s Day and look at me, I am ahead of the game! Now I just have to pop a 5x7 photo onto my page and Mother’s Day 2021 will be in the books!

I love the bright colors on this page, they are so happy and work so well together!

I love the bright colors on this page, they are so happy and work so well together!

I always want to play with new stuff so I pulled out the new Quiet Meadow Bundle to pair up with a returning stamp set Dressed to Impress and the new Days to Remember stamp set.

I stamped a few floral images in the background by my photo mat and added in three different die cut florals from the Meadows Dies. The Flirty Flamingo striped DSP strip ion the left side is from the new Hostess options and is called Pattern Party. I know it will be a hit! I love it!

Layered over the die cut flowers I added a tag from the new Tailor Made Tags Dies in Flirty Flamingo. The sentiment ‘Hello Fabulous’ is stamped in Pool Party ink. And really, aren’t all moms fabulous! I think so! Behind the sentiment I layered some Bumblebee Gingham Ribbon and Lined Thread.

A Gilded Gems acts as the perfect accent to this little area!

I love to create little areas of interest on my page such as this!

I love to create little areas of interest on my page such as this!


I punched a 2 inch circle out of the Hand Penned DSP and lined it up along the top right of my page. I trimmed a small portion off.

I added another stem from the Meadow Dies cut from Poppy Parade. I added ‘May’ over top from the Days to Remember stamp set with some Lined Thread and cut Bumblebee Trinket as accents.

final (1) 18.jpg
final 19.jpg

‘Happy Mother’s Day’ is stamped in Flirty Flamingo ink and is die cut from the Meadows Die and then layered on top of a tag from the Tailor Made Tags Dies. I added some Linen Thread and Pool Party in between and tucked a couple more florals from the Meadow Dies underneath with a Gilded Gem.

I hope this page inspires you to make your own page in anticipation of Mother’s Day!

I can’t wait to see how the rest of the Design Team spins these 4 colors! If you joined the Hop here (welcome!) you can go back to see what Nicole has designed and if you hit Next you can see what Tami has created for this week! Please feel free to leave a comment, I would love to hear from you!

Create with Connie and Mary--My Favorite Pre-Order Bundle!

This was a good challenge as I had a hard time actually DECIDING on what was my favorite. In the end, I think a good punch wins every time so I have landed on the Flowers of Friendship Bundle as my Favorite Pre-Order Bundle!

21DesignTeamBadge.png

And of course I needed to use some of our NEW upcoming In Colors on this project as I just LOVE them. I love how they all look amazing together and blend so well with our existing colors. They just feel fresh and lovely.

final (2) 11.jpg

Nothing beats a crisp Basic White card base and layer. It’s a win every time especially when you pair it with such an awesome floral stamp set such as Flowers of Friendship. This set has 4 floral images and such as great mix of fonts on the sentiments. Of the 4 sentiments, 3 are ‘Thank You’ which is fantastic. Other than birthday, I send more thank you cards than any other. I love how each of the sentiments is unique.

The perk of this stamp set is that is is PUNCH BUNDLE! Yay! I always love a punch as it is more efficient than die cutting. The Flowers & Leaves Punch is designed to cut the two individual flowers, large and small, plus the two leafs in the stamp set.

Nothing beats a flick of your Stampin’ Write Marker or Stampin’ Blends across your project for a spray of color.  It’s literally one of my favorite tricks! I flicked my Evening Evergreen Blend on this card concentrated at the bottom.  This adds to t…

Nothing beats a flick of your Stampin’ Write Marker or Stampin’ Blends across your project for a spray of color. It’s literally one of my favorite tricks! I flicked my Evening Evergreen Blend on this card concentrated at the bottom. This adds to the crisp white feel of the top of the card.

I felt that stamping in black ink felt to stark against the white, so I chose to stamp my floral images in Grey Granite ink. I stamped the large floral stem three times on the Basic White and then colored the flower buds and leaves in with my Stampin’ Blends in Pale Papaya (with a hint of Calypso Coral), Petal Pink (with a hint of Pale Papaya) and Fresh Freesia. The leaves were colored in with Soft Succulent Blends.

The punched flowers were colored in Soft Seafoam (with a hint of Soft Succulent), Pale Papaya (with a hint of Calypso Coral) and Fresh Freesia. In the center of each of these flowers I added an Opal Round.

final+%281%29+13.jpg

The sentiment is stamped in Evening Evergreen—-I really love this color as an alternative to black!

And finally I added my favorite new embellishment, Loose Flower Flourishes! You get two sizes and three colors with this amazing embellishment—Pale Papaya, Fresh Freesia and Polished Pink.

I can’t wait to see what the other members of the Design Team chose as their favorite pre-order item. Honestly, early access is one of the things that I LOVE the most about being a Demonstrator. Haha! We all have our thing right?

You can go BACK to see what Melissa has designed and NEXT to see what Connie has created.