Color Fusers--October!

Hi friends! Welcome to Color Fusers! We are happy you are here joining our hop—each month we each design projects featuring a fun color combination. This month we are hoping using Petal Pink, Calypso Coral and Wild Wheat. NOW, I know that Wild Wheat gets some hate, but I actually do enjoy it and I think it looks awesome of with Petal Pink and Calypso Coral.

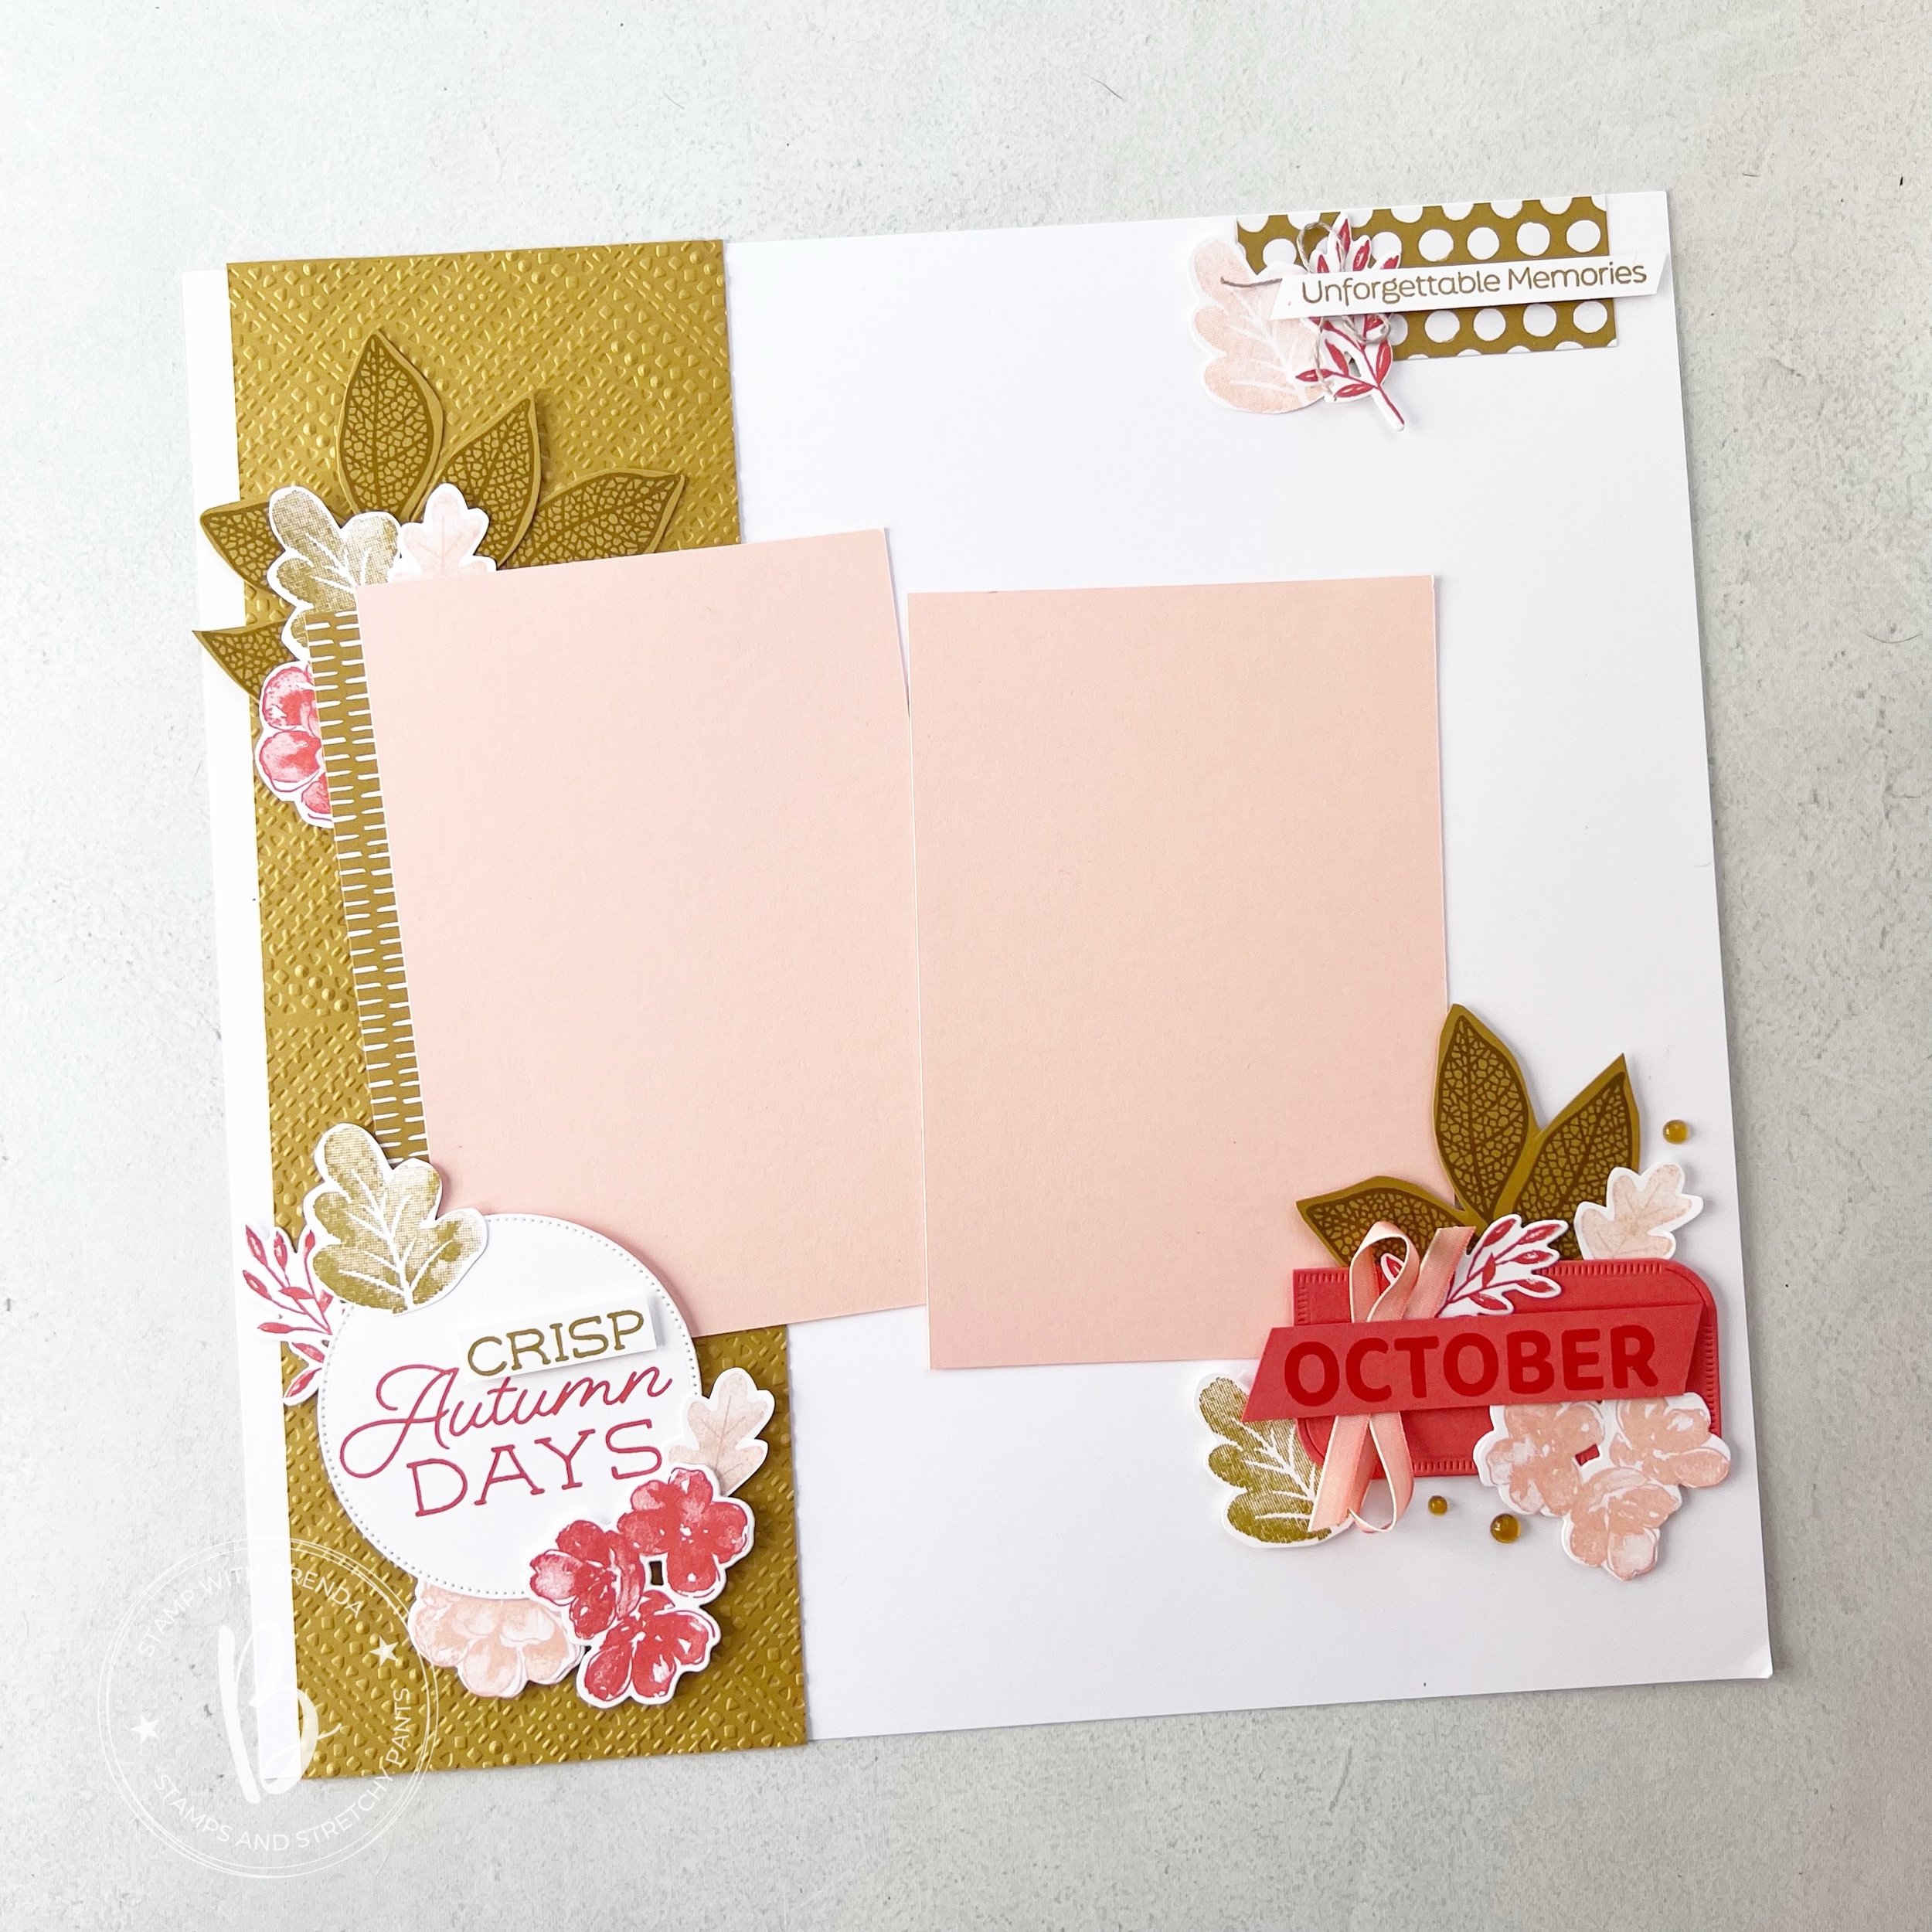
I decided to make a scrapbook page this month that features a bunch of new scrapbook products, mashed up with stuff from the Holiday Catalogue and a few favorite retired items.

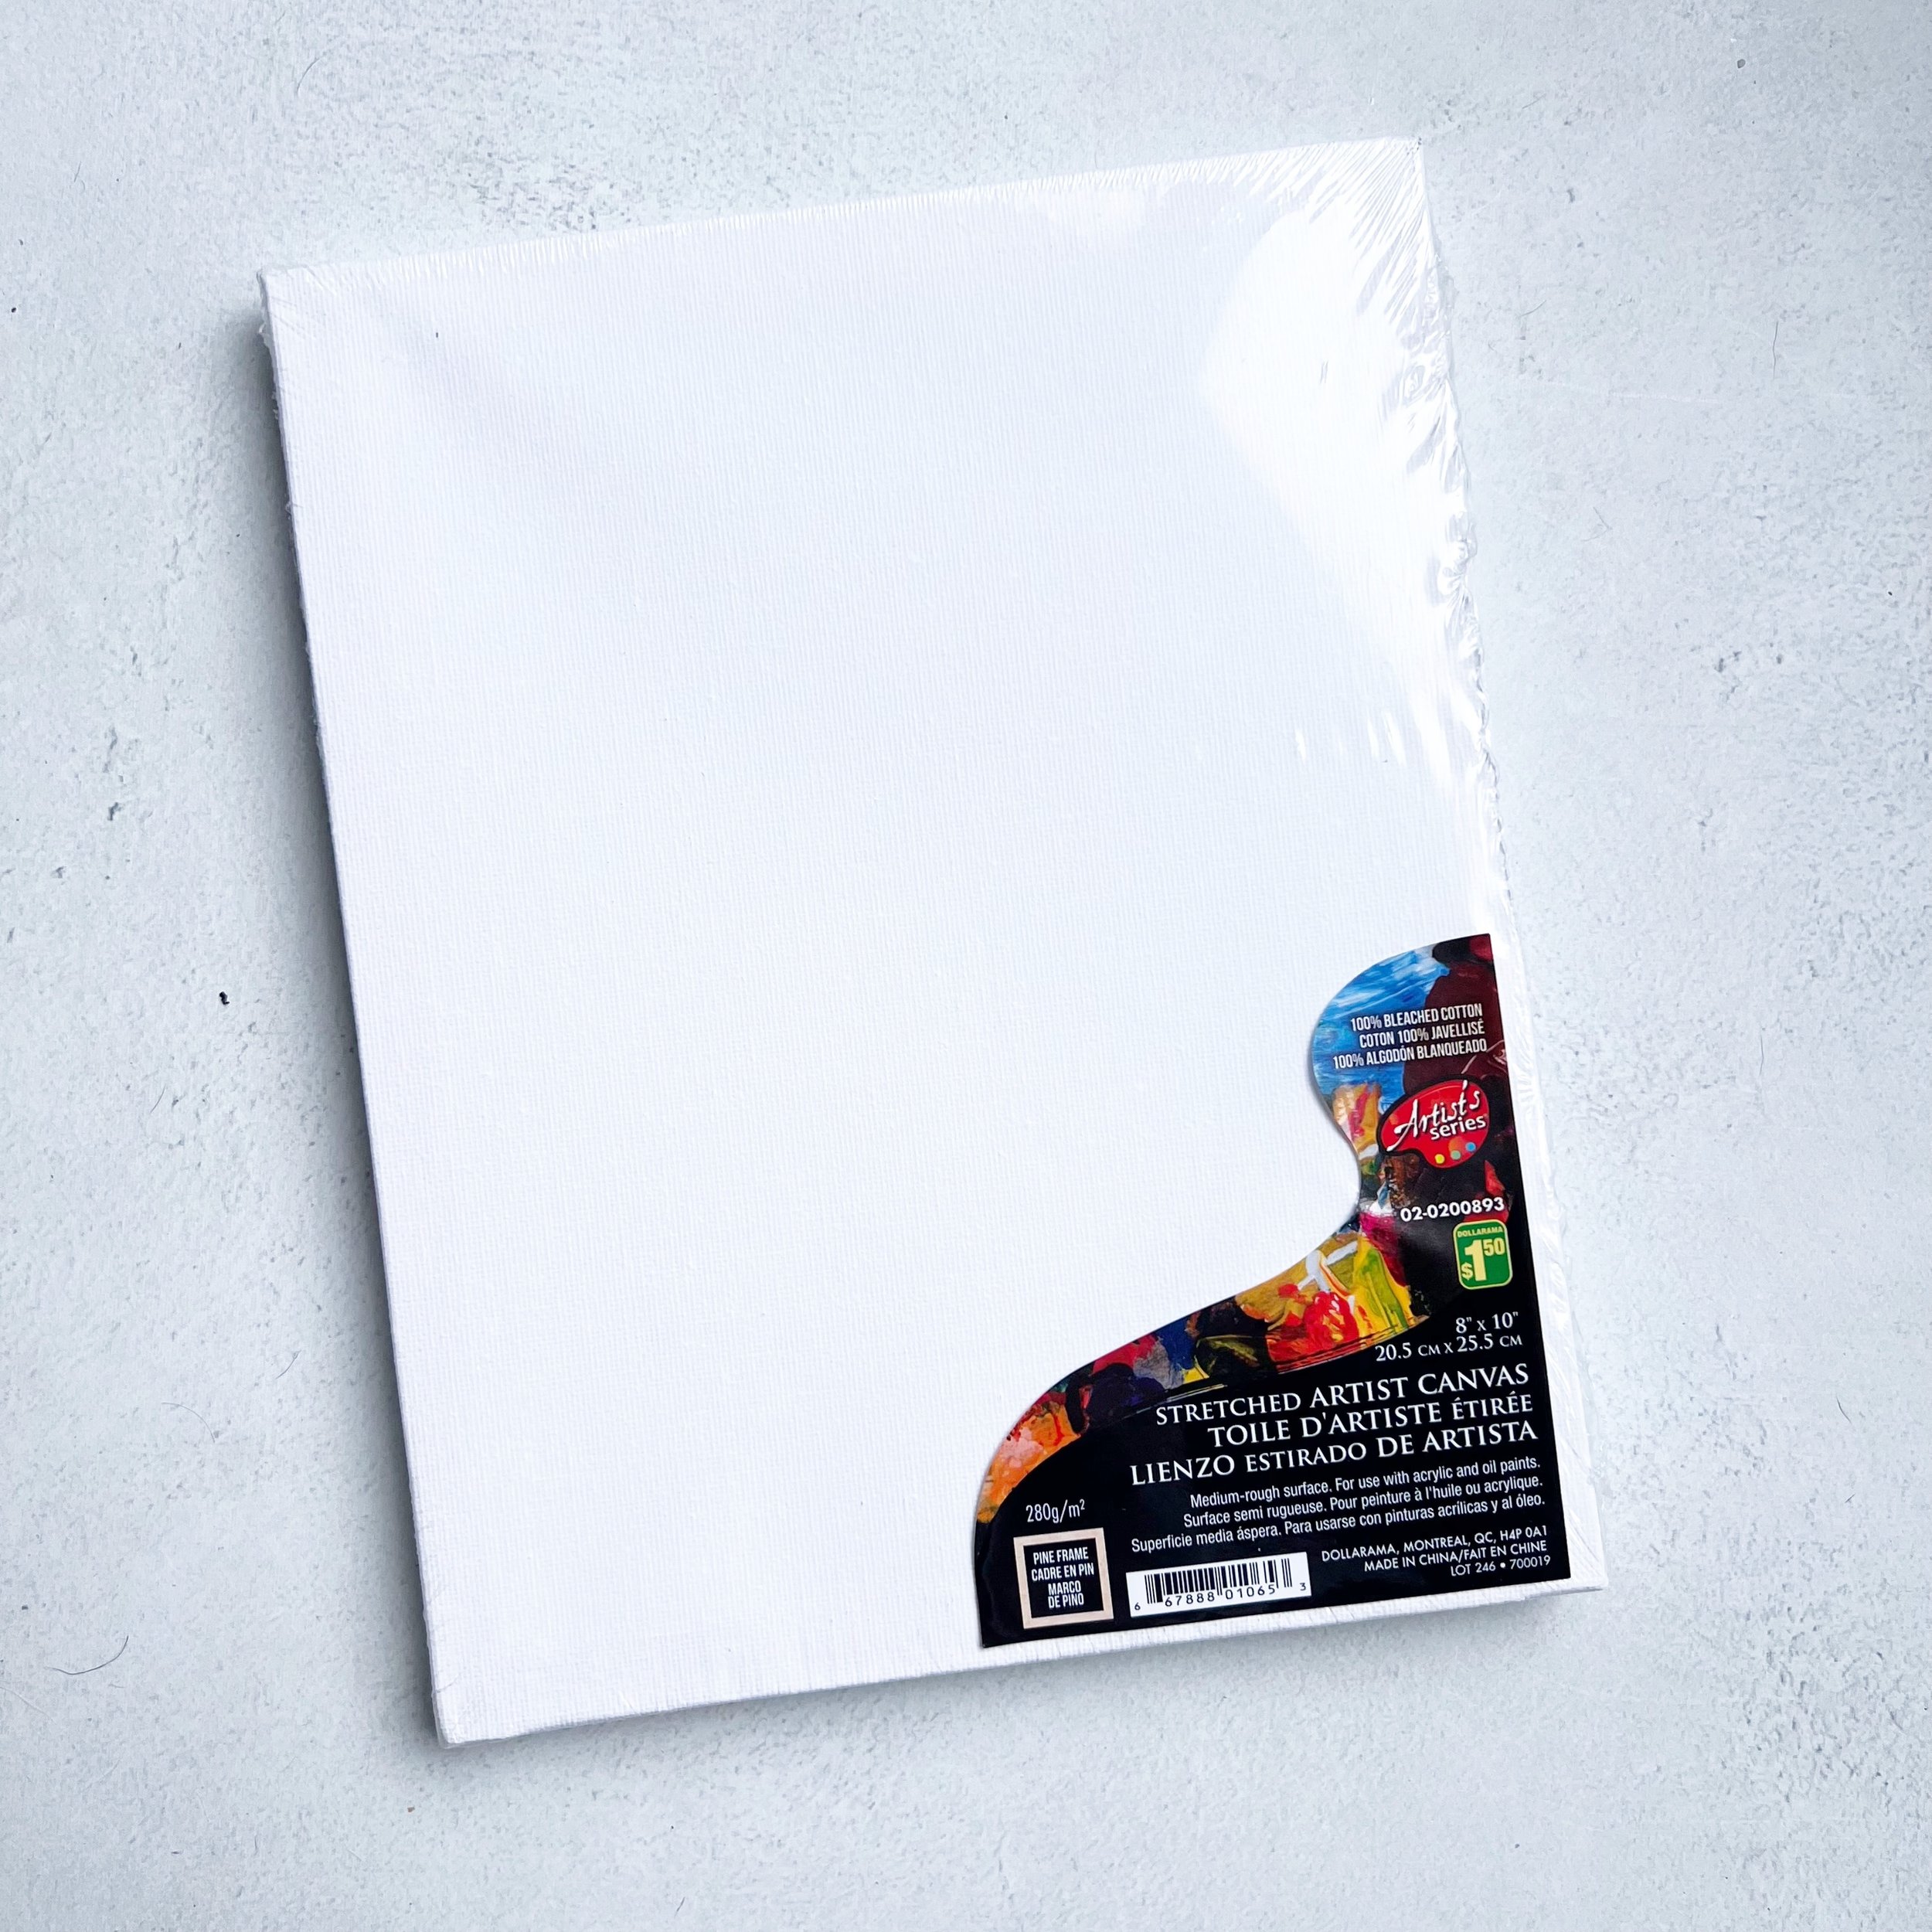
I actually used the new White Willow card stock and I made a little comparison sample to Basic White.

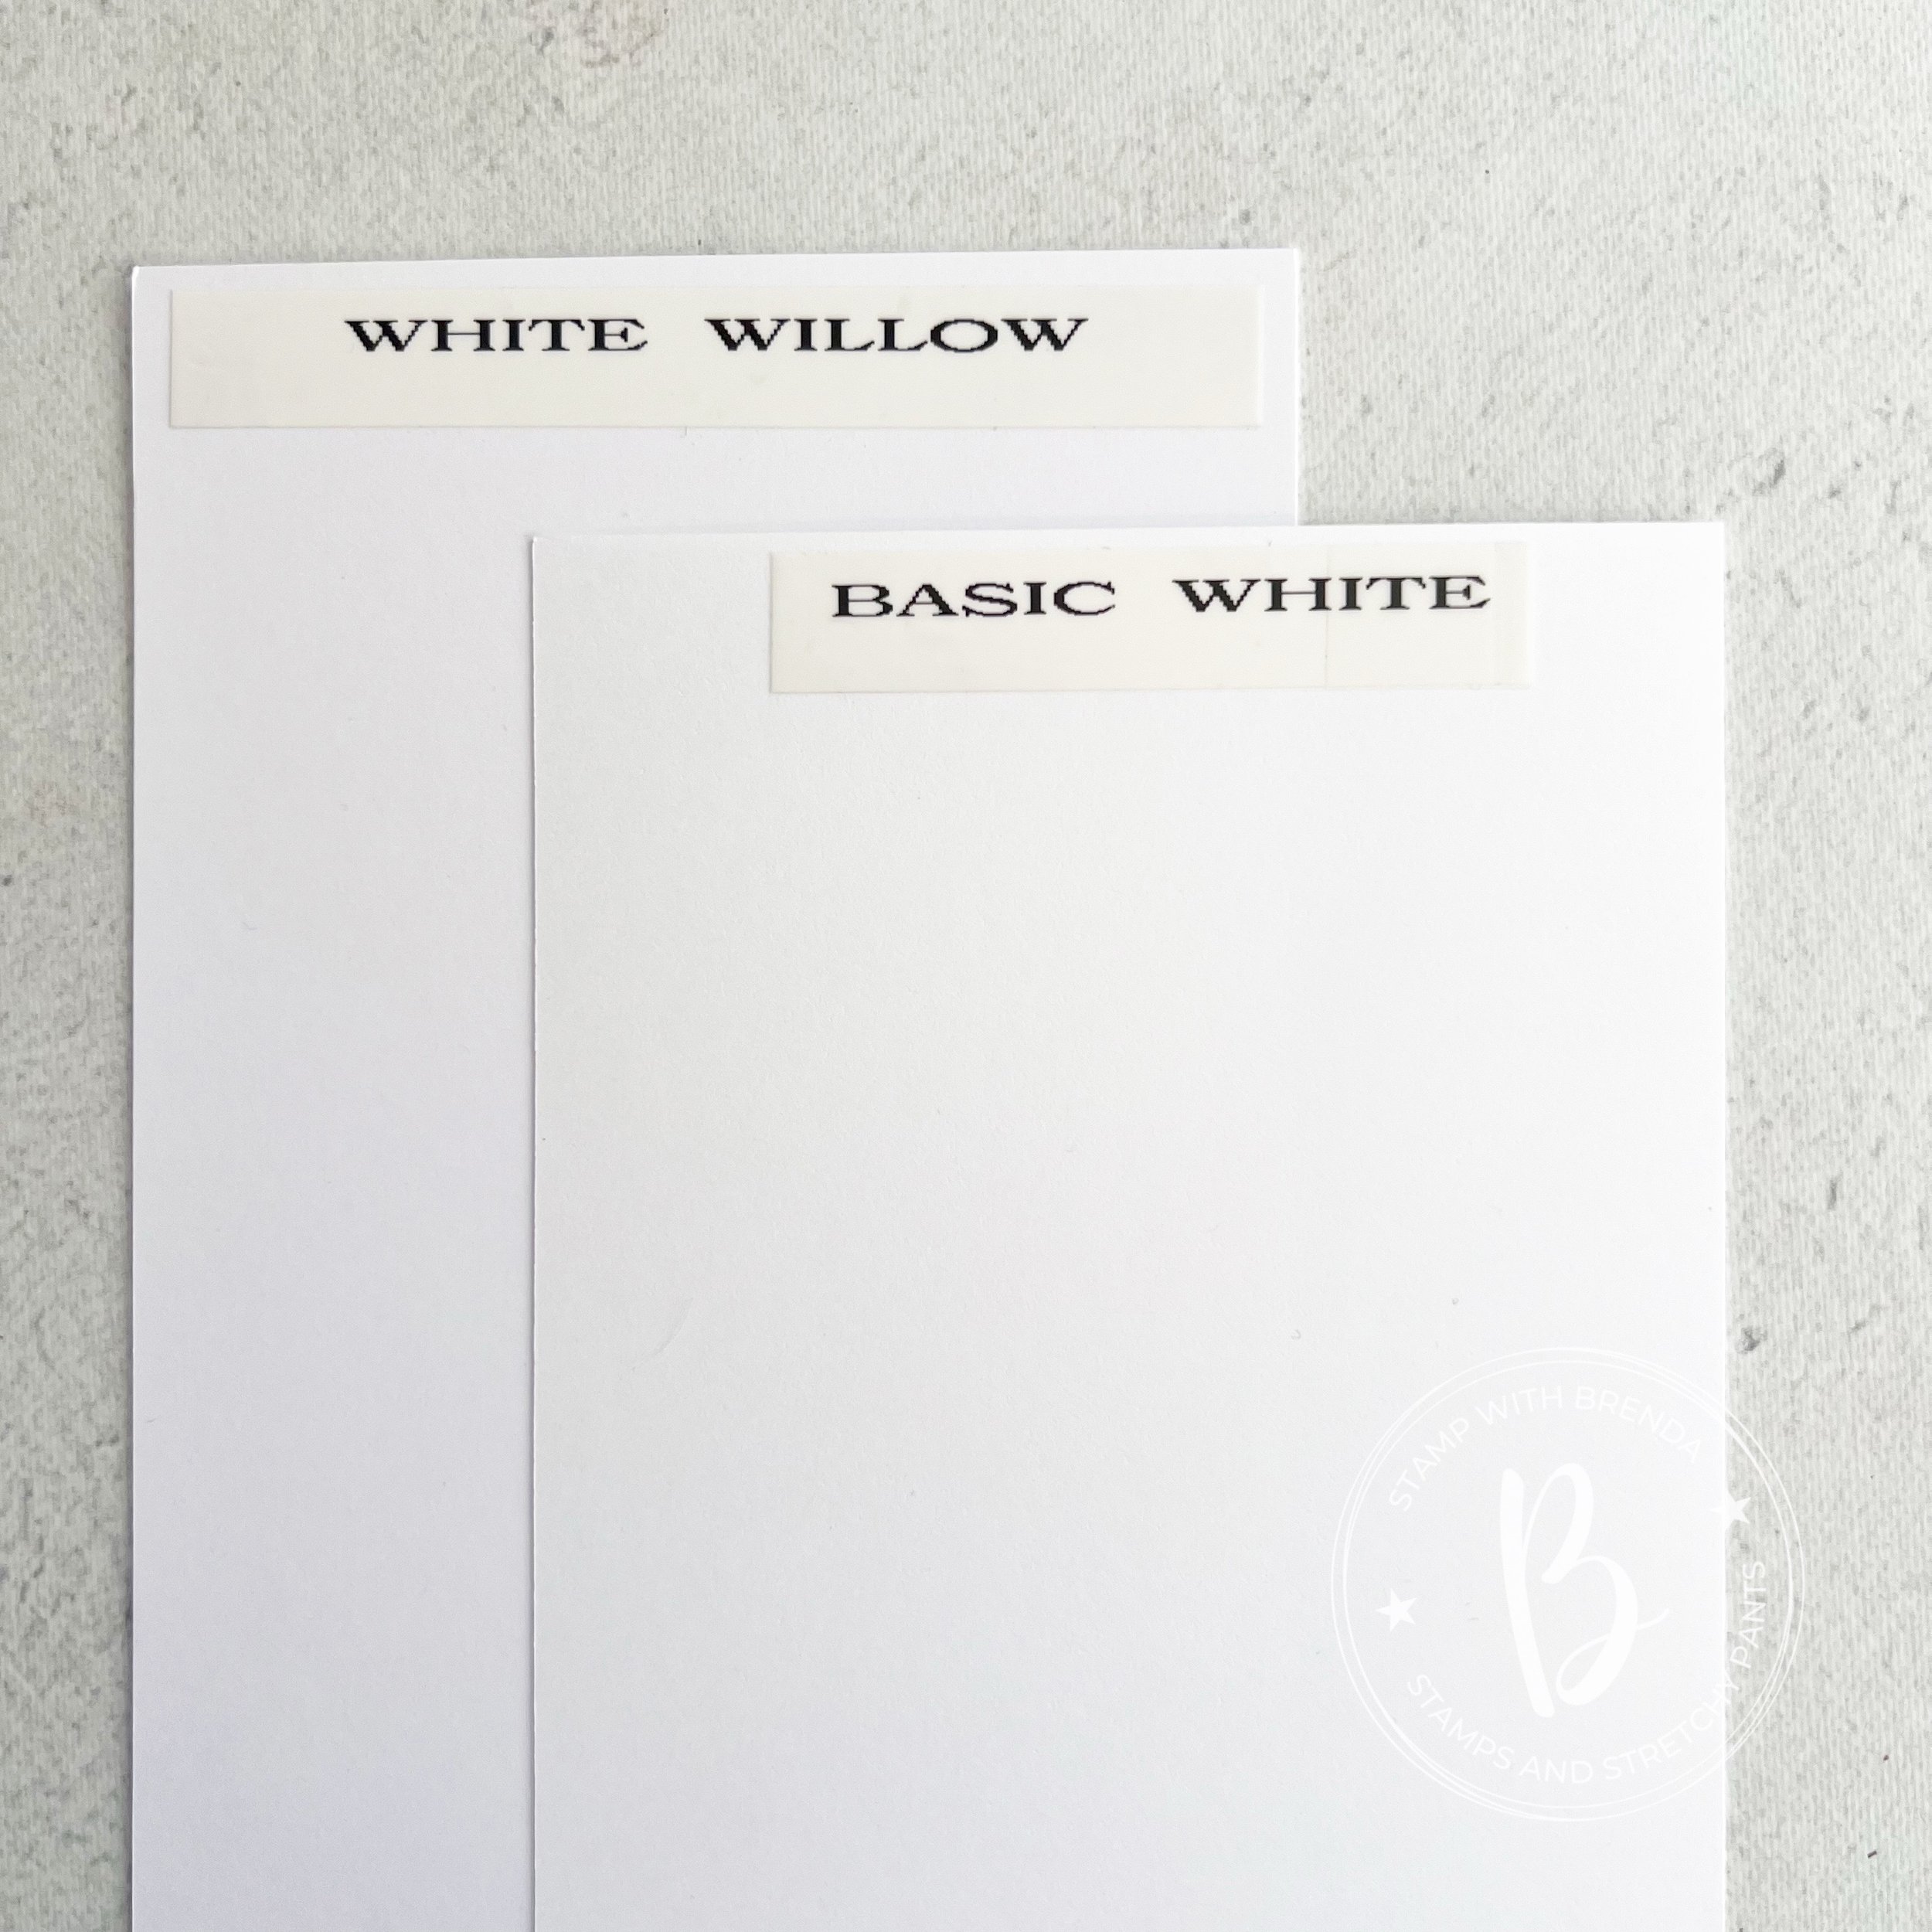
There is a slight different between the two whites—it is hard to capture in a photo but when they are side by side—you can tell. I would describe White Willow as a little bit brighter of a white. It is definitely worth ordering a package to see for yourself and share with your teams and customers.

This page is ready to add two fun photos taken this month!

I added a 4 x 12 strip of Wild Wheat card stock along the left side that I ran each end through the Dashing Designs embossing folder. It is probably my favorite folder in the catty. I used Petal Pink card stock for 2 photo mats. I added a strip of retired In Color DSP in Wild Wheat along the side of the left photo mat.

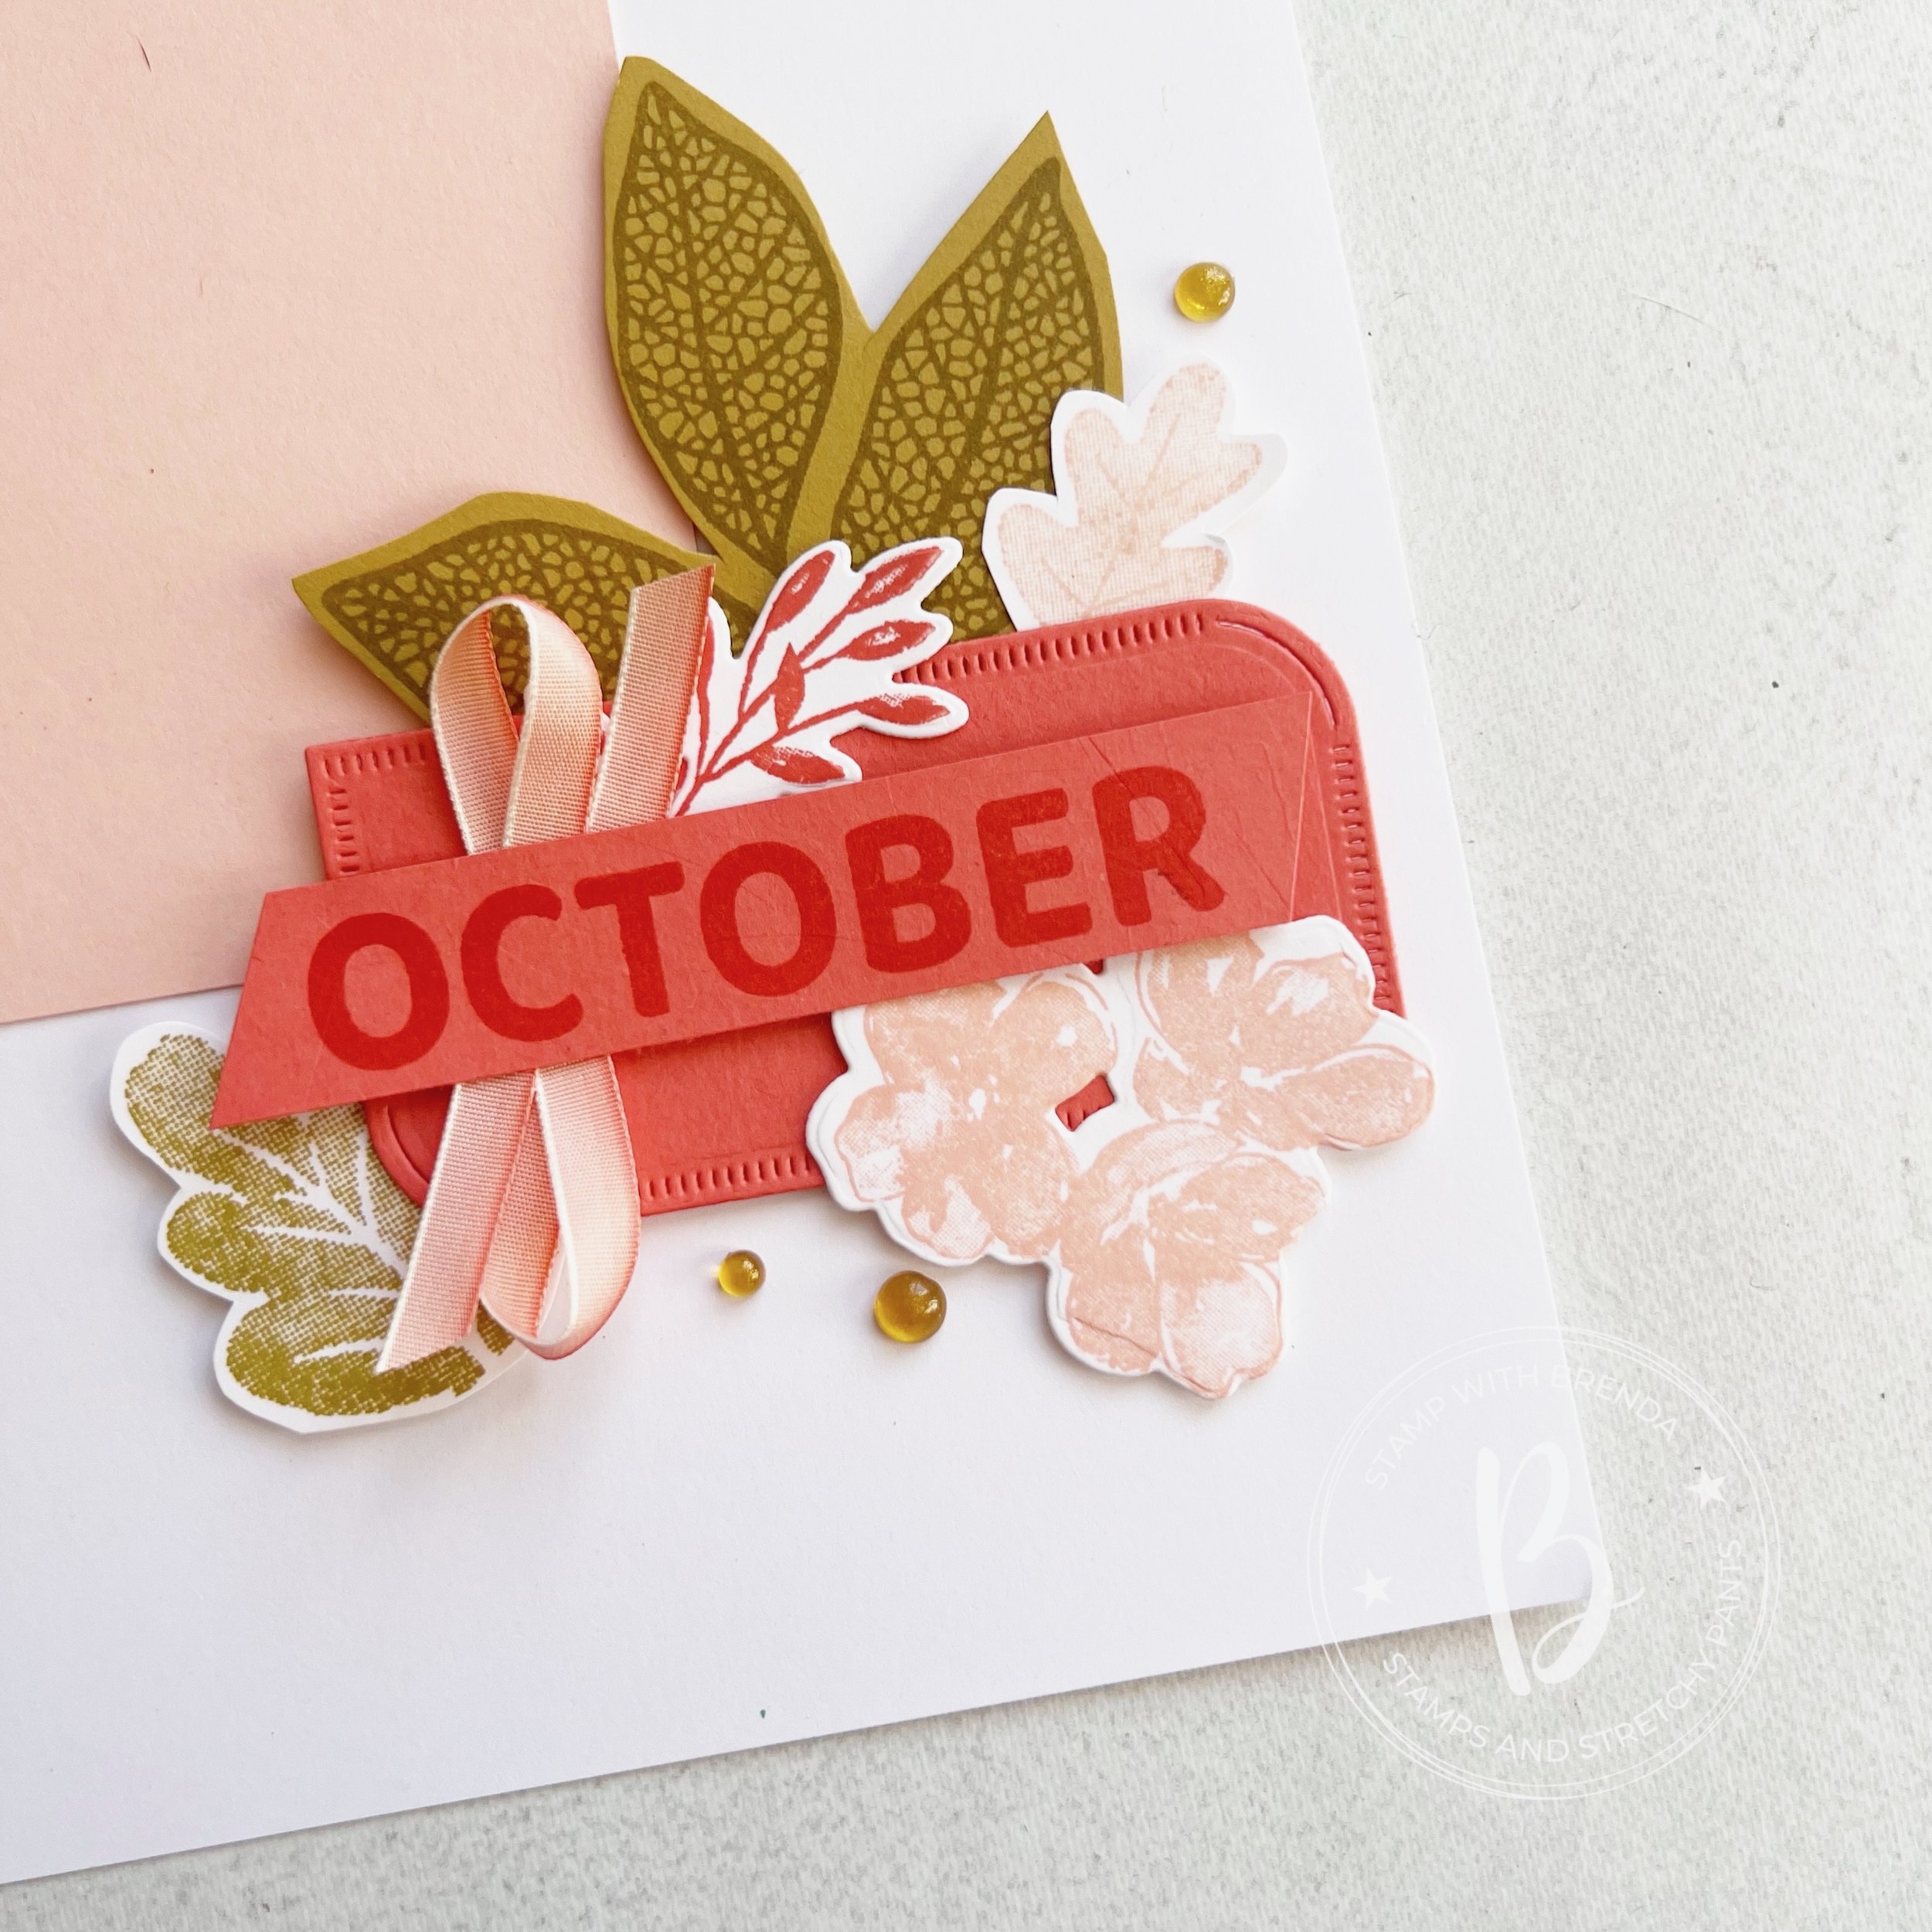
October and Crisp Autumn Days are from the Autumn to Remember stamp set which is from the new Scrapbooking Brochure. I stamped October in Calypso Coral for that tone on tone look, with a little bit of retired ribbon behind. It is on the label die Regal Floral Dies.

To bring the sentiment to life I added images from the Regal Floral, Caring Leaves, Changing Leaves and Autumn to Remember stamp sets. What a fun bunch of sets to mix together! A few Gold Textured Adhesive Dots completed this little section.

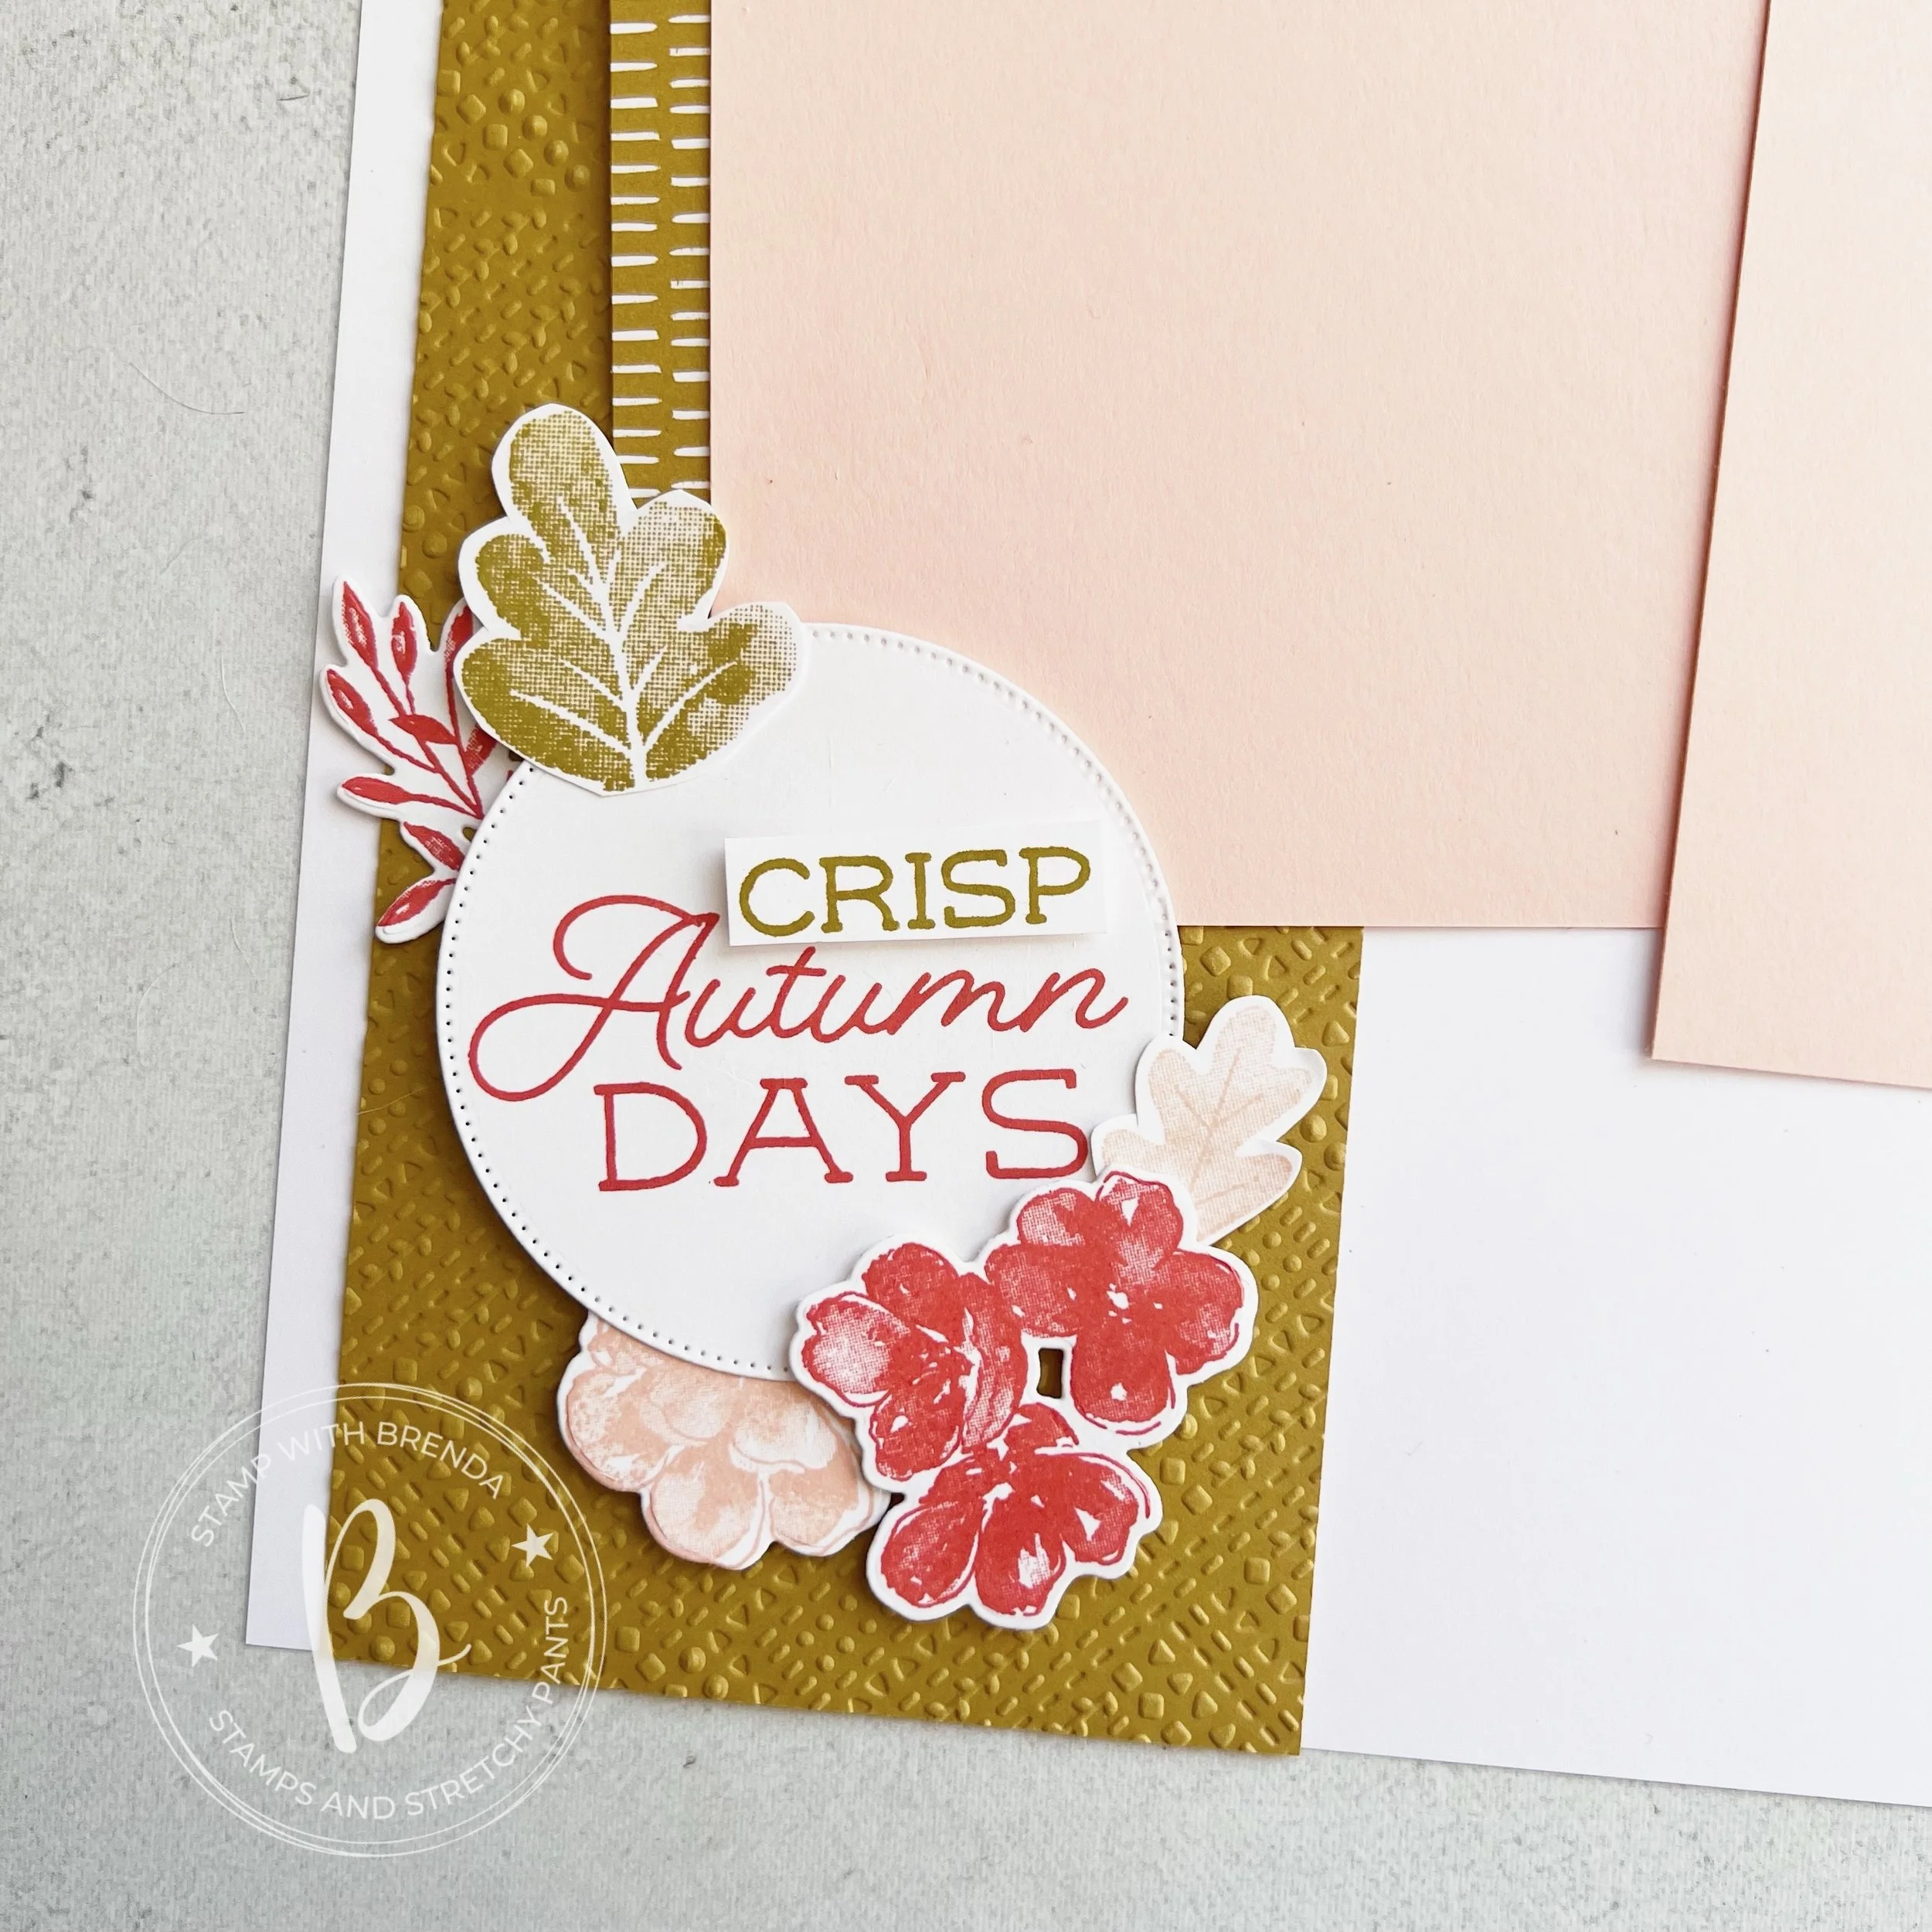
I love this section on my page—I try to add one to two areas on my page that are story telling or helping to bring my photos alive. I think ‘Crisp Autumn Days’ is awesome!

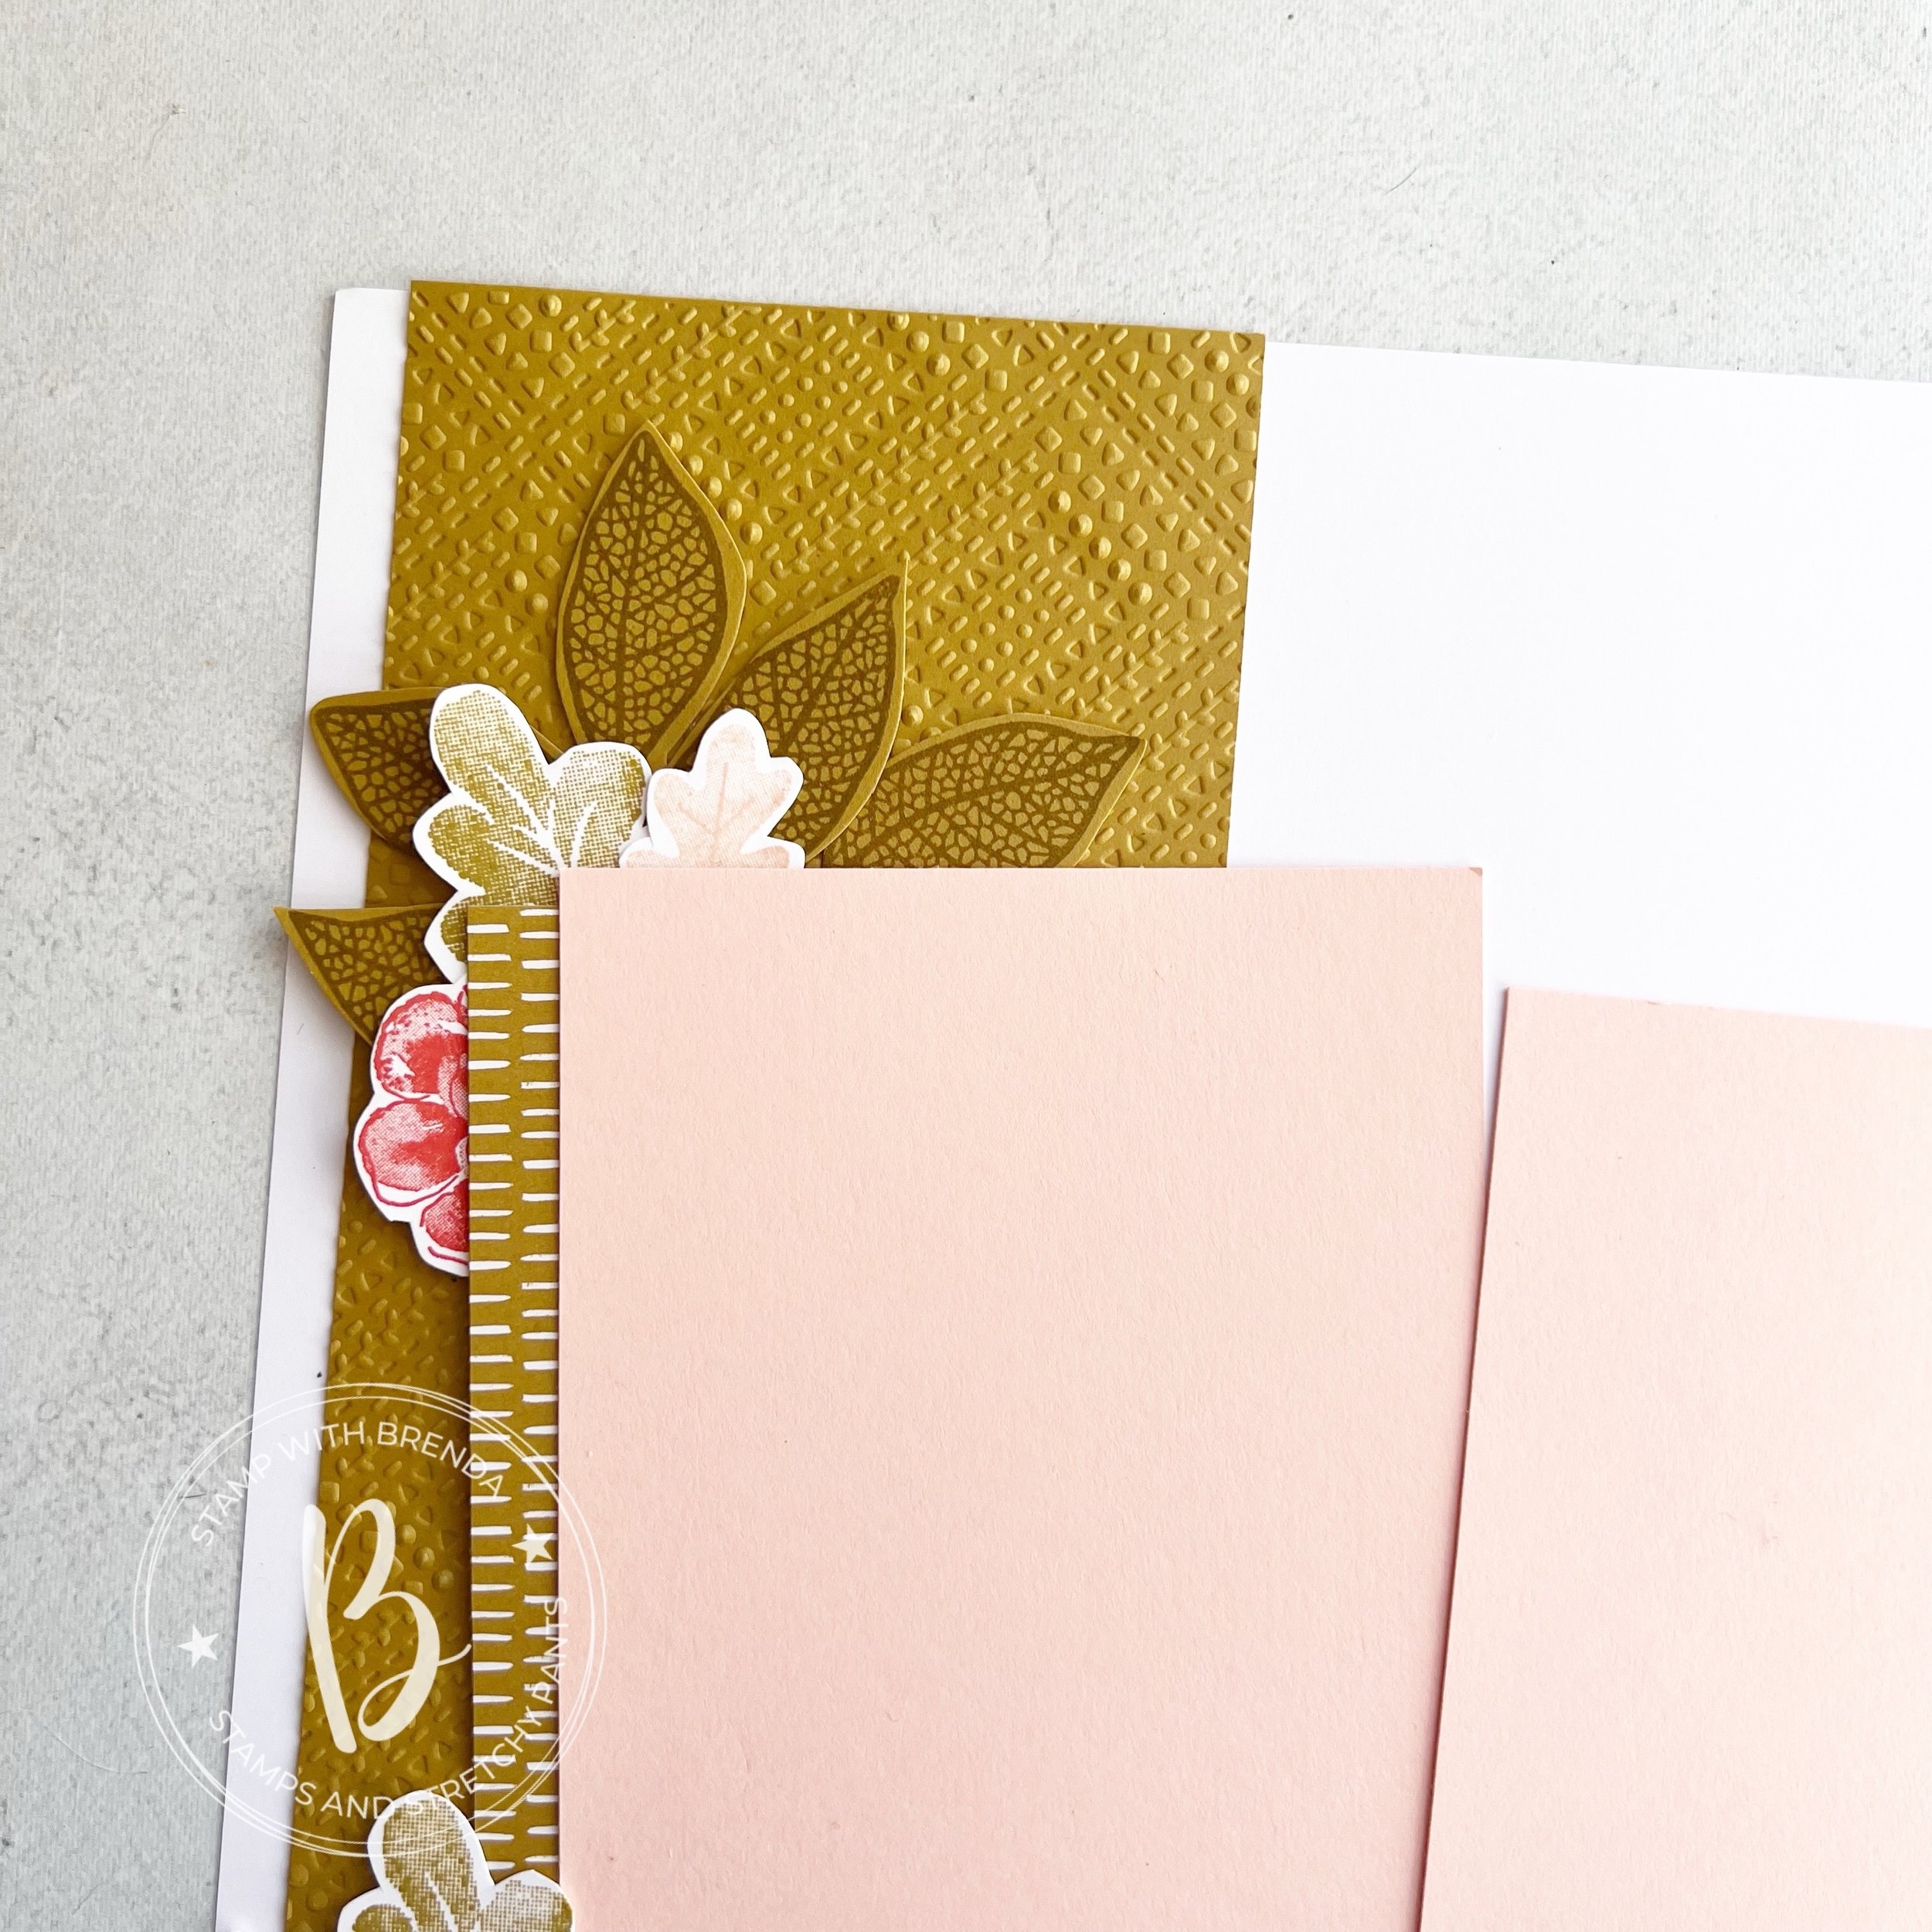
I love how the Regal Flora flowers work with the leaves to create this scrapbook page. I loved adding sentiments in from the new sets in the scrapbooking brochure. The phrase ‘Unforgettable Memories’ at the top of my page is from the new Snow Day stamp set.

This is a really wonderful color combination that I enjoyed crafting with. I can’t wait to see what the rest of the team comes up with!

Next up on the hop is the AMAZING Janekke—a former Artisan Design Team member! We had so much fun being on the team together. I love her style and I know you will be inspired.

You can also go the other way and see what Melissa Kerman has designed for this month! Either way, you will be impressed.

Please feel free to shop my online store if you need some supplies! It allows me to keeping doing what I love!

Father's Day Projects!

Hi friends! I wanted to share a really adorable Father’s Day project that I designed for a recent kids class! We had so much fun putting everything together and I know the lucky dad’s will be truly touched by this gift!

Of course you need to make things a ‘gift set’ right? We have our fun project, a coordinating card and tag for our gift bag! I do love matchy matchy stuff and its always so easy with Stampin’ Up!


I started with an inexpensive canvas that I got at our local ‘dollar’ store.

I did a bit of ink blending with Boho Blue and a Blending Brush on the canvas around the top left and bottom right of where my photo was going to be placed.

I used a cute 4x6 picture of my youngest son and his dad on a Night of Navy base. I love the combination of Boho Blue, Misty Moonlight, Night of Navy and Pebbled Path! It worked so well on this project!

I added a little strip of Misty Moonlight DSP along the left side of the picture and used a Pebbled Path piece to create the rosette. I am loving the Round We Go bundle! The rosettes are pretty easy to assemble and make this project come to life!

The sentiment ‘So Glad You are My Dad’ is from the Gone Fishing stamp set and ‘You’re Awesome’ is from the retired Circle Saying Stamp set. I also used the Encircled in Nature Dies as well to layer ‘So Glad’ in Boho Blue.

I think this project turned out so adorable and you could modify it for any occasion like a birthday or celebration (think Grad or even a wedding shower!).

And of course we have a coordinating card and I used our new Brayer for the first time on the bottom section! I inked it up in Night of Navy and brushed it over Basic White card stock, leaving a section at the top to run through an embossing folder. I used a strip of Night of Navy card stock to hide where it was uneven and to create separation between the two section.

I used our Water Painter to flick water over the inked section so the water droplets would ‘remove’ some of the ink. It basically happens on contact and is pretty cool technique.

The Trusty Tools stamp set was perfect for the front and inside of the card. ‘Dad’ is stamped in Pebbled Path ink on another shape from the Encircled in Nature Dies and ‘Happy Father’s Day’ is on Boho Blue in Night of Navy ink.


I decorated the inside of the card as well with a little strip of DSP and ‘You’re the most Awesome’ from Trusty Tools. The frame around the sentiment is from the Labeled with Love Bundle.

I think this is such a fun gift to give Dad and I loved how all the kids had their own creative spin on how to assemble the project! As you can see from the smiles below I think they really did enjoy putting things together!

Please feel free to shop my store or DM to place an order if you are inspired by this project! All of your support allows me to continue to ‘love what I do’!

Be Inspired Blog Hop--Sale a Bration 2024!

Hi friends! Welcome to the Be Inspired Blog Hop for January! We are all sharing some project inspiration featuring Sale a bration items. Now, if you have been a Stampin’ Up! fan for a while, would you agree with. me that this is one of our BEST Sale a bration offerings EVER! I am loving the variety of things we can choose for FREE!

Valentine’s Day is a really fun day around our house. I host a ‘pink dinner’ for my kids and even though they are teens, I still spoil them with fun valentine’s gifts. Of course, I also love to make a fun place setting treat for them for our pink dinner and the Most Adored 12x12 paper was perfect for creating some fun little treat boxes to dress up our table.

I used the Square Pillow Box and left the top flap open to create a fun little box to stick in a box of chocolates. Both the box and chocolates are wrapped in the Most Adored 12x12 paper in the two heart patterns in the DSP. Having the box left open creates a fun opportunity to stuff it full of fun Valentine’s treats and other stuff (I will probably add some gift cards or cold hard cash inside for my teens). Top off the box or add filler around your treat with some paper shreddie that you can easily pick up at most box stores in the party isle.

I love how simply keeping the box open creates the opportunity to stick in fun treats like this wrapped sleeve of chocolates. The sentiment on the box is die cut with the Everyday Details Dies which I am just loving at the moment! I didn’t even get the stamp set, I just got the Dies!

Using the Black& White Gingham ribbon on both projects helps unite the two projects. And the Heartfelt Hellos was a perfect set to add to these projects. A couple cute little foil hearts also add a special touch—you can find them in the Adorning Hearts Dies.

I hope this project inspires you to create some fun easy Valentine’s projects for the special people in your life too using just a few supplies—two of which you can get for FREE during Sale a bration 2024!

I can’t wait to see what new Artisan Design Team member Maheswari has created to share with us! You can see her project by clicking the image below, and of course visit the entire hop to be inspired on how you can craft with the 2024 Sale a bration collection!

If my project has inspired you, you can shop by Online Store by clicking any photo or using the Host Code shared on the side of my blog. Your support helps me keep ‘loving what I do’ and I appreciate you!

12 Days of Christmas--Day 12!

Ho Ho Holy smokes! How did our 12 Days of Christmas end so fast? I can’t believe we are at the end, but we are! And I truly hope you have enjoyed all of the projects that Melanie @melsinkyfingers and I have been sharing with you. If you missed any, please make sure you go back and take a peek!

The last project I want to share with you today is an easy card box, that you can store you holiday cards in or fill with cards to give as a gift to a co-worker, friend, family member, teacher or more! Who would not love the gift of cards?

This box is made from one sheet of 8 1/2 x 11 card stock and is decorated with the Christmas Classics Bundle—the whole Joy of Noel Suite is probably my favorite in the catalogue. I do have to say that I love traditional Christmas colors the most. They just make crafting and designing so easy!

I cut an extra panel of Real Red card stock for the front of the box and ran it through the Distressed Tile 3D Embossing Folder. This folder is simply amazing, it literally works with ANY type of design!

I wrapped a 2 x 12 piece of the Joy of Christmas Designer Series Paper around the box—now its not big enough, so you will need another 2x2 piece to fill in the gap. I specifically chose this pattern because its ‘busy’ so adding in an extra piece was hardly noticed. I tied a piece of the Black & Very Vanilla Check Ribbon around the box and made a gorgeous Tammy Bow to go on the front.

As you can see, the box is big enough to fit several card and envelopes. Even a cello bag with a holiday treat inside works! The possibilities are really endless.

Deck the Halls is embossed in gold and cut out with one of the shapes from the Christmas Classics Dies. I added some greenery and sprigs behind the sentiment as well in Shaded Spruce and Old Olive card stock.

It is such a beautiful project that doesn’t take that long to put together!

Here is a template for you to follow if you would like to create a box of your own. Start by trimming your card stock to 10 1/2 x 8.

Score @ 1, 3, 7.5 and 9.5 inches on the LONG SIDE

Score @ 3 and 5 on the SHORT SIDE

Trim away the shaded areas as shown:

I used Tear’n Tape to secure my box together and to wrap around the DSP belly band to a bit to hold the ribbon in place too.


You could even use the front of the box as card inspiration!

I cannot wait to see what project Melanie is going to share for her 12th day.

Thank you for following along with us!

If my projects have inspired you, please consider shopping my online store! It allows me to continue to do what I love!

12 Days of Christmas--Day 9!

Hello! I am so excited about my cute projects to share today for Day 9 of 12 Days of Christmas! I hope you have been enjoying all of the fun things that Melanie and I are sharing with you!

This is the season to send cards but its also the season of gift cards!

My project today is a fun cheery way to give a gift card. I have 3 teens in my house and lots of teenage nieces and nephews, so gift cards are a popular choice. I also make a cute little box for our holiday table each year that I place a gift card inside, so these little guys are going to be decorating my table for sure!

I used our Scallop Gift Card Boxes from the Annual Catalogue for these 2 cute projects, along with the Sending Cheer Bundle and Merry Bold & Bright DSP—you could even include the card I previously shared with your gift card box!


I wrapped a belly band of the star DSP around the top box and made a super cute mini bow to adorn the box. To make a mini bow you need 1 piece of 6x6 DSP that you cut into 1/2 strips and fold into a figure 8 shape. I used our defunct mini stapler to keep the loops together.

You stack them in the shape of a cross or tee, using a mini dimensional to keep them together. You then need one 1/2x3 inch strip attached end to end for the middle. I have a really great reel on my blog from last holiday season that shows you step by step how to make bow. Go check it out @stampwithbrenda

The gingerbread men on both boxes are stamped in Pecan Pie. I used the envelope stamp from the Sending Cheer stamp set on both projects as well. On the top it presents like a tag in Poppy Parade and on the bottom box as its intended, the worlds cutest envelope in Coastal Cabana.

On the bottom box I cut a layer in Basic White and ran it through the 3D Basics Folder for a little texture. The belly band on this project is the fun stripped DSP. I also colored in the little hearts on the gingerbread mans tummy with a Flirty Flamingo Stampin’ Write Marker.

I love these little boxes, they are so festive and fun! I hope you will consider making some too for your family or friends! They will definitely take your gift box level up!

I can’t wait to see what Melanie has designed for us today! Please make sure to go and check out her project!