31 Boo's to You

This is a little twist on Halloween because this card doesn’t actually say…Happy Halloween but its implied! Hahaha! I thought it would be fun to focus on ‘31’ as its the date of this fun holiday!

final (4) 3.jpg

The background of this card is created using the Alcohol Blends technique again and it really pops to have the vellum on a Basic White background! I used Rich Razzleberry, Basic Black and Night of Navy Stampin’ Blends to create this custom background.

I cut the glittery wreath and the tag using the Frightful Tags Dies. Have I ever gotten my money’s worth this holiday season! I have made countless projects using this die set!

The ‘31’ is cut using the Playful Alphabet Dies—-if you haven’t looked that closely at them, they do contain numbers as well. This is a great die set to have in your collection.

final (7) 4.jpg

I added the ‘Boo’ from the stamp set Thinking Thanks & Peace which is in the Holiday Catalogue. I love how the ‘Boo’ has a little ghost floating above. It reminds me of the ghosts in Pac Man!

The twine is from the Playful Pets Trim Combo Pack which also has a thin red and white ribbon—great for that upcoming other holiday!

If anything has inspired you today or on any of your other visits to my blog, please consider supporting me if you live in Canada! I would love to keep doing what I love! Thank you!

Happy Haunting!

Hello friends! I offer 3 different scrapbook classes each month so of course for October we had to make some spooky layouts! I wanted to share one with you today that is a little more traditional Halloween than my pink and gold pumpkin page!

final.jpg

The base of this page is Pear PIzzazz and when I think of this color I picture the Wicked Witch of the West from the Wizard of Oz! Hahaha! I love how a color can evoke certain memories!

In a few select spots on the background I stamped some bats from the Sparkle of the Season stamp set in Pear Pizzazz ink.

Happy Haunting is from the Banner Year stamp set and is on a label found in the Pretty Pillow Box Dies. When you go through your dies you never know what you might find! Behind the sentiment I layered some Linen Thread and some of the Black & White Gingham ribbon! I just love that ribbon!


The Trick or Treat area is actually my favorite on the page as I incorporated ‘October’ from the Days to Remember stamp set is a really unique and subtle way that I love.

I die cut a label from the Seasonal Labels Dies and I ran it through a retired spiderweb folder, I just can’t part with it! Behind it I added a spooky black wreath from the Seasonal Swirls Dies.

The pumpkin is die cut using the Detailed Pumpkins Dies and I brought the sentiment to life by stamping mini spiderwebs on it (from the Banner Year stamp set) and adding some Black Glittered Organdy Ribbon.

final.jpg

Because I am obsessed with the spider web from the Frightful Tags Dies I had to add it onto this page too with a little “Happy Halloween” found in the Sparkle of the Season stamp set.

I added some Cute Halloween elements too—Trick or Treat and the little strip of DSP! And by having two placed to add photos I can snap two Halloween selfies!

If this page has inspired you at all, please reach out to me to see how you can join in my scrapbook classes! They are my absolute favorite and I am always excited to stamp with new friends!

You can message me at stampsandstretchypants@gmail.com

Beyond the Tombstone

Aren’t these Tombstone Treat boxes just the best? Did you know that you can cut a little window out for a sneak peek at your treat?

final (12) 5.jpg

I love a good Halloween treat, especially one that is easy to assemble! When you need to make multiples for classroom treats or to give to coworkers this is important. I think that SU nailed the design of these boxes. The best part is there are so many fun ways you can dress them up! Spooky style that is!

For this box I wanted to create a peek a boo window of sorts so I used the Painted Labels Dies from the Annual Catalogue as the shape was similar to that of the tombstone.

TIP: the two box pieces look very similar so make sure you are die cutting through the top piece!

Once you have cut your window take a rectangle of Window Sheet and using Stampin’ Seal+ add it to the backside of the box. Now you have created your fun window to look through! I added some chocolate pumpkins to the inside of my box as a fun treat!

Trick or Treat is stamped using the Little Delights stamp set and die cut with a circle on Rich Razzleberry Cardstock. I used the same color Stampin’ Blend to customize the Black & White Gingham ribbon. I just love when we can do things like that to make our projects more special.


The sentiment is labeled on a black label shape from the Frightful Tags Dies and rotated on the vertical.

I added a spooky owl die cut from the same set and filled in the eyes with some black scrap paper!

I think this makes such a spooky-licious treat to give away!

Please feel free to shop with me if you are in Canada! I would love your support so I can keep loving what I do!

final (12) 5.jpg

Happy Halloween everyone! The countdown is ON only one week to go!

Pink Pumpkins and Golden Webs!

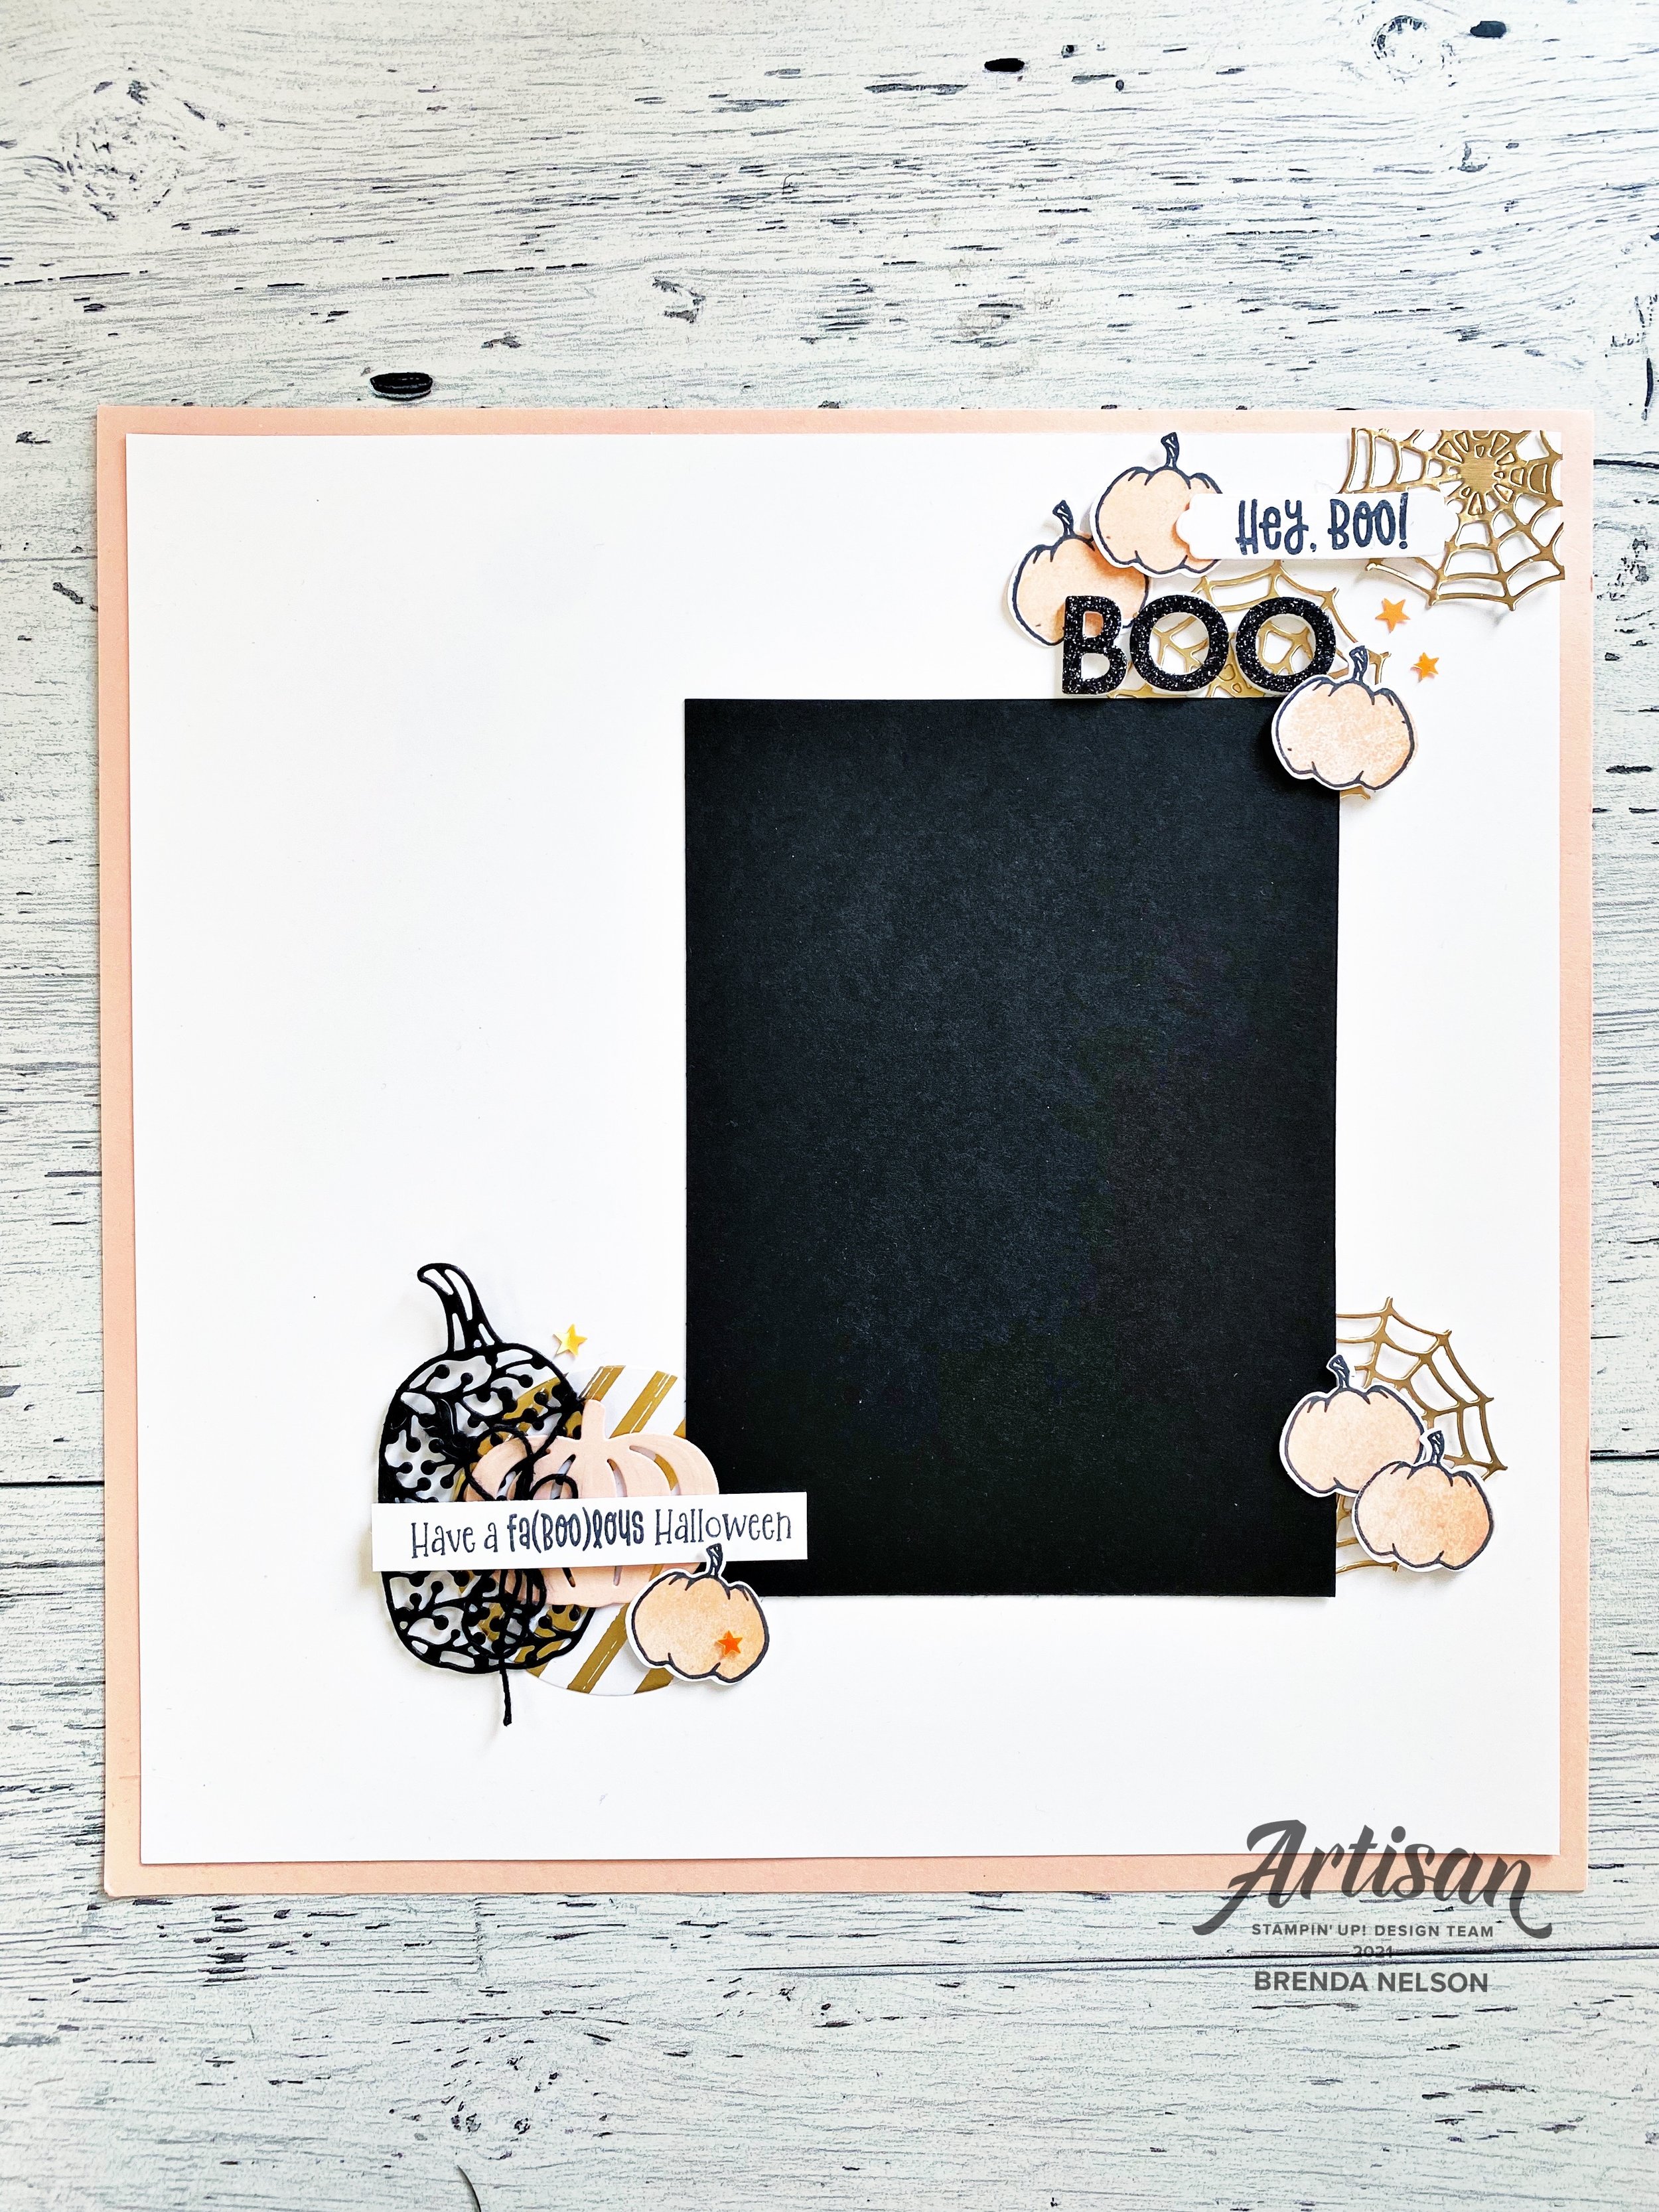
Here is a Halloween scrapbook page with a twist! Who doesn’t love the sophisticated colors of pink and gold? I decided to use them here for a unique color palette for this scrapbook page!

final (4) 6.jpg

I started with a base of Petal Pink card stock in 12x12 and added a layer of Basic White over top. There is actually no background stamping on this page, which is a little unusual for me! I let amazing dies do all the work to bring this page to life!

I used the stamp set Cutest Halloween for my pink pumpkins and the sentiments “Hey Boo” and “Have a fab(boo)lous Halloween”. I thought they were the perfect sentiments for this page.


I love this fun little area or vignette on the top right of my page. I used the Brushed Metallic Cardstock and the Frightful Tags Dies to cut out the spider webs and I love that they are incomplete webs—meaning you don’t see a full web.

Hey Boo! is cut using one of the label dies from the Seasonal Labels Dies.

Boo is cut from our Black Glitter Paper, Foam Adhesive Sheets and the Playful Alphabet Dies.

I also added a few of the Cute Stars Adhesive-Backed Sequins as an extra fun embellishment!

final (5) 4.jpg

The pumpkin outline is stamped with Momento Ink and filled in with the Petal Pink ink. You can punch these out using the coordinating Halloween Punch! One is added flat to the page and the other two are elevated with Dimensionals. I think this whole little area has so much texture and interest to it!

final (1) 16.jpg

For this bottom left little vignette I wanted the feel of an elegant pumpkin patch. I started with a large circle but from the Expressions in Ink Designer Series Paper and layered pumpkins from the Detailed Pumpkins Dies in Basic Black and Petal Pink. Of course you want to tie in elements on your page together so I used another stamped pumpkin and some of the Cute Stars embellishments again.

The sentiment also has some black twine from the Bakers Twine Essentials Pack behind it as well. Have you noticed I love me some twine?

final (4) 6.jpg

I hope this page inspires you to create a scrapbook page with colors that you don’t normally associate with Halloween! I absolutely LOVE how it turned out and I can’t wait to add a picture to this page after this years festivities!

If my design has inspired you, please consider shopping with me if you live in Canada! I would love to keep doing what I love!

Skull Shaker Card

I love a good shaker card, but what I love even MORE is an EASY shaker card and this one delivers on both!

To make this EASY shaker card you will need one of our clear envelopes found in the Annual Catalogue. They are self sealing but I do add some tape to the back as you will need to fold over the edges a bit. The clear envelope is designed to fit a regular card so you can see how it is folded a bit smaller. Some tape on the back works perfectly when you get to that step!

The base of this card is Highland Heather and has Basic Black layer that is 4 x 5 1/4.

The ‘shaker’ layer is Grey Granite. I stamped the skull faces from the Cute Halloween set along with some little spiders.

 
final (5) 3.jpg

The stamp set has two different faces that you can stamp for the skull as well. I stamped them randomly in the background in the matching ink color along with some spiders. Once you have this piece stamped you are going to slip it into the clear envelope. Set it aside for now as you will need to make your filler!

You can really use whatever you like for a shaker card. For this one here I used some skulls that were stamped on Basic White and hand trimmed. I stamped a few Candy Corn as well (from the Cute Halloween Set) and added some Subtle Shimmer Sequins. Once you have added all of this to the clear envelope you will want to seal it up. Make sure you leave a little air so that things can shake around. If its too tight of a seal things won’t really move around freely.

final (5) 3.jpg

Every card needs a sentiment so I added ‘Hey, Boo!’ from the Cute Halloween set. I stamped a few Candy Corns in Pumpkin Pie ink on the same color of card stock and then used the Layering Circle Dies to cut it out along with a scallop circle in Highland Heather.

I layered a bit of the Black & White Gingham in between the layers too—since its such a fun ribbon! See wasn’t this easy to create? I really love this simple style of shaker cards!

If anything has inspired you to make a purchase I would love your support if you live in Canada. You can shop directly with my store by clicking this button!