Rainbow of Congrats!

Did you see the awesome watercoloring technique I shared yesterday on my blog? If you didn’t you need to go there right now and check it out as I used the same technique to create the stars for these Congrats cards I made for a group swap!

These cards are just so bright and fun and I know they will make whoever receives them feel even MORE AWESOME for their accomplishment!

final.jpg

I knew I wanted to play around with that water-colour technique again using a brighter color palette and I thought pairing it up with die cut stars would be a great match. The dies are called Stitched Stars and you can find them in our annual catalogue. Keeping the card background on neutral Crumb Cake I think really helps these stars jump off the page!

final.jpg

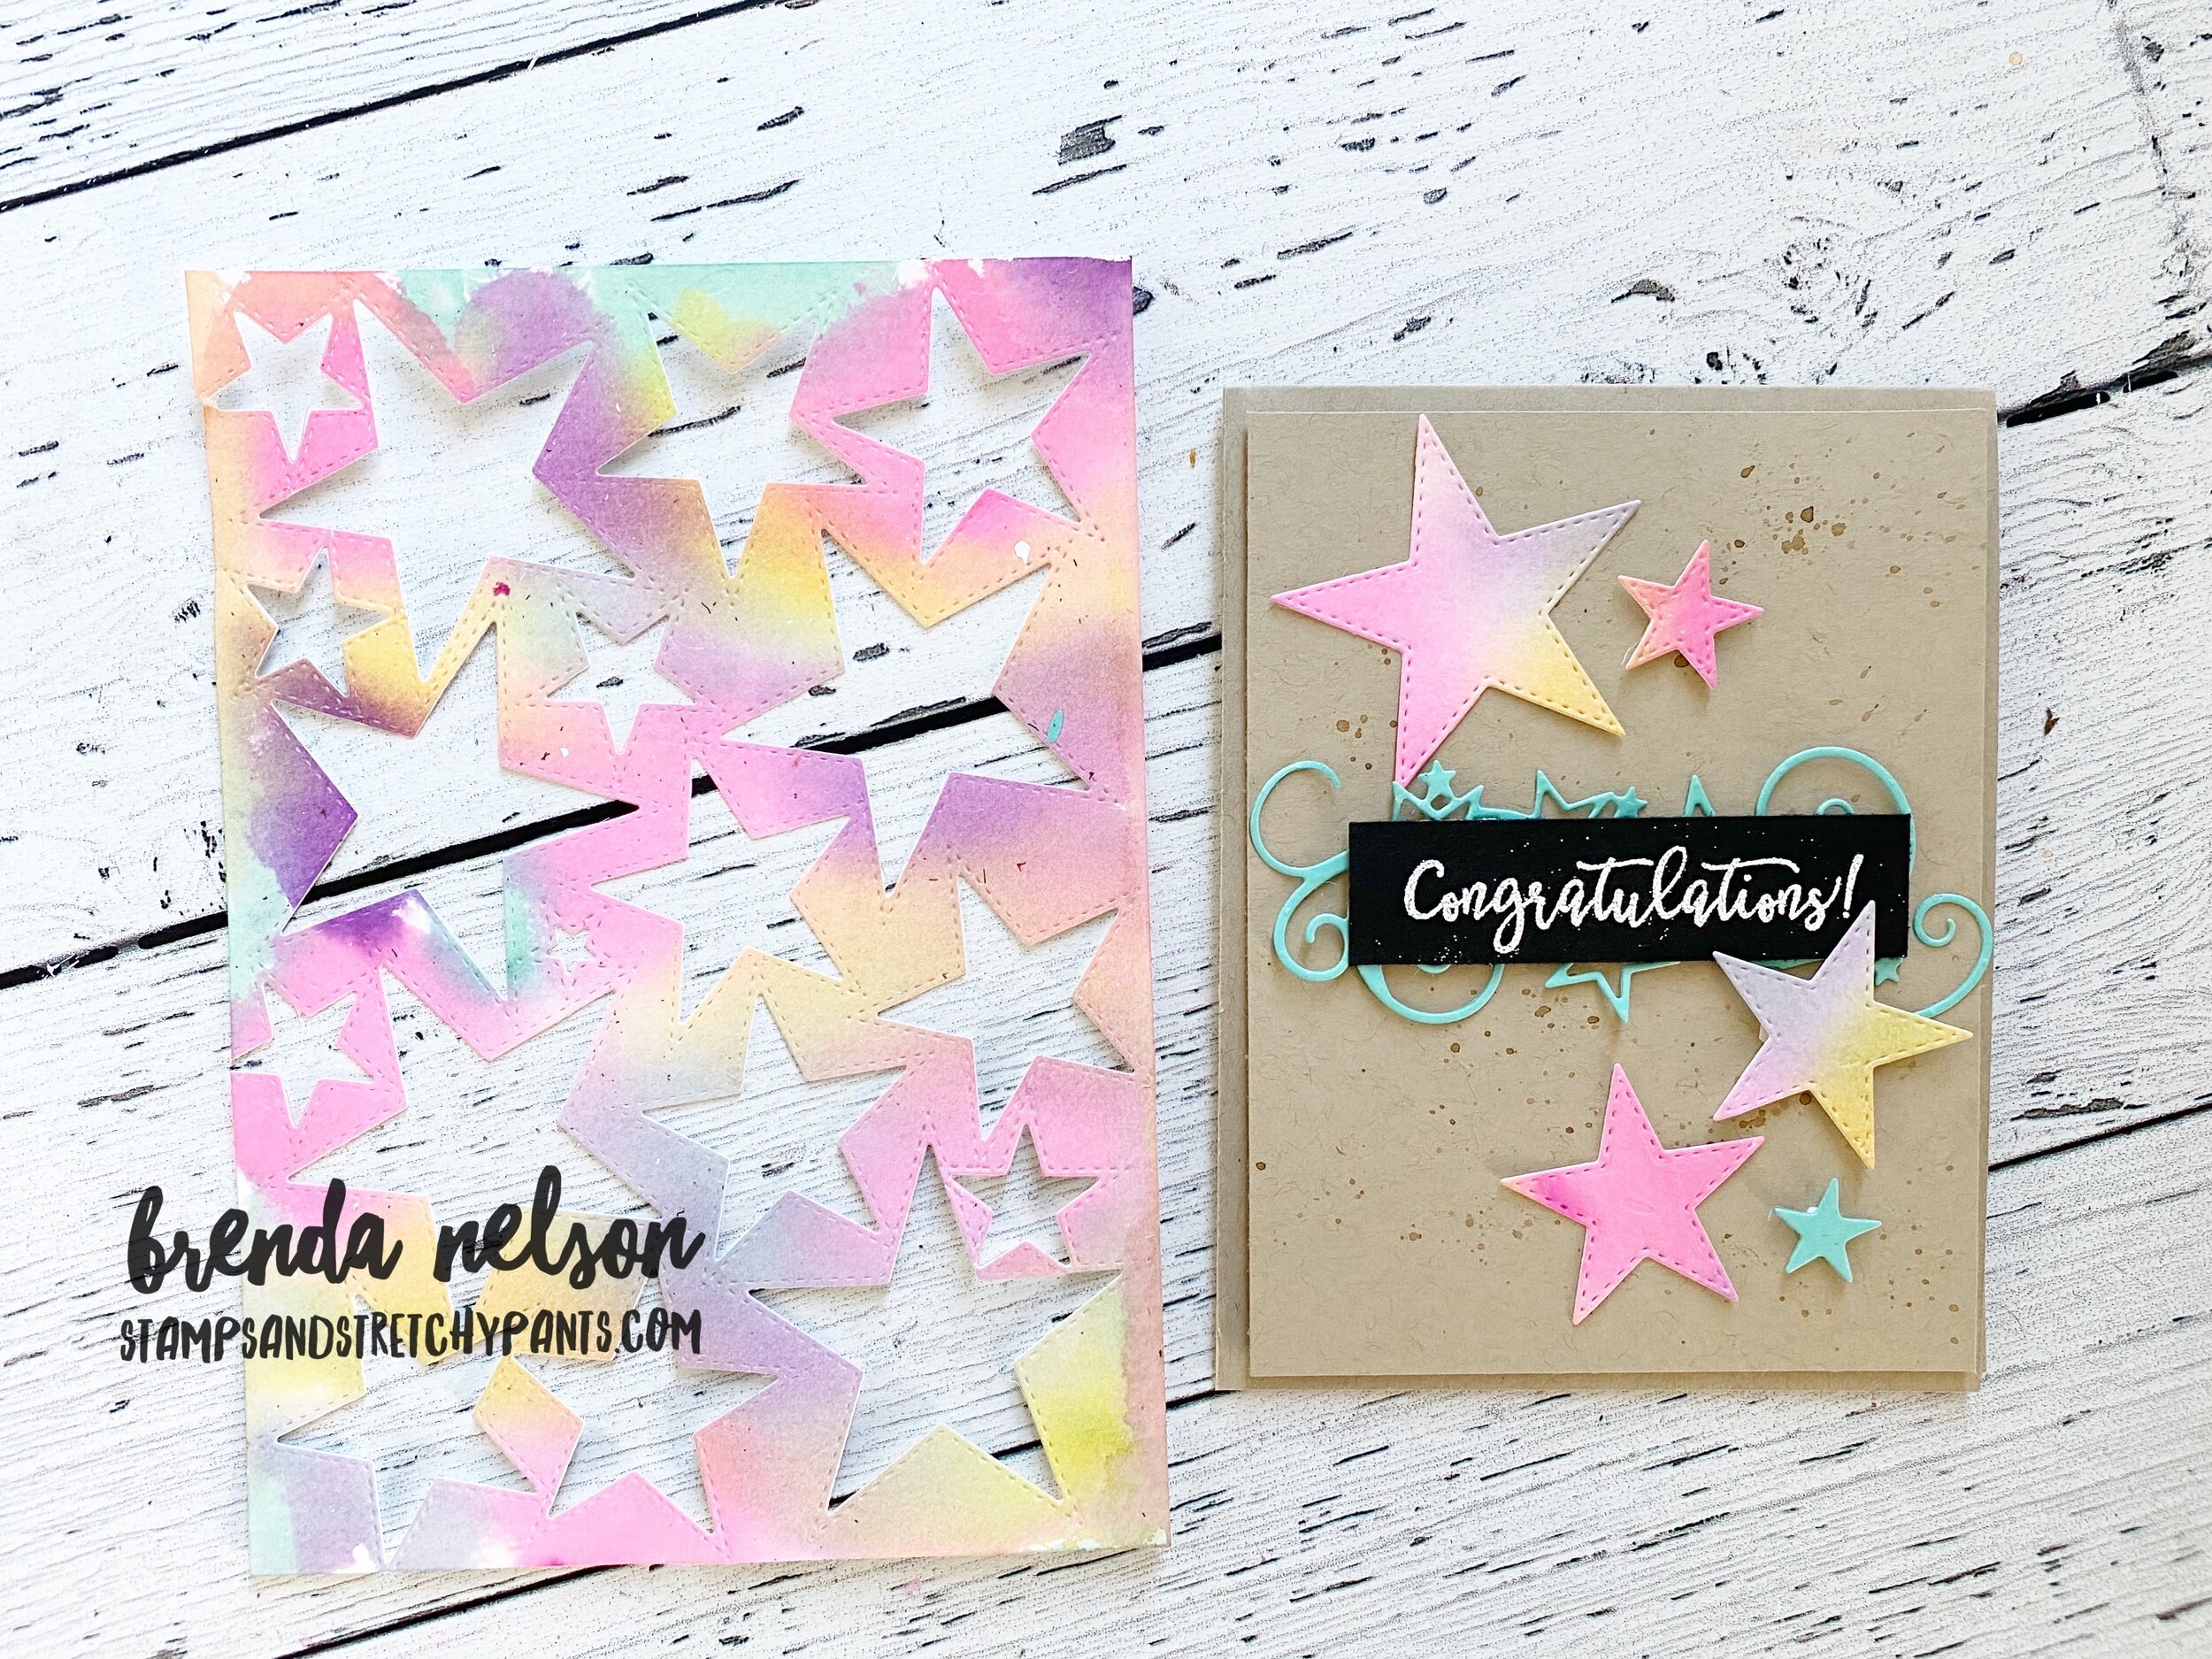
I was able to get enough stars to embellish 4 cards and each one is unique! I used Magenta Madness, Gorgeous Grape, Coastal Cabana and Mango Melody for my color palette. I think together they make an awesome rainbow inspired combo!

I also flicked Soft Suede over the background of my card too just to give it a little extra!

Now the Congrats font is from the A Grand Kid stamp set, do not overlook it because of its name! It has some really really terrific sentiments in it and you can find it on page 97 of the annual catalogue.

final.jpg

I also wanted to decorate the inside of this card too! So I added in a few more stars and a bit of Magenta Madness ribbon. I think its a fun surprise!

I hope you will give this fun technique a try! It is easy to do, I promise, and is a great way to incorporate watercoloring into your projects!

Create with Connie & Mary--Thinking of Fall!

I will admit, as much as I don’t want it to be so, there is a little fall chill in the evening air! I am so blessed to live in a part of the world where we experience 4 distinct seasons. I love summer so much, but the beauty of fall is just spectacular here in Alberta. I love when all the leaves start to change and that is what influenced the design of my scrapbook page for this weeks theme—Thinking of Fall!

fullsizeoutput_12d57.jpeg
I love this photo of my two friends Donna and Karina.  For the past several years we have worked together to offer 3 large group events each year called Creative Day Getaway, to local demonstrators and stampers.  We are hosting our 20th event this S…

I love this photo of my two friends Donna and Karina. For the past several years we have worked together to offer 3 large group events each year called Creative Day Getaway, to local demonstrators and stampers. We are hosting our 20th event this September so I thought featuring them on this page was perfect!

fullsizeoutput_12dbb.jpeg

I used a really fun and easy watercoloring technique to create these leaves! Something similar was shared on the Stampin’ Up! Instagram page recently as well. I love how our Stampin’ community shares and inspires each other!

I chose the colors Cajun Craze, Rich Razzleberry, Merry Merlot and Pumpkin Pie. You will need a piece of water color paper, the large Water Painter Brush (I used the same one moving from light ink to dark ink), a Stampin’ Spritzer and the Stitched Leaves Dies.

Start by spritzing the water color paper with water and starts adding in your color. It may look a little weird but after you spritzer it one more time at the end and either let dry or use your heat tool it blends all the colors together. Cut out your desired leaf shapes for your project.

fullsizeoutput_12dc2.jpeg

I also wanted to play off of the grey tone in the Plaid Tidings DSP with the photo mat and some grey leaves. The photo mat has little leaves stamped on it in Smoky Slate ink to coordinate with the paper. The stamp set I used is Banner Year, don’t overlook it at the back of the Handmade for You catalogue! pg 65! It has tons of potential!

I used the old school Rock’n Roll technique on my grey leaves. Stamp them in Smoky Slate and then ‘roll’ the edges in Basic Grey Ink.

I also pulled in the large maple leaf image from the Gather Together stamp set for some background stamping. And I love the stitched look of the leaves so I decided to use the Hippo & Friends dies to cut out the sentiment with a stitched detail.


When I am creating scrapbook pages I find the magic is all in the details. Adding in different threads, textures, embellishments, layering stamps and colors. This little corner is a perfect example!

If you are in Canada and want to recreate this page you can order all the supplies from my online store! Just click below to head right there!

Shop now


fullsizeoutput_12dbe.jpeg

Thanks for hopping along with us this week as we are wrapping up August and heading into September. You can go back to see what Melissa has made if you are just joining in here or continuing hopping forward to see what Connie has designed! See you next week!

You're Amazing (heart)

Last week I shared an amazing double page layout featuring the Prized Peony suite and I am still having fun creating with it! This was the page my scrapbook class made this week. Once a week, last Wednesday of the month, I have a group of gals come to make a single page layout. They had requested doing some colouring with the Stampin’ Blends and I feel like this bundle just has so many options. Pairing it with the scripty soft font of the Ornate Thanks stamp set was a perfect match along with the Beautiful World stamp set.

final.jpg

I really love this soft color palette that was inspired by the Peony DSP and having my oldest son in the photo. I wanted this page to feel soft and masculine at same time. No one ever said you can’t use flowers with boys!

I started by embossing some of the mid sized peony blooms on the Whisper White background with white embossing powder. The effect is soft and subtle and draws your eye from the top of the page down.


Sometimes a background doesn’t need much, but I always find it needs something!

Embossing such an easy way to add detail to your projects.

final.jpg

I really love how the Prized Peony dies include outline dies, dies to make a 3 D flower and the scalloped embossed edge piece is perfection. I used it here to bring in that touch of blue with Seaside Spray. I feel this blue has a bit of a grey undertone so it worked perfectly on this project. I coloured the peonies in Seaside Spray, Petal Pink and Old Olive Stampin’ Blends.

final.jpg

I used the Grey Granite 1/4 shimmer ribbon and the Seaside Spray 1/4 metallic ribbon to draw interest and attention to the sentiment. I love our metallic pearls and they helped add an elegant feel to this page.

The lace detail is from the Fabulous Florals dies and worked so perfectly with this page!


final.jpg

I love this little corner at the right hand top of the page. I stamped the little background in Smoky Slate and cut one of the cute stitched shapes from the Hippo & Friends dies in the same color. I trimmed it down in half and added the small peony and You’re Amazing. Sometimes it really is all in the details!

I hope you love this page as much as I do! I absolutely LOVE to scrapbook and feel so blessed to have this platform to share my creations with you! Please feel free to shop with me or leave me a comment! I love to see them in my Inbox!

shop with me

Create with Connie and Mary--Cute Critters!

This week our creative theme is Cute Critters and if you have looked through the catalogue at all you know, there are quite a few options? So how could I pick just one. I decided to make ONE card template and FOUR critter cards from it! I think this shows how versatile a great card design can be!

fullsizeoutput_12d57.jpeg

What is also worth noting is that on each of the four cards, they only use ONE stamp set per card! This is also important to our customers because it shows the value and potential in a single stamp set.

This little zebra is just too cute for words! You can find him and two other zebra friends in the Zany Zebra stamp set. I added a bit of extra color to his stripes with my light Smoky Slate Stampin’ Blend and Magenta Madness Stampin’ Write Marker.

This little zebra is just too cute for words! You can find him and two other zebra friends in the Zany Zebra stamp set. I added a bit of extra color to his stripes with my light Smoky Slate Stampin’ Blend and Magenta Madness Stampin’ Write Marker.

I absolutely could not choose just one stamp set to use as all of these sets have so much potential and are all ‘cute critters’, even the whale by my definition!

I started with a Coastal Cabana base and layer. I chose one sentiment out of each set to stamp in the background and then I used my Water Painter brush with the matching ink to create a splatter effect in the background. Each card has a strip of DSP from the Flowers for All Season 6x6 collection in a Just Jade polkadot pattern. I love how Just Jade and Coastal Cabana look together, they pair up perfectly! I wanted a little punch of color so I decided to add in Magenta Madness as an accent color. I cut little strips of the woodgrain pattern from the In Color 6x6 collection to add behind the critter on each card along with some Just Jade ribbon. The Playful Patterns Resin dots in Coastal Cabana were the perfect finishing touch!

Each critter is on a white stitched circle and I found one little stamp in each set to add to the circle in Magenta Madness! It could not have worked out better to choose these four stamp sets and this is going to make the perfect class in September!

This little cutie is from the Pampered Pets Bundle and is coloured with the Smoky Slate Stampin Blends!

This little cutie is from the Pampered Pets Bundle and is coloured with the Smoky Slate Stampin Blends!

This was actually my first play with the Hippo Happiness Bundle. What I really love about this bundle are the Hippo & Friends dies. There are 25 dies in this set including 3 different types of labels. It really is a tremendous value!

This was actually my first play with the Hippo Happiness Bundle. What I really love about this bundle are the Hippo & Friends dies. There are 25 dies in this set including 3 different types of labels. It really is a tremendous value!

And finally Mr. Whale as I have nicknamed him from the Whale Done bundle. I love that he is a punch and you can stamp him and punch him out or create him using punch art!

And finally Mr. Whale as I have nicknamed him from the Whale Done bundle. I love that he is a punch and you can stamp him and punch him out or create him using punch art!

I hope this card collection inspires you to take one design and create different projects from it! Now you can go back on our hop to see what Melissa created or you can keep going forward to see what Connie has designed! Either way, I know you will be inspired! Have a wonderful Saturday! And if you want to shop my store for any of these projects, please do and use the August Host Code! Thank you!

`

`

Shop with me by clicking this button if you live in Canada!

shop with me

C is for Cookie...

And it’s good enough for me, oh C is for Cookie and its good enough for me because COOKIE COOKIE COOKIE COOKIE starts with C!

Hahaha! How many of you learned your ABC’s from Sesame Street? Can you guess who my favourite character was? Cookie Monster! And ya, maybe I still do eat my cookies like he does! hahahaha! I also really liked Grover and when they occasionally showed you glimpses inside Oscar’s garbage can…man, that was a good day!

So needless to say I love the Nothing's Better Than bundle and could not wait to make a fun cookie treat. I will be giving these out to everyone who places an order with me next month and I absolutely cannot wait!

final.jpg

I have to say the best thing about having a tweet is their willingness to do things for money, so I employed my daughter to cut out 48 ‘cookie’ words for me the other day. Then we worked together to cut the other parts and I stamped the ‘Today’s Plan Consume’ in Soft Suede on Sahara Sand card stock and flicked the background with a Water Painter and Sahara Sand ink. I added some retired Baker’s Twine (use that stash up) between the stitched circle and scallop circle layers and added the labels to a package of Dad’s Cookies (bough at Costco!).

I can’t wait to share these with all of my group members in September! Ask me about joining one of my monthly groups if you live in the YEG area!

I can’t wait to share these with all of my group members in September! Ask me about joining one of my monthly groups if you live in the YEG area!