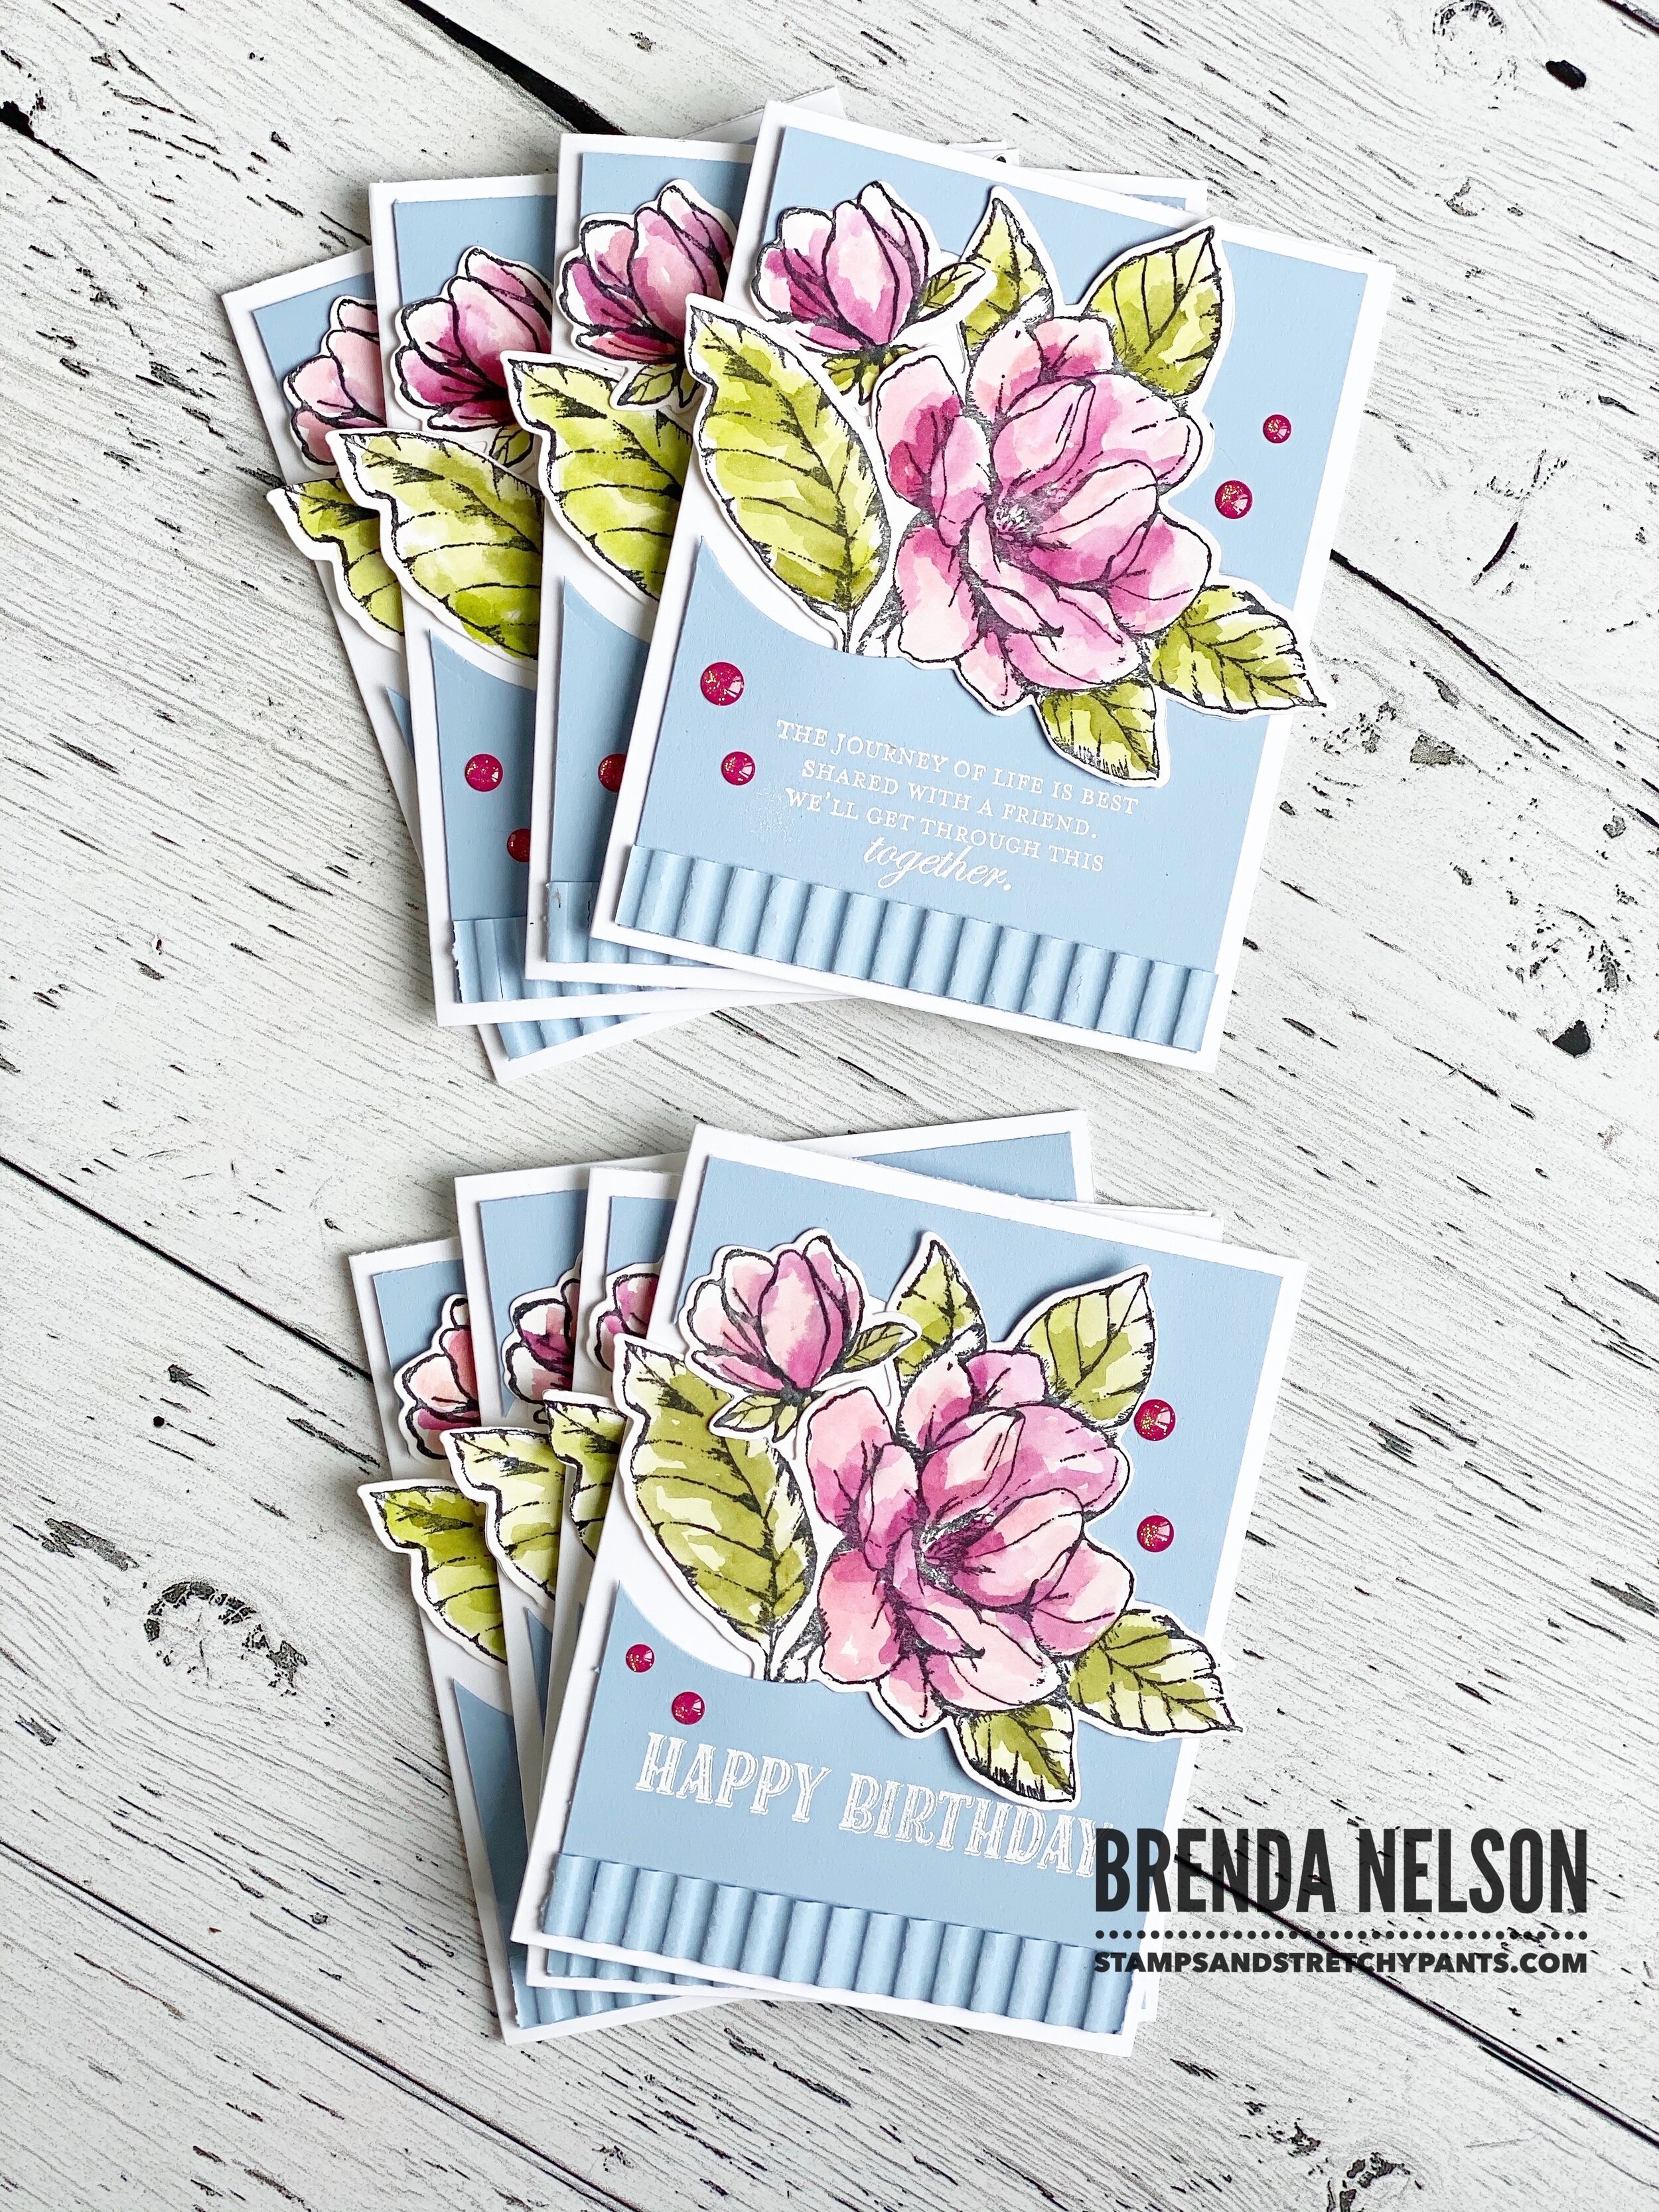
We will weather this together...

Today I was inspired to make a card to send out to some of my tribe. In light of everything, it is our relationships with each other and this amazing Stampin’ community that will see us through these trying times. I am so thankful for this amazing hobby that I love so much!

I don’t know if I would call this card a ‘fun fold’ but it is a bit of a pocket card. A style I have been leaning on a lot lately! You basically score your 4 1/4 x 5 1/2 piece of card stock in half and then score again on one side 1 1/4 inches. That becomes the little flap. I like to round the edges too! I do use an adhesive to keep the flap down so the Bakers Twine around it just helps to keep the pocket card closed.

I used the Under My Umbrella Bundle (found on page 42 of the Occasions Catalogue) to decorate this card. The card base is Balmy Blue, a color I haven’t pulled off my shelf lately and the little strip of raindrop DSP is from the limited edition Pleased as Punch DSP. The Stampin’ Blends in Highland Heather, Daffodil Delight and Flirty Flamingo made colouring the umbrella and little flowers so easy. I did add some Wink of Stella to the umbrella and flowers as well.

This is for all of friends far and wide, thinking of you and knowing we are in this together!

This is for all of friends far and wide, thinking of you and knowing we are in this together!

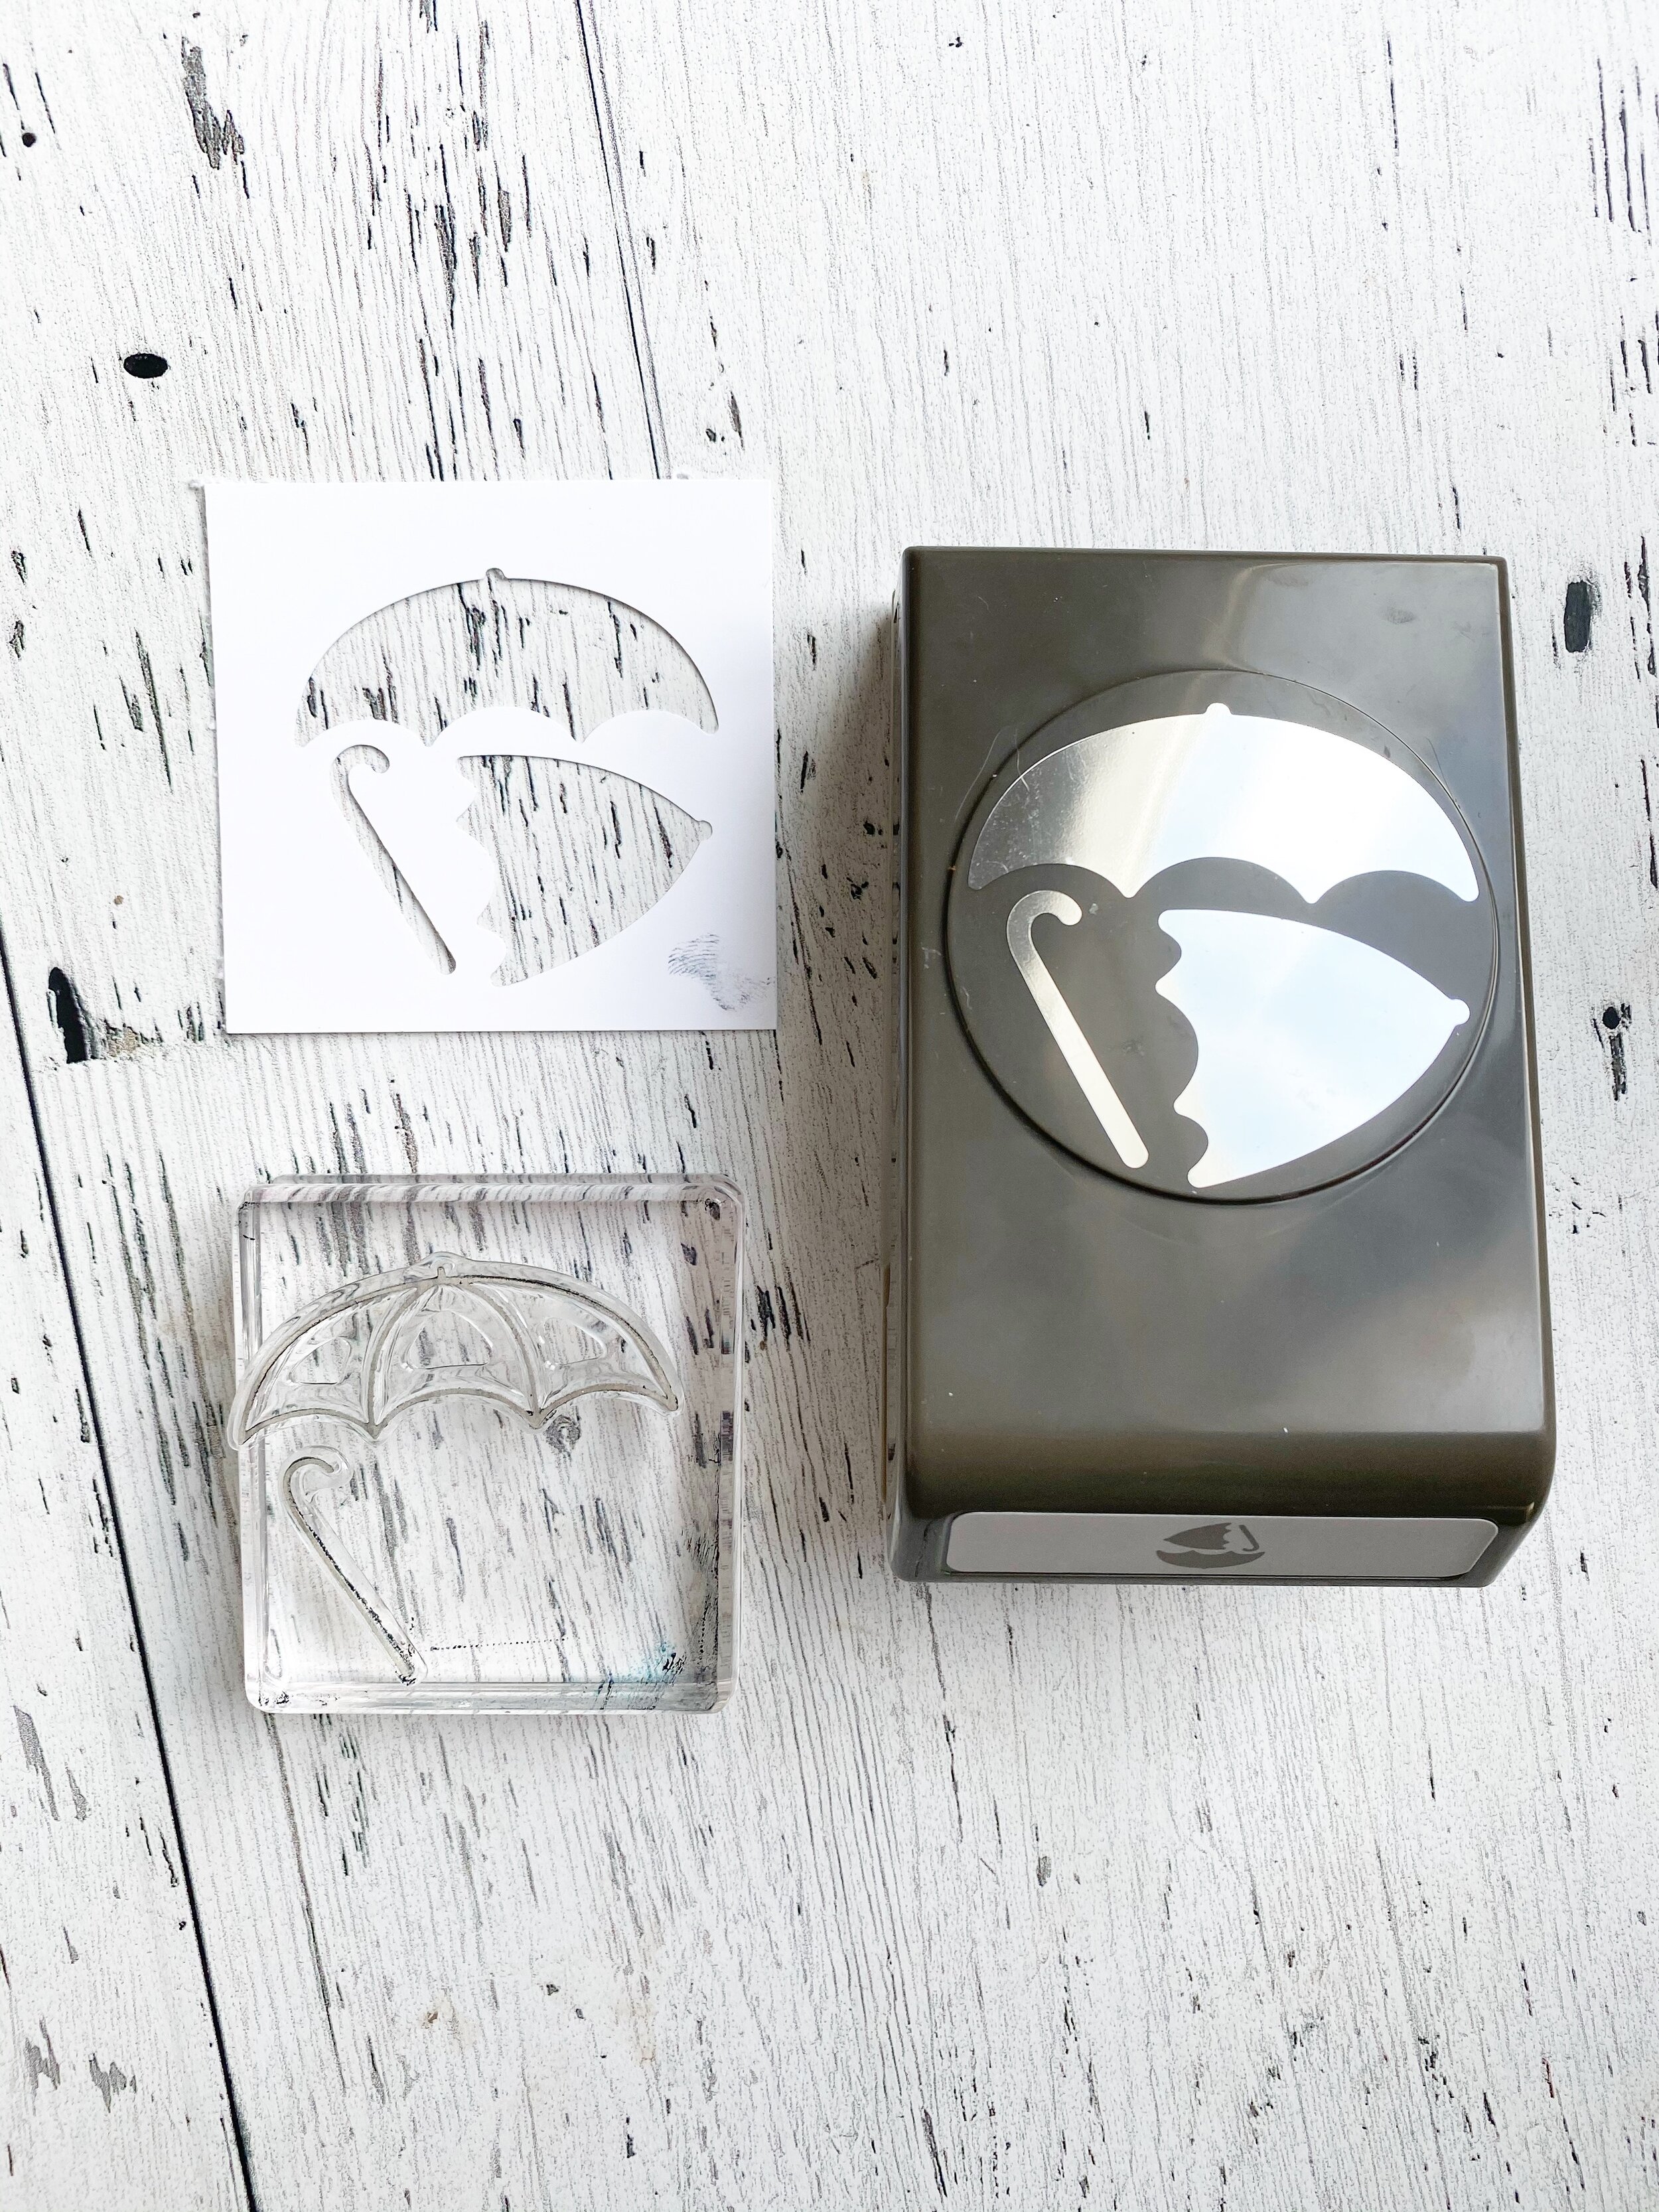
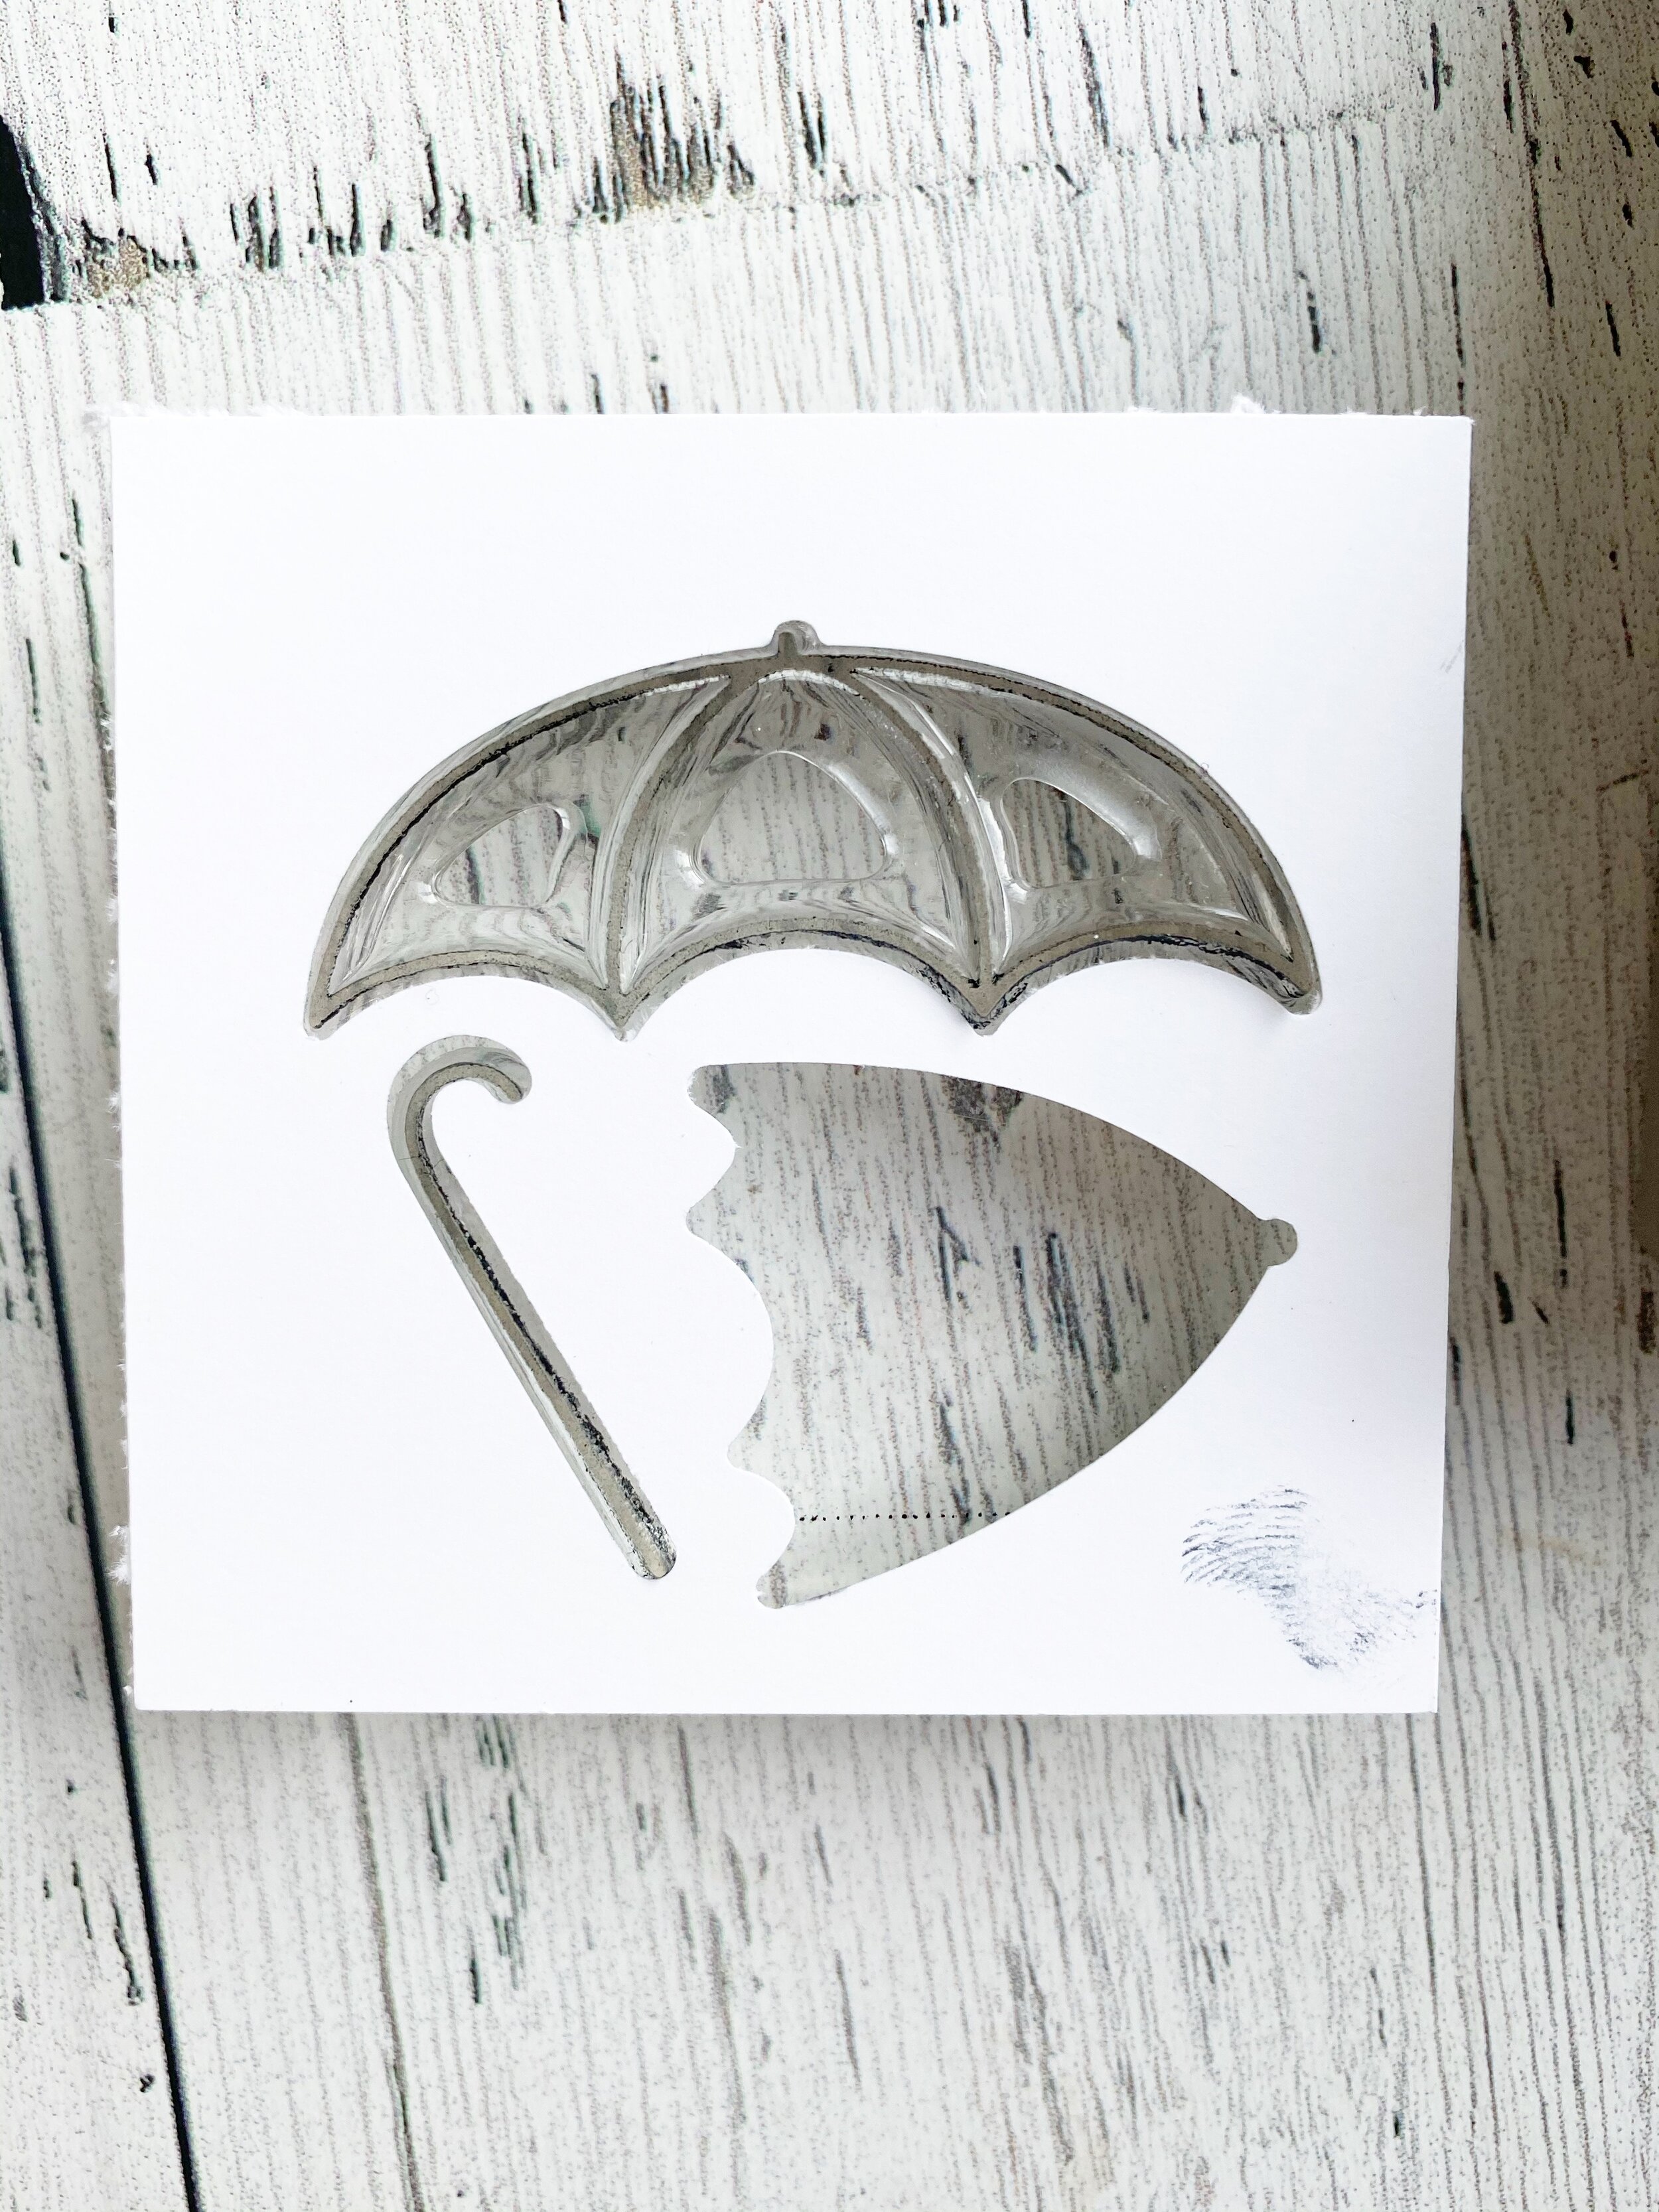
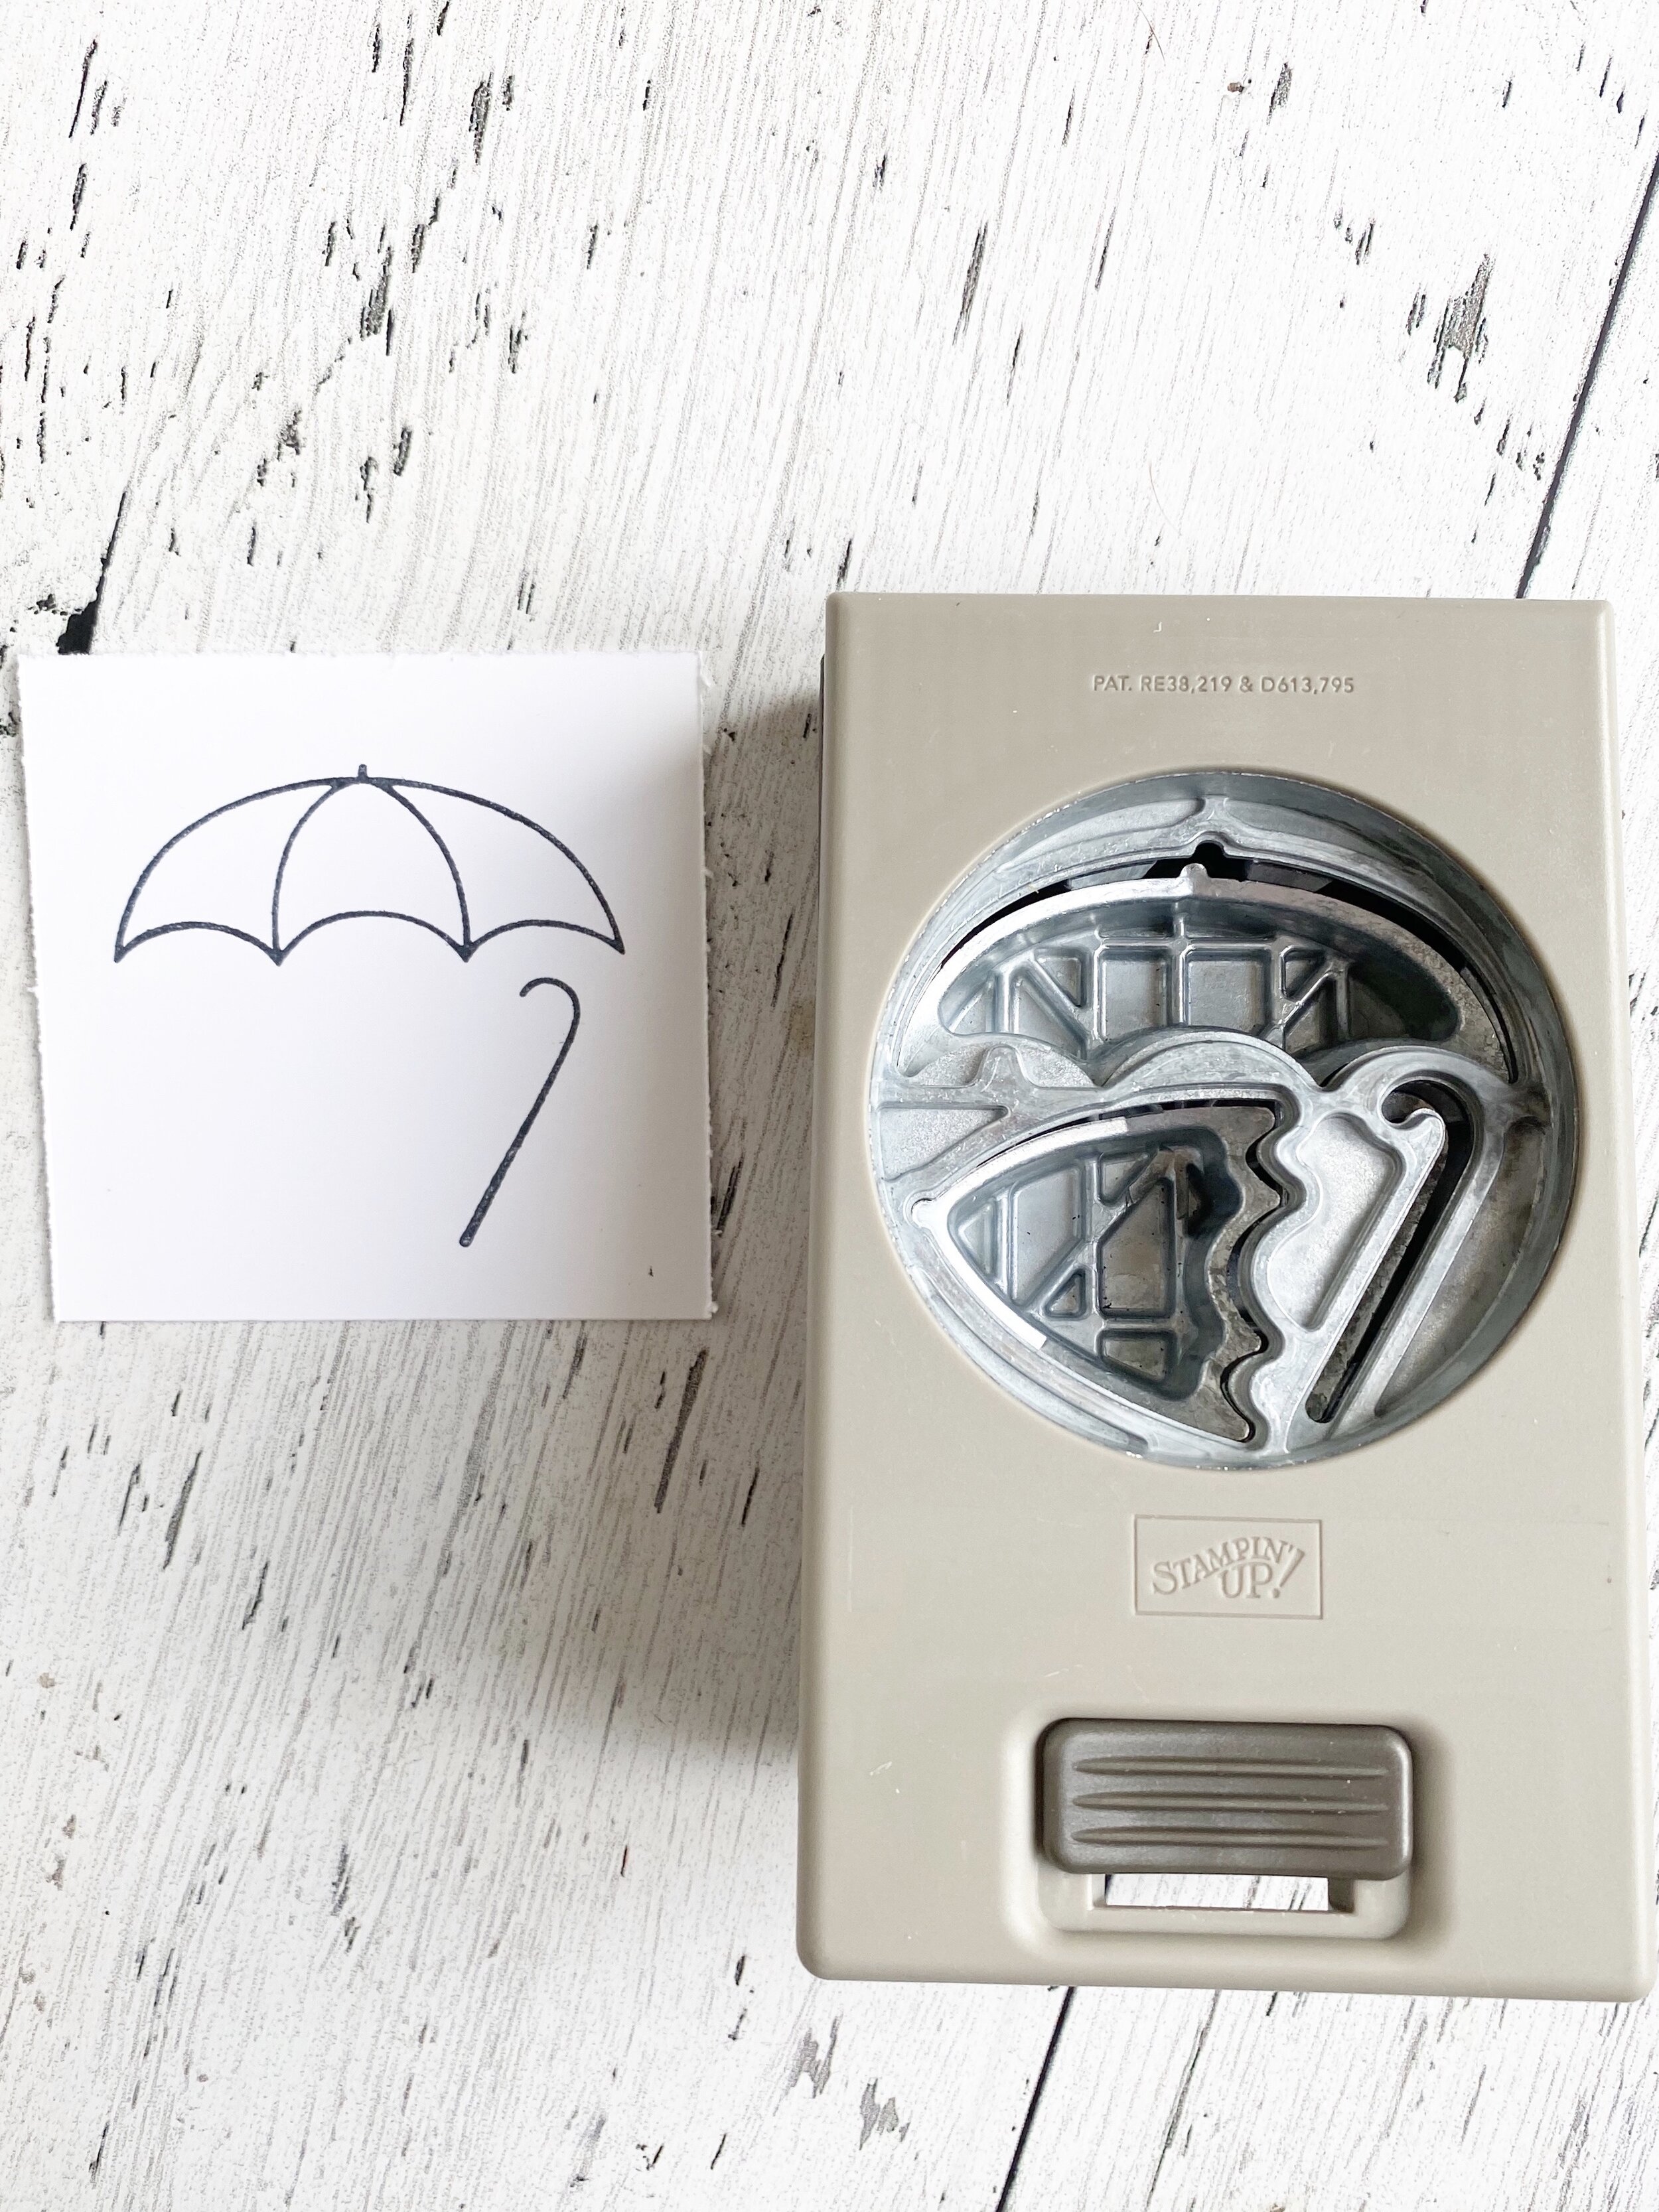
Quick Tip: I wanted to share a quick tip on how to align your stamps so they coordinate perfectly with the Umbrella Builder Punch. I start by punching a template (do you like my finger print smudge? haha, I kept it there to keep things real :), and then take the template and line up on a block. I align the stamps I need under the template (you can see in picture two how they are underneath) and then when you stamp them out they will punch out perfectly.

Joy of Sets March Blog Hop--Easter Fun!

I am so happy to be participating in another Joy of Sets Blog Hop for March! The theme this month was Easter so I knew immediately that I wanted to use the Welcome Easter stamp set in the Occasions catalogue. And I couldn’t resist using the Pleased as Punch DSP for the color inspiration for my page. The hearts are a part of the DSP and are designed to work with the Heart Punch Pack. The Happy Easter sentiment is from the Word Wishes dies in the Idea Book & Catalogue.

The images were stamped in Sahara Sand and coloured with the Water-colour Pencil crayons and an old school Blender Pen! I love the soft look it gives. A few little embellishments like the Rose Gold thread and the In Color faceted dots finished off the page!

final.jpg
Scrapbook pages can easily be inspired by cards—-or in this case, a card can be inspired by a page! I loved colouring these cute easter critters so much I needed to make a second project!

Scrapbook pages can easily be inspired by cards—-or in this case, a card can be inspired by a page! I loved colouring these cute easter critters so much I needed to make a second project!

Click on the link below to visit the amazing Jill Chapman in the UK to see her crafty creations!

Click on the link below to visit the amazing Jill Chapman in the UK to see her crafty creations!

Magnolia Birthday...Catty Case!

I think I have mentioned a couple of times on my Blog that one of the fun things I do with my team is try and case the entire Idea Book & Catalogue. So far we have not completed this challenge over the years, but we are always ambitious to give it a try! It is a great way to get the team together and help them use up their Stampin’ supplies! This month, I chose this card that you can find on page 4 of the catalogue! I also decided to make a few extra and turn them into birthday cards featuring the Birthday Jubilee stamp set from the Occasions Catalogue.

My magnolia’s are coloured with Flirty Flamingo and Rich Razzleberry inks and an Aqua Painter for the bloom and Granny Apple Green and Old Olive for the foliage. The coolest part of this card is the strip at the bottom. I cut a 1/2 inch strip of Seaside Spray and ran it through the Corrugated Embossing Folder.

TIP: run several strips through at one to avoid the paper ripping apart. This folder puts a lot of stress on the paper fibres so distributing it amongst multiple strips helps avoid breakage.

I hope you will let the amazing work of the SU concept artists inspire you create and get those stamps working!

final.jpg

Hello Fabulous Friend

final.jpg

I can’t believe this is the first time I have pulled out the All Dressed Up Dies (pg 56 of the Occasions Catalogue)! It was actually quite easy to assemble this little purse, which can also convert into a cute backpack too by just placing the straps in different spots. I love the stitched details around the edges of the purse and because of that I decided to leave it ‘clean’ and just have an over the top embellishment instead. I paired the Dressed to Impress stamp set with the Cherry Blossoms and Painted Labels Dies and added in some Pineapple Punch ribbon, Bakers Twine and Metallic Thread. I reached into my stash and pulled out some Faceted Gems (pg 178 of the Idea Book & Catalogue).

Sometimes our scraps can create the most beautiful things!

Sometimes our scraps can create the most beautiful things!

The best part of this card is the fact that it was created almost entirely with scraps I had laying around in my craft room! I had already created the purse and thought it would be fun to create a coordinating card. The purse is a perfect way to give a gift card! I stamped the large cherry blossom stem from the Forever Blossoms stamp set (pg 16 of the Occasions Catalogue) straight on the card base, a very rare occurrence for me, and added a few flicks of my Call Me Clover marker. I had a scrap of white card stock on my table so I ran it though the Parisian Flourish 3D Embossing Folder and layered on top some of the Braided Burlap Trim and Pineapple Punch ribbon. I cut another shape from the Painted Labels Dies and added in some Metallic Thread. I left the sentiment at ‘friend’ and inside stamped ‘you mean so much to me’. Together I think they make an awesome combo!

final.jpg

Parisian Blossoms for the Win!

Back in November I shared how I had been asked to present at On Stage (in Edmonton) the Parisian Blossoms suite! It was such a great experience, however, because I was so immersed in creating content for that event I was, I dare to say, a little over the Parisian Blossoms suite. Well I am back on it! Hahahaha! Have you ever felt that way before?

Luckily for me, my monthly scrapbook group requested that I create a layout for them using that suite, so I used a couple pages I had already designed as a springboard to create these pages. I used as many elements as possible from the suite on these pages and let the Parisian Blossoms DSP dictate the color pallet.

I have never been to Paris, but I liked using the Eiffel Tower as think it does represent doing something magnificent like the sentiment suggests! I added in some white flowers to keep a light tone on tone feel to the pages. I like to add texture to a scrapbook page that way.

If you look to the left side of the layout you can also see how I used the Label Me Fancy punch in a bit of a different way. I always like to incorporate a different way to visualize using a punch to my customers. Sometimes it might seem simple to us as creators to but to them its like a lightbulb moment!

I think my favourite thing on this page though are the panels of white card stock that I ran through the Parisian Flourish 3D folder. It is just the perfect folder! It has so much depth and detail after you run it though the Big Shot!

fullsizeoutput_10efc.jpeg