Color Fusers--June 2021 Blog Hop

Hello friends! Welcome back to another fun blog hop featuring the new amazing In Colors 2021-2023. Now, I have been stamping with Stampin’ Up! for a quite a while, coming on 15 years actually! And I have to say that this new lineup of colors is probably some of my all time favorites. Remember that year they released Coastal Cabana…me neither but its probably at the top and this new collection just might kick it out of first place!

June 2021.jpg

If you are a total newbie to Stampin’ Up! then this might be one of your first peeks at these colors or experience with the In Color collections. If you are a seasoned stamper than you have been seeing this colors ALL OVER THE PLACE because demonstrators like myself, cannot get enough!

I wanted to make a scrapbook page and showcase these colors with another new amazing product— the Shimmer Vellum. Now this ain’t your regular old vellum friends, this is shimmery and awesome in all the right ways and it comes in 12x12! Yay! You can expect to see me using this alot during this catalogue period.
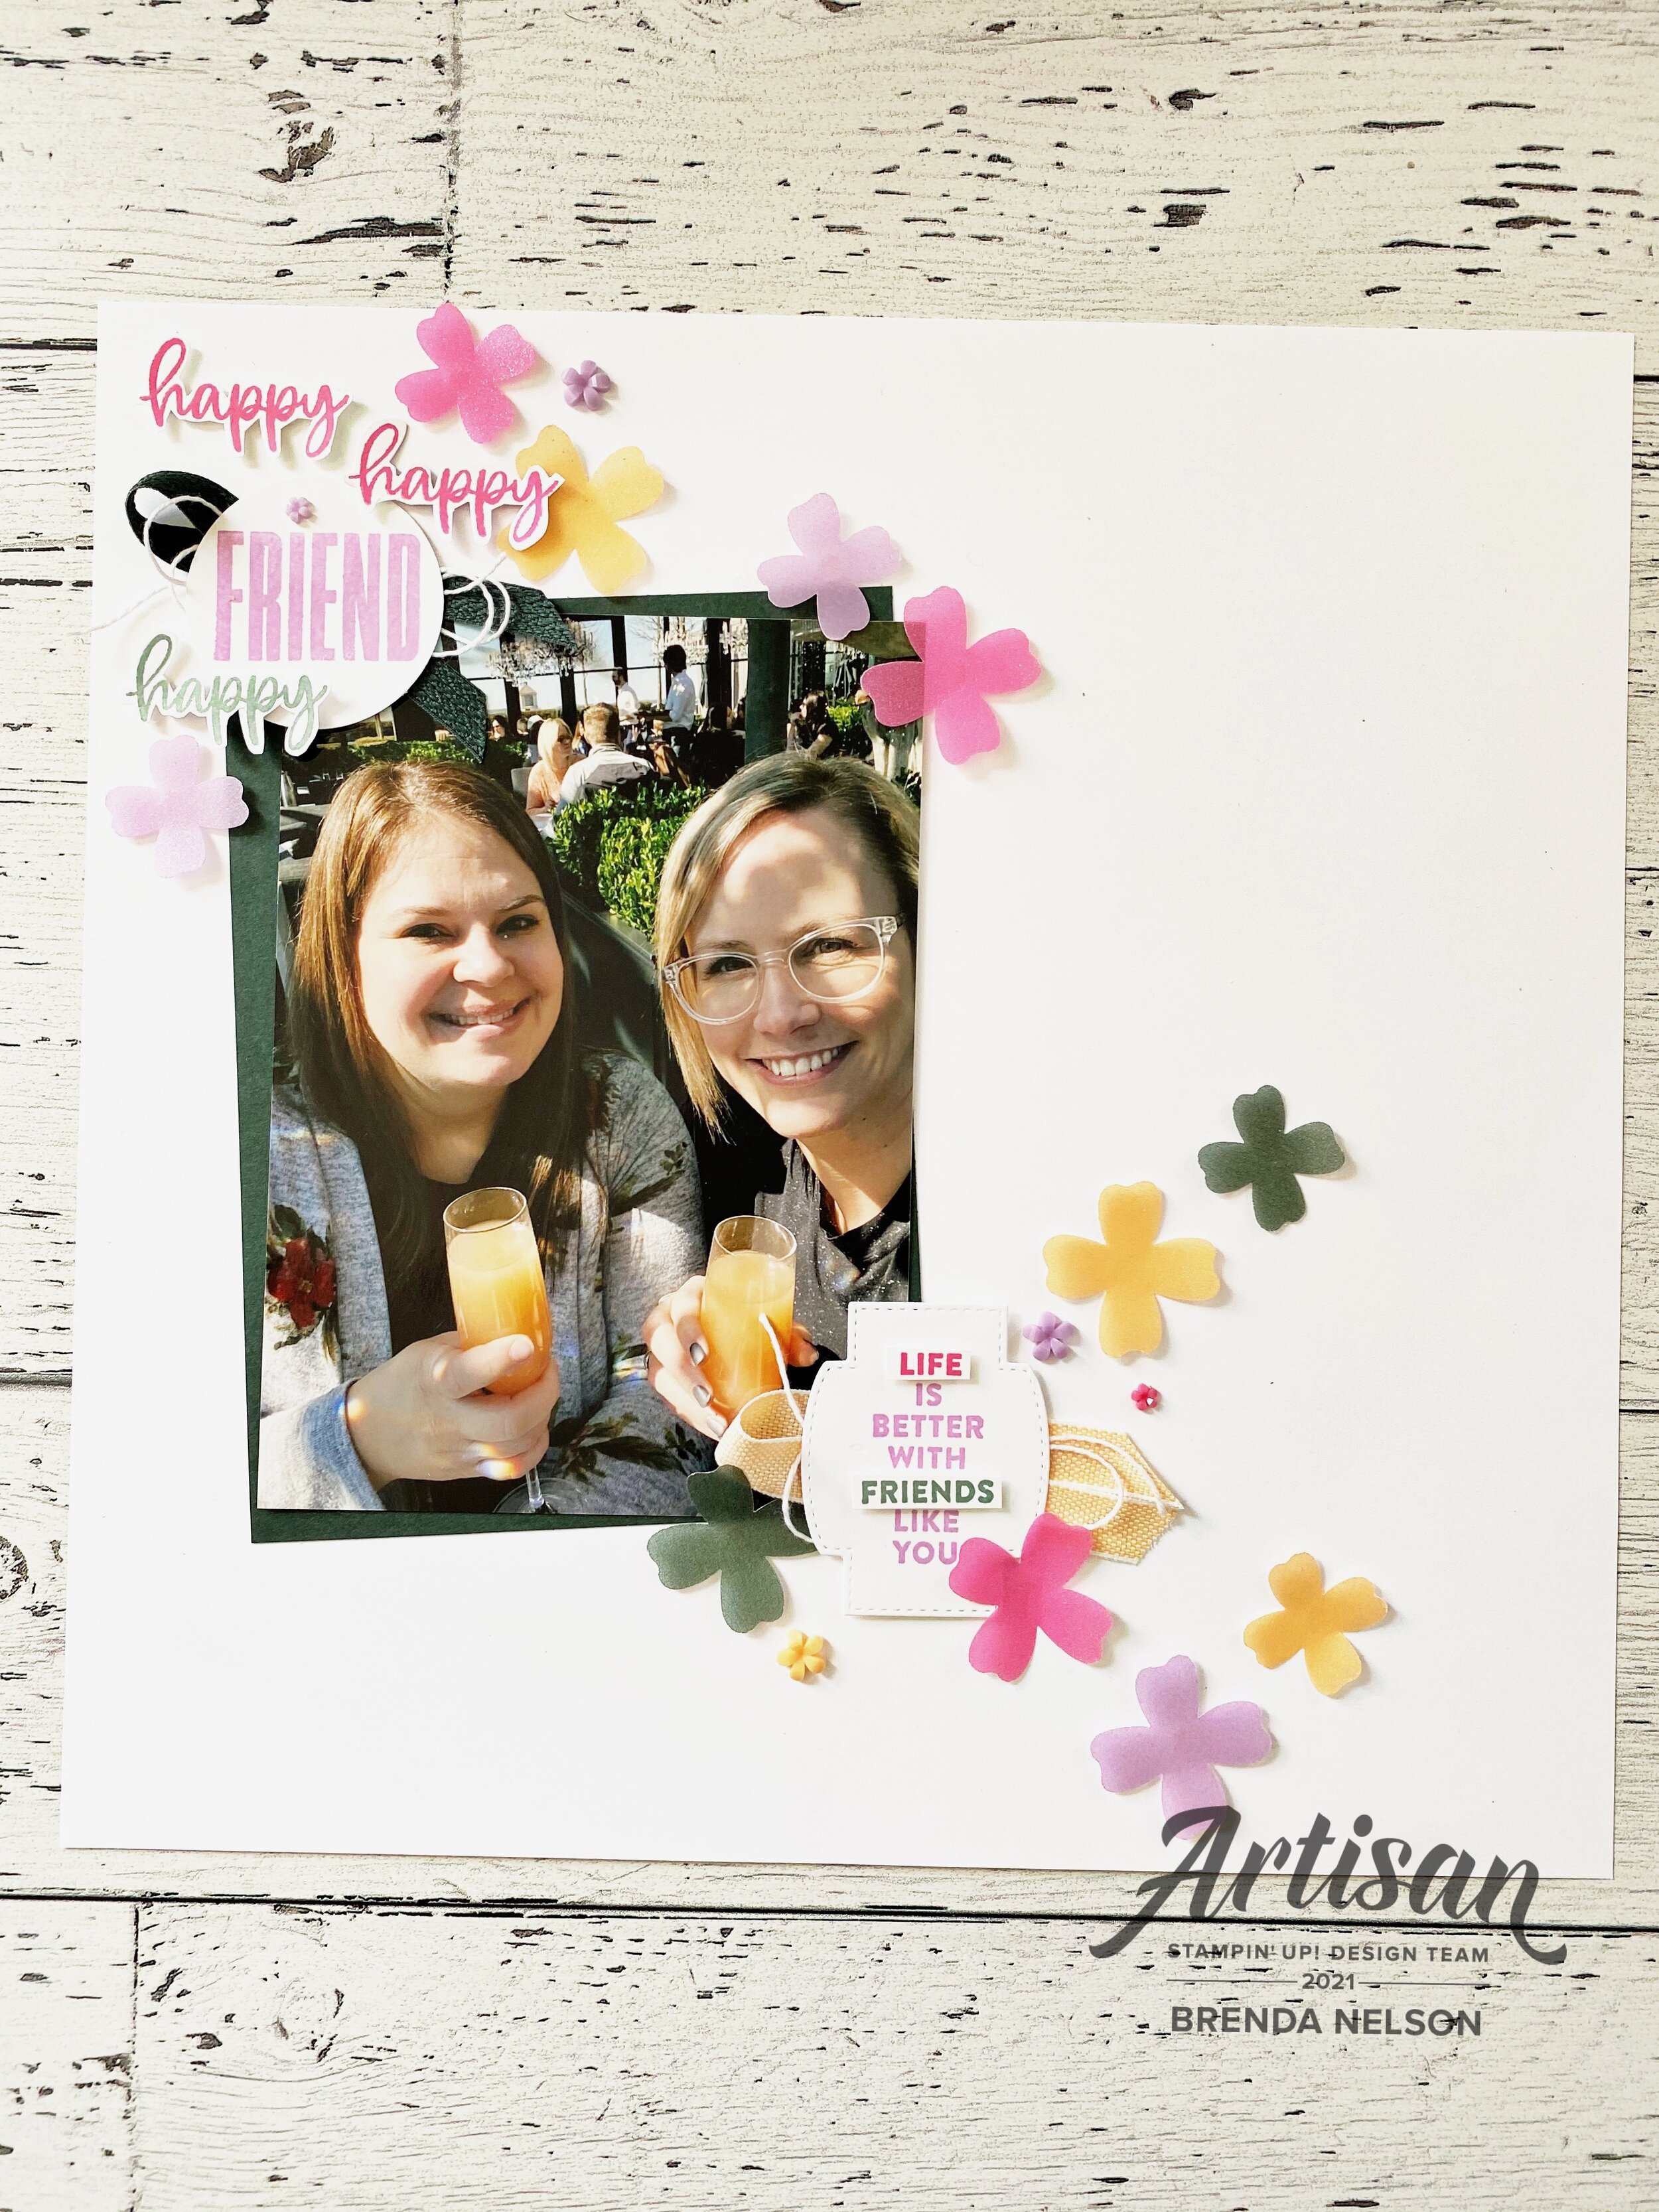
This is my awesome friend Jessica and I on our last girls trip together in March of 2020! Look at us, so smiley and happy.  The day after this trip ended to Ohio—guess what happened? Covid.

This is my awesome friend Jessica and I on our last girls trip together in March of 2020! Look at us, so smiley and happy. The day after this trip ended to Ohio—guess what happened? Covid.

I used the Flowers of Friendship bundle and the Biggest Wish stamp set as the features on this layout. The crisp Basic White base really helped these flowers pop right off of the page. Now vellum can be tricky to adhere because you can usually see the adhesive through the vellum, but would you believe there is a Mini Dimensional behind these flowers? This vellum is just thick enough they disappear on the white page base.

final (4) 4.jpg

One of my favorite new embellishments are the Loose Flower Flourishes which I have also added onto this page as they are available in Pale Papaya, Polished Pink and Fresh Freesia. They work so well with the Flowers of Friendship bundle too as the flowers have a similar look to them. And they are a flat backed embellishmentt so they attach easily with a Glue Dot.

I stamped out the sentiment in Fresh Freesia and die cut it with a shape from the Stitched So Sweetly Dies. I then stamped it again in Polished Pink and Soft Succulent so I could trim out a couple of the words to pop up on a Mini Dimensional.

I added some of the new Pale Papaya & White ribbon behind the sentiment with some white twine. I can’t help myself, I love my embellishments and almost always had some ribbon or twine, or both, behind my sentiments.

final (7) 3.jpg

I wanted to incorporate the Biggest Wish stamp set into this page as I loved the fact that it had the word Friend in it. I am always on the lookout for that. I stamped it with Fresh Freesia and punched it into a circle. I used one of the mini flower embellishments for the dot of the ‘i’.

Behind the ‘Friend’ I added the new Evening Evergreen 3/8 Chevron Weave ribbon which is so nice in person! And of course a little more white twine.

I stamped ‘happy’ twice in Polished Pink and once in Soft Succulent and hand trimmed them out to add to the page with a Mini Dimensional. How did we survive before Mini Dimensionals…these are the thoughts that keep me awake at night! hahaha!

I hope this page inspires you and if you have not added the Shimmer Vellum to your cart than do so! You can shop with me by clicking the Hostess Code link on the side of my page.

I can’t wait to see what the rest of the team creates with these fantastic new In Colors! You can hop NEXT to see what Melanie has designed for us!

Or if you want to head backwards you can do that too! Either way go all the way around so you don’t miss any awesome inspiration. By clicking Previous you will be heading to visit Bonnie! Have a lovely June and we will see you back again in July!

Flowers of Friendship Artisan Design Team Project

Hello friends! Thank you so much for stopping by today! I really wanted to create a blog post to showcase these 2 projects I created for the Artisan Design Team for the month of May. Each month the whole team releases a bunch of projects to the Stampin’ Up! Facebook page and then over the course of a couple of weeks they are shared individually on Instagram—so today is my day! It never gets old seeing your creations being featured by Stampin’ Up! Its been truly a dream come true and awesome learning experience to be a part of the team for 2021 :)

My assignment was to create two projects with the Flowers of Friendship Bundle. I LOVE a fantastic punch like this one that creates flowers that look great stamped or on their own.

IMG_7565.jpg

For my projects I wanted to share a different way to think about using your Flowers and Leaves Punch. I decided to create a stencil with one of our Window Sheets. Now I only wanted to highlight the flowers so I used a bit of tape to cover and block off the leaves.

I then placed my stencil over the card and scrapbook page Basic White layer and used the spatula and Embossing Paste to create a unique textured background.

To create a random placement of flowers you will need to allow some drying time in between applying each flower with the paste as you do not want to inadvertently cover or touch one that is already there and not dry as this will lead to smudging. So patience is your friend with this project but it is truly worth it in the end.

BrendaNelsonCloseUpMay2021.jpg

You will notice that my flowers have a soft feel to them and that is because they are stamped in Grey Granite ink. Black just felt like too harsh of an outline with the softer color pallette of this page. I colored my flowers in with the Stampin’ Blends in Pale Papaya and Fresh Freesia.

On the card I added the sentiment from the Flowers of Friendship stamp set in Grey Granite ink as well and looped some twine from the Baker’s Twine Essentials Pack behind along with an accent using the Loose Flower Flourishes (LOVE—in fact you should check out my Top Ten List for my new catty favorites).

I also incorporated the Tailored Made Tags dies into both of my projects and they have become a staple item these past few weeks! I can’t get enough of them as my have been noticing on some of my latest projects shared here on my blog or on my Instagram feed @stampwithbrenda.

I hope these projects inspire you to think outside the box when playing with this awesome bundle! If you do not have it already you can add it to your cart and shop with me by following this link!

Dad--You're the Best Scrapbook Page

I am really on a roll with my Father’s Day projects this year! I have created a couple different pages and I am so happy to share them with you in advance! Hopefully you will be inspired and can get the supplies together you need to make them!

final 70.jpg

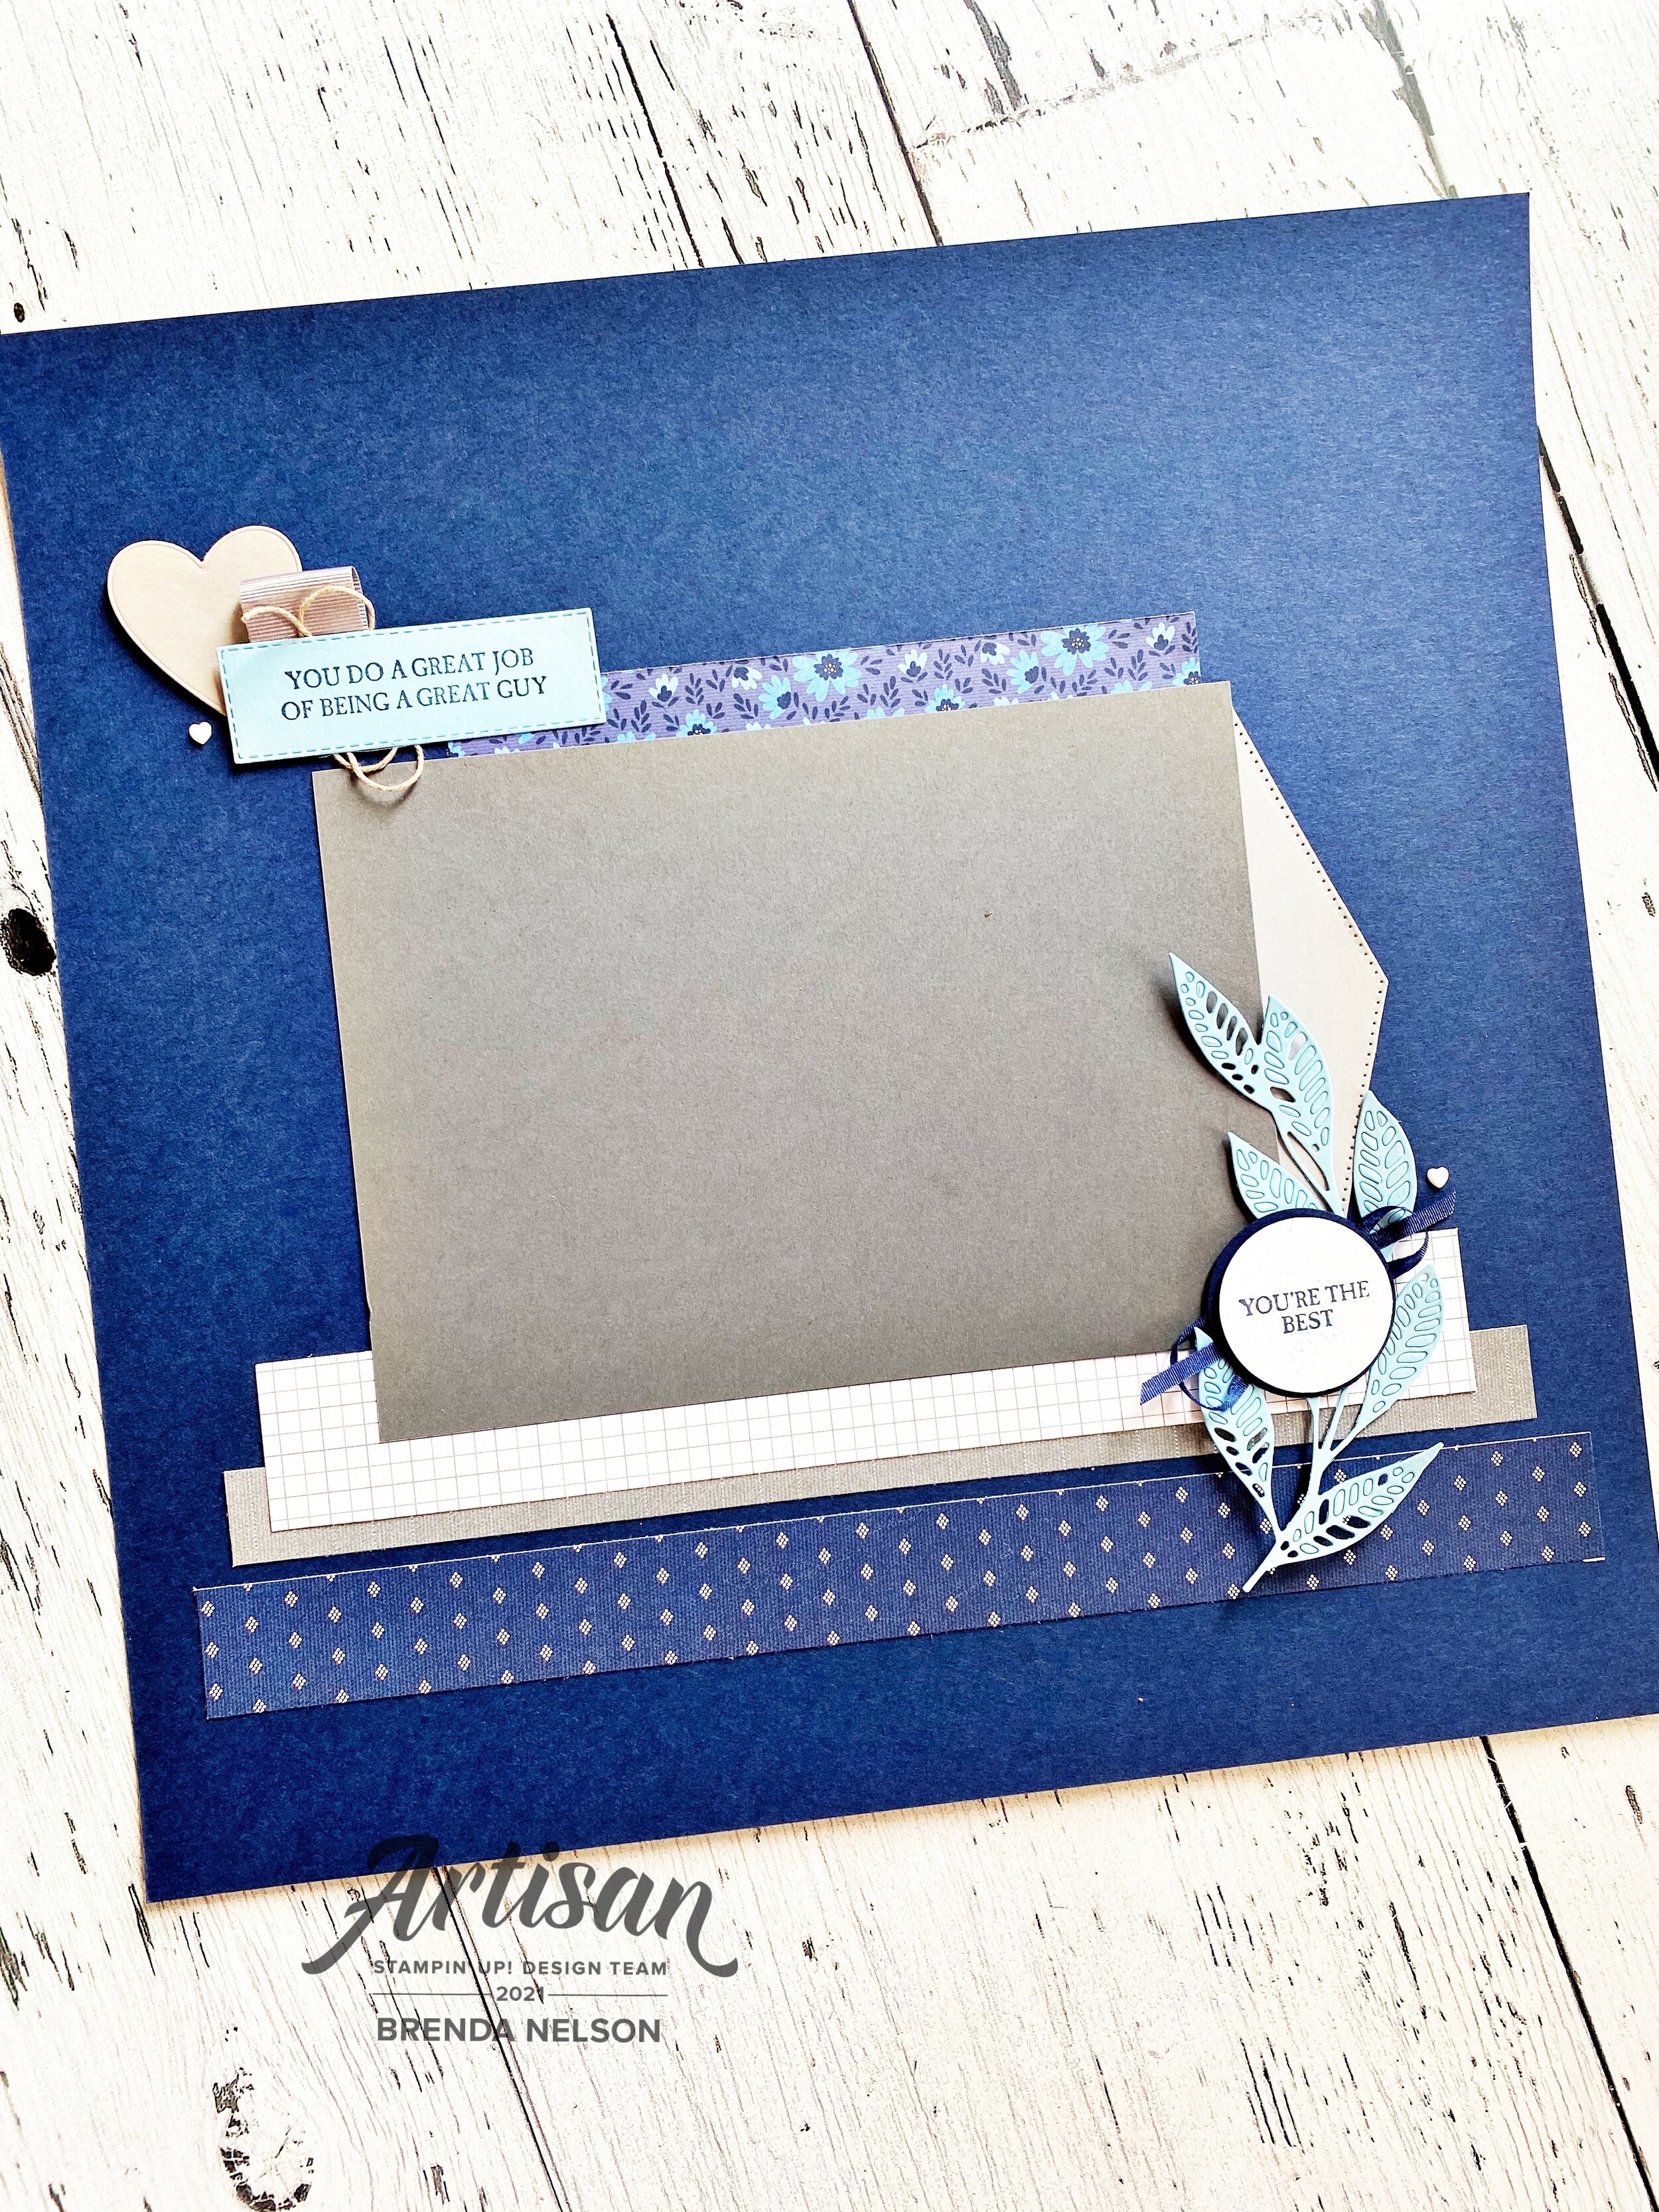
I always find masculine pages more challenging, you can’t just add in flowers on a masculine page! hahah! The base of these pages is Night of Navy (classic man color) and I was excited to add in some Designer Series Paper from the Well Suited collection and the returning favorite In Good Taste. In lieu of flowers I did decide to incorporate the leafy sprig image from the Artistic Dies. I also added in the pointy die from the Basic Borders dies on each of the photo mats as a unique and new accent.

final (1) 38.jpg

The hearts on both pages are from the Give it While Die and I ran them through an embossing folder for some texture.

I always like to add a variety of sentiments onto my scrapbook pages. On the top left “It’s Your Day” is stamped in Night of Navy ink from the A Good Man stamp set. The main sentiment on this page is from the Handsomely Suited stamp set. While I don’t gravitate towards the ties in this set, I do really enjoy the variety of phrases it has. To draw attention to the ‘Father’s Day’ aspect of the phrase, I stamped it on Smoky Slate and hand cut it to add over top with a Mini Dimensionals. The main sentiment is cut with the Switched So Sweetly Dies. A fan favorite!

I added in some Linen Thread and a bit of retired crumb cake ribbon for a lighter natural feel. Plus a few Resin Hearts because I couldn’t resist and I will be sad when they are retired.

final 69.jpg

You will notice this partner page has some carry over elements. This is important to me to create balance and connection across my two layouts. However, it is important to add some unique features too. Here I have added in a the new Smoky Slate Textured Ribbon behind the top sentiment. This sentiment is from A Good Man and is die cut with the Stitched Rectangles.

You’re the Best is from the same stamp set with a different ribbon behind but layered on the shape from the Artistic Dies. I also like having photo mats that go in both directions for a bit of variety!

I have one more ‘Dad’ themed page that I created that I am planning to share next week! I hope you will pop back for a visit!

You're Amazing!

Do you scrapbook your pets? I love to scrapbook my dog, Hawkins! In fact when I pull out my phone I swear he starts posing. Hahaha! I want to remember all the things, and the picture of my son Shepard and Hawkins reminds me of the school pick up days. My dog sits on the console between the front two seats anxiously awaiting the arrival of the kids to the car. Scrapbook the everyday, not just the big days!

0B2D86E9-11B6-412F-A43A-D93230DC3453.jpg

The base of this page is the new Soft Succulent In Color and I paired it up with a peachy coral tone that I was able to achieve by adding in some of our new You’re a Peach DSP and Pansy Patch DSP. I love this color combo with some hints of gold.

I used the Meadow Dies because they are literally my favorite thing at the moment…maybe in a tie with the Tailored Made Tags Dies…both so versatile and fabulous!

I added in phrases from several stamp sets—A Grand Kid, Create with Friends, and Color & Contour!

I think you could easily recreate this layout using different colors, stamps and DSP! I hope you are inspired!

Create with Connie and Mary--Favorite NEW Designer Series Paper

Okay, I supposed we are actually supposed to pick just ONE…but I can’t because what I love about our Designer Series Papers is how well they work TOGETHER! Have you noticed this? I love that several of the colors and tones are present in multiple papers. This is fabulous and makes way more sense to be able to create with several options! So I have a hybrid project that includes my ‘favorites’…plural!

21SUSatHopWelcome.png
See what I mean? How outstanding do these Designer Series papers look together? And will make you want all 3—-mission accomplished!

See what I mean? How outstanding do these Designer Series papers look together? And will make you want all 3—-mission accomplished!

I have been a Stampin’ Up! demo for 15 years and I got into stamping from a scrapbookers lense. So I have always been a big fan or our DSP…and dare I say it, this may be my favorite year yet!! There are honestly so many gorgeous options and so much design potential!

I started with the base of Pale Papaya for my page. One of the best new In Colors we have had in a while (in my humble opinion because it’s a yellow and it’s an orange). And if you poke through the catalogue you will notice this color in more than one Designer Series Paper—WIN!

Typically I do not design pages with out photos first, I don’t know why, it is just how my brain works. But I wanted to create a beautiful Mother’s Day page so I had it ready to go for the day. And this way I was able to tell my husband I needed pictures snapped in both directions, hahaha! He is pretty well trained though!

I hope everyone had a lovely Mother’s Day!

I hope everyone had a lovely Mother’s Day!

This layout uses the Hand-Penned, Pansy Petals and the hostess paper Pattern Party! Isn’t that amazing? If I was forced to make a single selection of my favorite, I guess I would say Hand-Penned. I just love the line art soft style of the florals and I am always a sucker for polka dots, stripes and scallops so it checks all those boxes!

The smallest strip of DSP in Misty Moonlight is from the Pattern Party DSP stack. I can’t tell you how happy I am that Stampin’ Up! has included a DSP as a hostess reward option. Whoever decided that should get a raise!

The large floral strip of DSP is from the Hand-Penned collection, along with the Pale Papaya polka dot tag (cut with the Tailored Made Tags dies). Seriously, add them to your list right now!

The gingham piece is from the Pansy Petals DSP and I think it’s awesome that there are gingham options in 3 colors in this collection. So brilliant.

The photo mat is Garden Green. I really love how the concept artist wove this color into the Hand-Penned DSP.

The photo mat is Garden Green. I really love how the concept artist wove this color into the Hand-Penned DSP.


Can we talk about the Meadow Dies for a minute? I am having a love affair with them. They are AMAZING and seriously look good with any project—cards, scrapbook pages, box toppers, I can go on and on but if you follow me on Instagram @stampwithbrenda you will come to see what I mean as I can’t even put them away!

The “Happy Mother’s Day” sentiment is from the Dressed to Impress samp set and is cut with a shape from the Meadow Dies. I then layered that on top of a shape from the Stitched So Sweetly Dies.

final 35.jpg

For this side I decided to focus on the Misty Moonlight design from the Pattern Party DSP by making it the largest section of DSP. I added the same design from the Hand-Penned over top and if you look close you will notice that the circle behind the “Love You More” is from the In Color 6x6 Designer Series Paper stack. The sentiment is from the Measured with Love stamp set.

The other sentiment on this page is from the Dragonfly Garden stamp set.


The dies really stand out on this layout, especially with the floral image stamped direct to the page from the Quiet Meadow stamp set and then softly stamped in the background of the larger sentiments.

final 36.jpg

I hope this layout helps you think about combining patterns and designs from multiple DSP collections. Like I said, I really could not pick just one so I hope you enjoy this blending together of my favorites! You can go BACK to see what Melissa has designed this week or you can go NEXT to see what Connie selected as her favorite DSP! Have a lovely Saturday and thank you for popping by! Please leave a comment and if you are in Canada and feel inspired by my layout, please chose to shop by online store! I am always happy to have a new stampin’ friend!