Seven Days of Scrapbooking--Day #2

Hello friends and welcome back! If you missed the dozen amazing scrapbooking projects shared yesterday on my Instagram Stories just search the hashtag #sevendaysofscrapbooking and you can see all of the amazing projects! I am really excited to share my page today as it focuses on the Textured Chic Memories & More cards. I used these card packages quite frequently to make traditional scrapbook pages and I hope this sparks a creative idea in yourself!

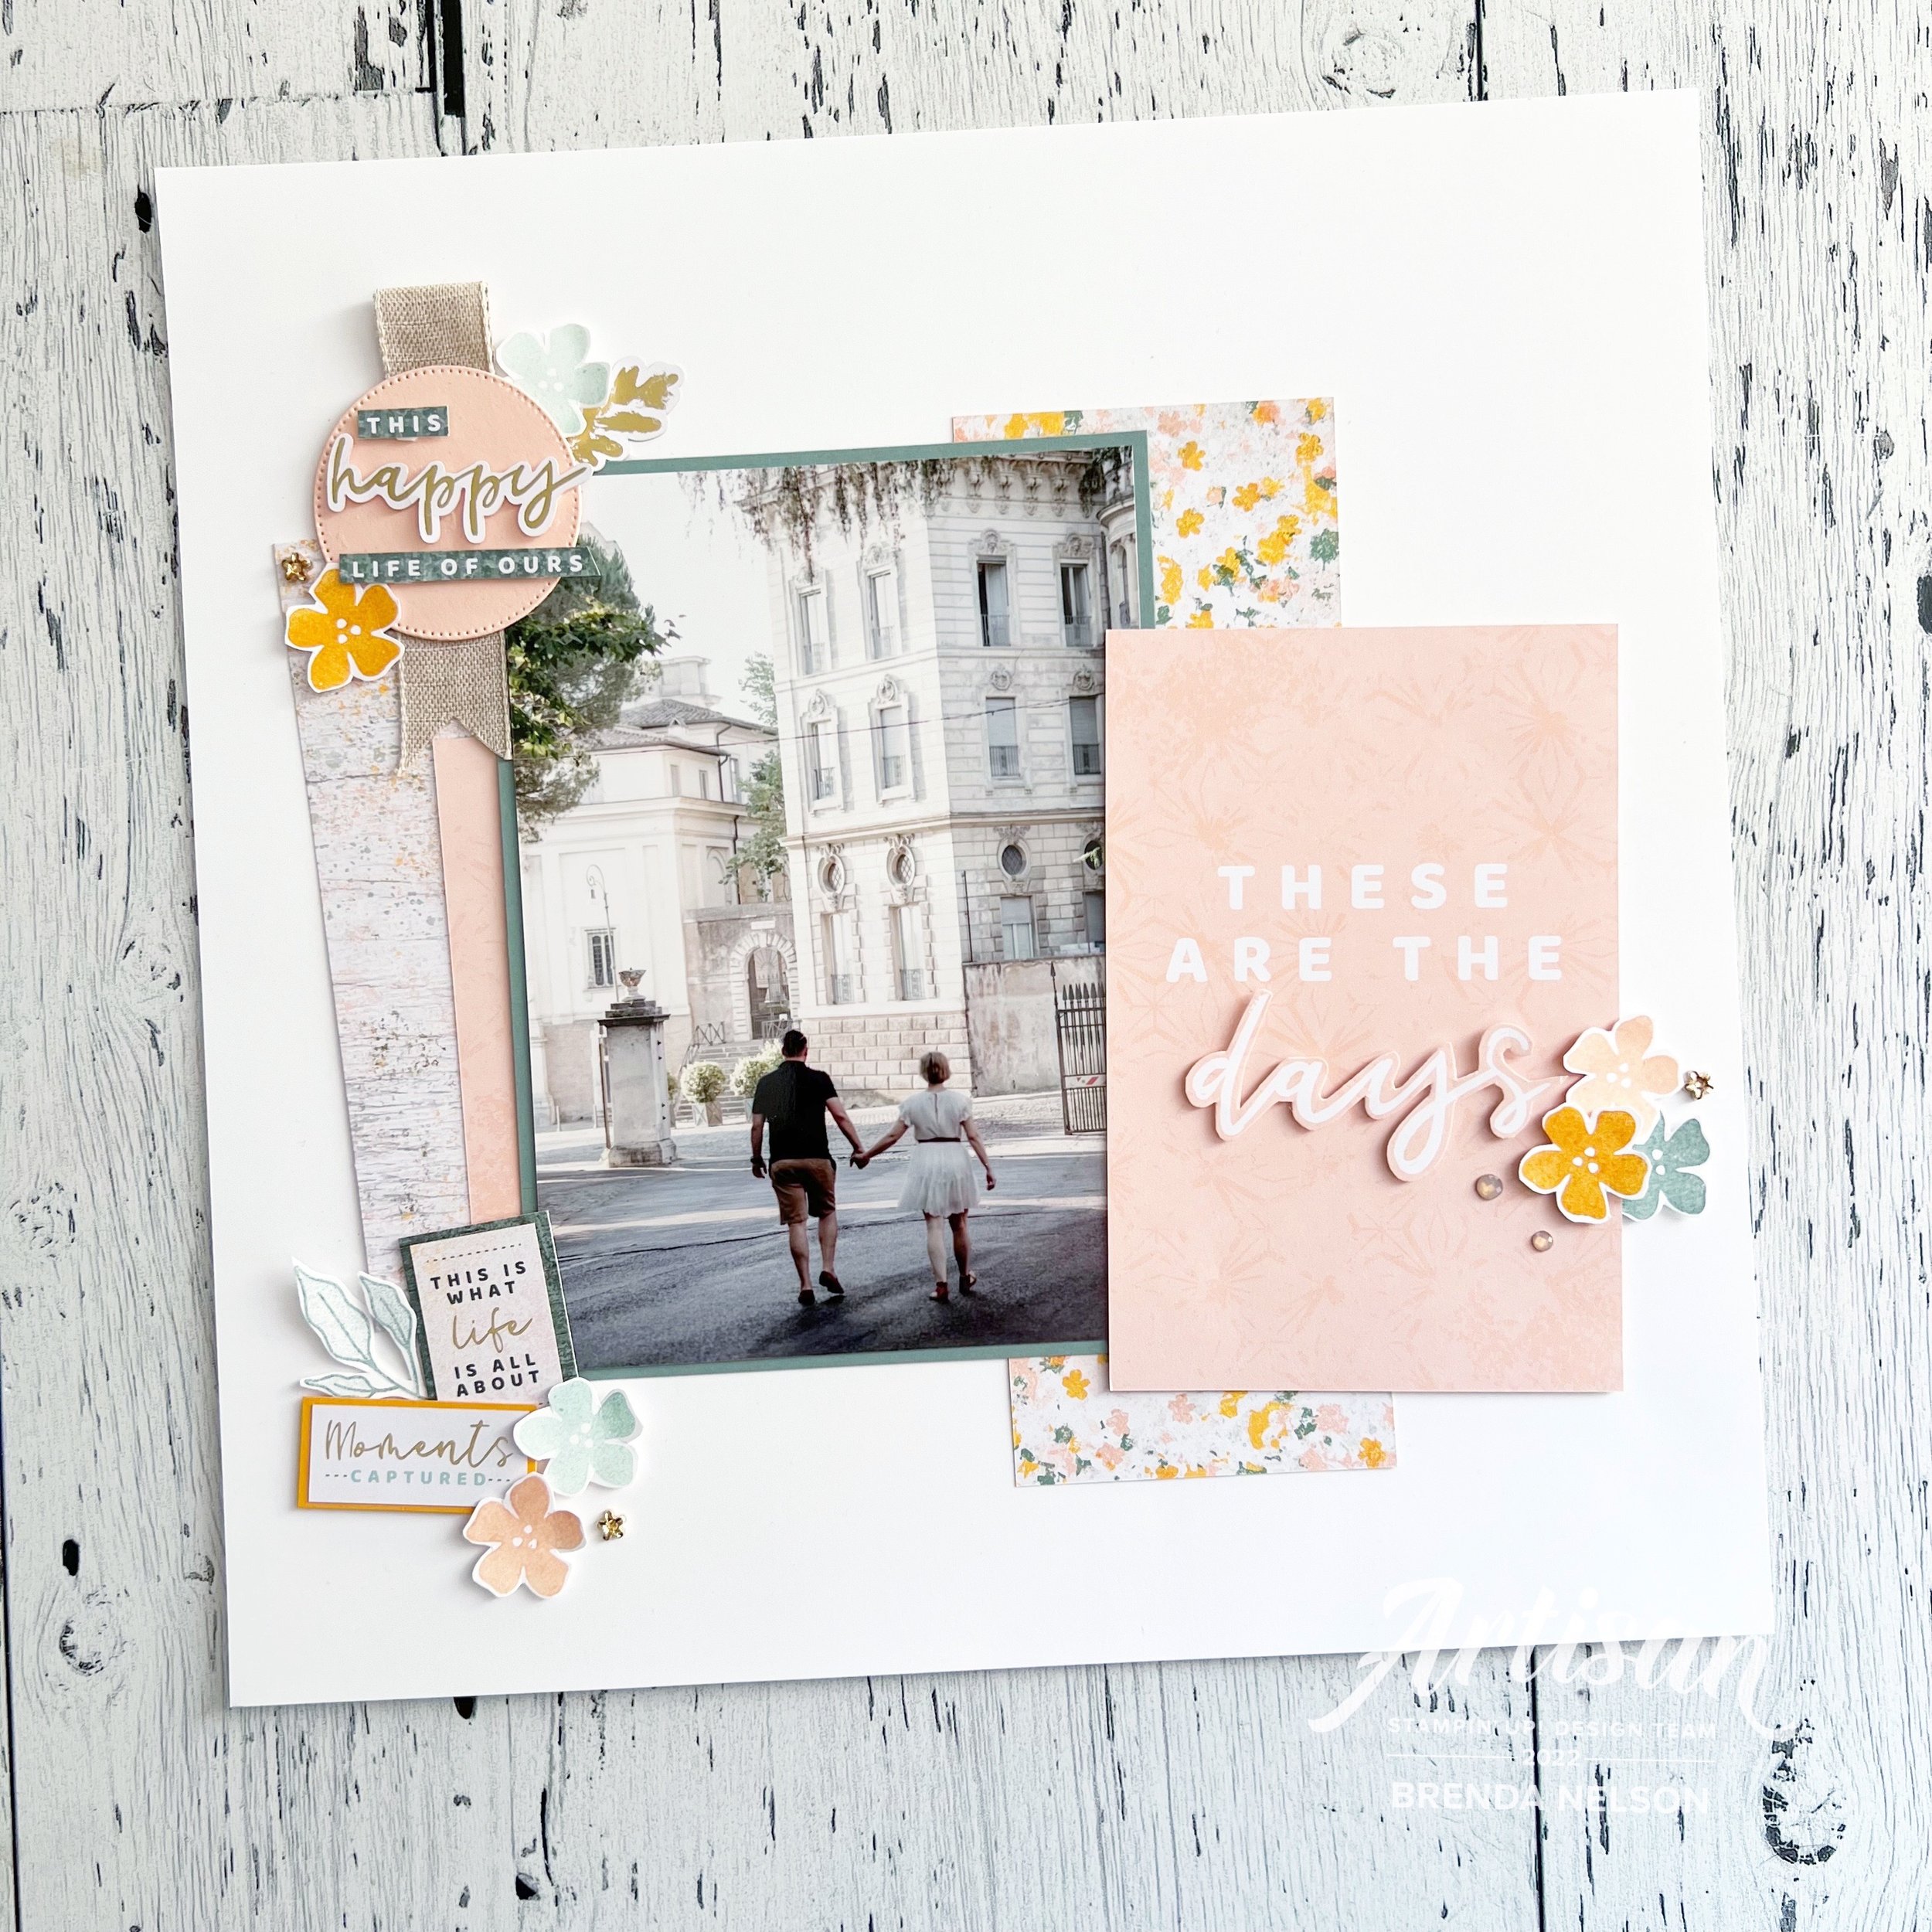
With a few additional supplies I was easily able to make this amazing page to capture this moment in Rome with my husband. This picture was taken on the Greece Incentive trip using a photographer we booked through Flytographer and was one of the best experiences we have ever had on a holiday!

Fun Fact: We were at our photography location at 6 am to take these pictures! It was worth the early hour to not have a soul around in our pictures!

Let me start by saying what I LOVE about our Memories & More cards—the thickness and style of the cards, a little stiffer than our regular card stock and DSP so they immediately add texture. The VALUE of the cards is amazing! You get double of everything which allows you the freedom to cut up a card and layer it if you need to (on the word ‘days’ for example), and finally the variety of phrases and sentiments in the collection of cards. I find there are some really unique sentiments not found in our stamp sets. And the concept designers have been knocking the collections out of the park over the past few catalogues!

And if there are coordinating Cards & Envelopes, make sure to get those too! I often use them as layering pieces—the envelopes are decorative so cut them apart for layering!

For this page I actually did add in a few stamped florals and greenery from the Framed Occasions stamp set so this is actually a hybrid project of sorts. The top left corner of this page truly represents all that I love about M&M cards. For example, I have die cut a circle using Petal Pink card stock and the Stylish Shapes dies and on top have added a sticker (yes! the cards come with stickers too which is brilliant) and then CUT APART one of the 3x4 cards to make a whole new sentiment. I layered some of the new Natural Finish ribbon behind along with some stamped flowers, another sticker and the cute little Flower Trinkets!

On the bottom left of the page I used 2 more stickers (like seriously, how perfect are they?) that I mounted on a piece of Mango Melody card stock and part of the M&M card that was left over after I snipped out those words. Don’t let anything go to waste! A couple more flowers and some greenery tied this area together with the first one—this is a design key. You always want to have repeating elements on your scrapbook page (in my opinion or style of memory keeping at least). :)


My favorite thing to do with this style of memory keeping is to cut one of the duplicate cards apart to layer on top of the original. By adding ‘days’ that is hand cut and popped up with a Dimensional we have truly brought this one dimensional card to life. And don’t get rid of the extra left over, if you look along the left side of the photo mat I have tucked it there to bring this color across the page! Its a pro tip for sure!

I also added a few of the Elegant Faceted Gems to this section with more stamped flowers and a Flower Trinket. Its the best way to add this color trio over to this side of the page.

If you haven’t tried Memories & More cards yet on a traditional scrapbook page I really encourage you to give it a try! The investment isn’t steep and its fun to play around with the many card options in your design!

Make sure to check out my stories so you can see what everyone else is creating and sharing! If you are in Canada and would like to order anything, please visit my store with sincere thanks in advance and send me a message if you are interested in joining in any of my classes!

#sevendaysofscrapbooking

Seven Days of Scrapbooking--Day #1

Hello all of my friends! I am so happy you are here to spend Seven Days of Scrapbooking with me! Some of my crafty friends and I were talking about my A Card a Day in May Challenge and got on the topic of scrapbooking and how fun that would be to make a page a day! Well I don’t have the luxury of that amount of creative time but we thought that Seven days could be manageable! So make sure to follow my Seven Days of Scrapbooking on Instagram and here on my blog!

I also have a Scrapbooking Gallery that you are welcome to enjoy!

My first page to share with you just makes me so happy! I love the colors of the page and the picture is one of myself and my kids at our local zoo. Memory keeping is honestly the best thing I have ever prioritized in my life. I would rather make scrapbook pages than cards and I truly cherish my many many many albums I have created over the years.

The most important things we have in life are the people we have and the memories we make together.

I miss this fun age of my kiddos! Time goes too quickly and with my son graduating on Friday, I am definitely feeling all the feels!

The base of this page is Pool Party (one of my fav colors) and I used our new Hostess Designer Series Paper—Design a Daydream to guide the color palette.

I stamped some flowers from the Fresh Cut Flowers stamp set in the background (do not overlook this stamp set in the new Annual Catalogue) in Pool Party ink so it was a subtle detail to flank my photo. I have noticed that I tend to use 5x7 photos the most frequently in my designs. So I am going to challenge myself during this Seven Days of Scrapbooking to break free from that.

The rest of my design is a mash up of the Sweetest Cherries and Sending Smiles stamp sets.

The little teeny hearts are from the Teacup Dies and the adorable Heart Pearls!

I tend to create what I called ‘Vignettes’ to support my photos. After all, my picture is truly the most important thing on my page and I rarely create a page without a photo! My photo completely guides my design process.

So for this page at the bottom right I decided to create the sentiment “Life is Sweet with you in it” from the Sweetest Cherries stamp set. In fact when I am picking stamp sets to purchase I do look at them through the lense of scrapbooking and how I can incorporate them into page design.

The ‘Life is” portion of my sentiment is die cut using the Teacup Dies. I also stamped the floral image from Fresh Cut Flowers onto the circle (cut from the Stylish Shapes Dies) to tie in the imagery with the background of my page. This is a subtle way to take away the ‘whiteness’ of the Basic White circle as well.

Because this picture was taken during the summertime I also wanted to add some greenery so I reached for the Forever Flouring Dies to cut some shapes in Old Olive and the Vellum Layering Designs.


At the top left corner of my page this little ‘vignette’ also includes the Forever Flourishing Dies along with the new Natural Finish Ribbon and sentiment from the Sending Smiles Bundle.

Both vignette areas have elements that repeat for connection and a cohesive feeling on the page.

I hope the Seven Days of Scrapbooking encourages and inspires you to make some pages for yourself! And if you live in the YEG area, I teach tons of scrapbooking classes each month. Please message me if you are interested in getting started or joining in the fun!

If you need any supplies, please consider shopping with me so I can continue to do what I love!

Check back tomorrow to see another scrapbook page!

A Card a Day in May--Day 7!!

Hello friends! I have another manly man card for you today! I am excited as this card will be a part of my upcoming The Man’s Man card class in early June! So consider this a fun little sneak peek! And if you live in the YEG area I hope you will consider coming to one of my “In Person” card classes this year!


I was so excited about this new Brewed For You Bundle in our new annual catalogue. A: because I enjoy BEER and B: because BEER is Fun and C: its awesome to see some more ‘manly man’ stuff in our catalogues!

I used Night as Navy as the base and first layer for this card while stamping some fun beer mugs on the base in the same ink color.

I wrapped some of the Fan Bakers Twine around the first layer and over top I added the largest square from the Stylish Shapes Dies #addtocart

Hot Tip: Click with shop with me button or product images at any time to be directed to my online store

Even though this card is in a more manly man color scheme (Night of Navy, Early Espresso, Cinnamon Cider and Crushed Curry) you can still give it to a beer loving gal pal or re-create it with a more gally gal color palette!

The two different been mugs are stamped with Momento Ink and then I very lightly added a touch of Balmy Blue ink with a Water Painter to accentuate the glass. The detail on the foam has a bit of Dark So Saffron added with the Stampin’ Blend.

Both mugs and foam are popped up on Dimensionals as well. The sentiment ‘Another Round for Your Birthday’ is stamped in white craft ink and embossed. I also used the Stylish Shapes Dies to cut the sentiment.

And lastly I added a few of the dark blue rhinestones from the Waves Rhinestones because secretly I think men like bling.

Hope you are enjoying the first WEEK of A Card a Day in May—31 projects will be shared this month! I can’t wait as I am also MAILING a card a day as well! This is great motivation for me! :)

shop with me

Color Fusers April 2022

FRIENDS!! I cannot tell you how excited I was about this month’s color combination challenge! I say challenge, because some months they really are, but not this month! I had instant inspiration for this project. Don’t you LOVE when that happens?

Look at this awesome combination of Crumb Cake, Bermuda Bay, Old Olive and Bumblebee. Let’s have a moment of silence for Bumblebee as it is heading into retirement. In Disney speak we would say ‘The Vault’. Hahaha! But you never know, previous In Color’s have returned as permanent Stampin’ Up! colors—like Coastal Cabana!

As soon as I saw this combo I thought of this amazing photo of my daughter Summer on the Thailand Incentive Trip in 2017. I absolutely LOVED sharing this experience with Summer. The travel to arrive in Thailand tested me beyond belief and often when I think something is hard, or “I can’t do this”, I actually think of that experience! If you know, YOU KNOW! The travel was like nothing else and I hope to NEVER repeat it again!

And because of that, the moments we spent together on that trip, have even more value to me. As a mom, I will never ever forget being able to share that with Summer.

This picture of Summer was taken at Ao Bang Thao right off the shore by our hotel

I started with a base of 12x12 Bumblebee card stock and layered a nice big piece of Designer Series Paper from the Daffodil Afternoon Sale a bration collection. This pattern was PERFECT for these pages! The strip of Bermuda Bay stripe is from the Sunshine & Rainbows SAB DSP too. Who does not LOVE free paper!

My photo mat is Crumb Cake and then I incorporated all of the colors from our challenge into my design using the Artfully Layered Bundle. I have created so many projects with this bundle, its just amazing!

The Tailored Made Tags are a must have in my craft room. I use them consistently on scrapbook pages and of course in card design. I would suggest #addtocart if you haven’t already!

“You are Amazing” is die cut using the Amazing Thanks Dies and they are just the perfect accent to this page. Layered on a Tailor Made Tag with a bit of ribbon and twine is such a great way to incorporate a sentiment onto your scrapbook page.

I used a mix of die cut elements, some stamping and coloring with Old Olive Stampin’ Blends and just basic stamping to create texture and dimension to help tell the story of this tropical adventure we had together. My design style always incorporates embellishments and the Playing With Patterns Resin Dots were perfect for this page.

Happy & Heartfelt is another stamp set I have barely put back on my shelf! I love the variety of sentiments and this one was just right for the top left of this page. I added a little heart from the Sweet Hearts Dies and the sentiment is cut from a new up and coming die set called Stylish Shapes. These will be another #addtocart item I will suggest once the new Annual Catalogue begins in May.

When I designed Stamps & Stretchy Pants a few years ago it was to serve two purposes. The most important was to create this digital legacy for my kids. I wanted them to be able to go some place to see our Favorite Family Recipes (yes, I have a whole recipe section under Lifestyle) and be reminded of my passion for scrapbooking and card making. I think it will help them get to know ME beyond just being their MOM and that is really important to me. Secondly, I really really really wanted to apply for the Artisan Design Team so I needed a blog!

And because my blogs spirit is to record in a digital aspect, my life, I have chosen to add a few fun photos of our trip to Thailand together! I hope you don’t mind! :)

I hope you are inspired by this amazing color combination! I would love to see what you create so share it on Instagram and tag me! You can find me @stampwithbrenda

I cannot wait to see what the rest of the Color Fusers Team has created this month with the bold fun color combination!

Next up is one of my former Artisan Teammates from the 2021 year. You will absolutely LOVE what Janneke has designed, I have no questions about it. She is so talented and has such a lovely style! Just hit 'NEXT STOP’ to check out her creation.


If you would like to go in reverse or jump back, click on the button below and you will find yourself directed to my fellow Artisan Design Team member Tami! I cannot say enough about how kind and generous and amazingly talented Tami is, so please make sure to go all the way around the Hop. You do not want to miss any of the creativity on this team!

If you are inspired to create anything based on my scrapbook page, please do! And if you need any supplies and live in Canada, you can easily shop with me by hitting any of the product images below!

Hello Ladybug Artisan Design Team Project

Hello friends! This month my group on the Artisan Design Team was assigned the Hello Ladybug Bundle to create with. I was really excited about this bundle as I immediately saw my cute ladybugs in pastel colors. That is the best thing about being the designer, we can create things in any color schemes we like!

I had the perfect picture of my kids for this page layout. This was taken several summers ago at our local zoo. I let the colors of the greenery impact the color of green I used in my layout.

Each month along with our projects we need to share a tip with everyone and as soon as I saw the Ladybug Builder Punch I knew I wanted to share my template tip. Each time we introduce a new builder punch I created a template. The template allows me to align my stamps on a block with perfect precision and have them punch out with little to no paper waste. I then store the template in the stamp case so I always know where to find it.

After you have created the template place the stamps on an acrylic block using the template, stamp and punch!

For both of the projects I designed I used the Vellum 12x12 Layering Designs. I absolutely love this vellum and am so happy it is in a 12x12 format for scrapbooking. Both projects also use DSP from the In Color 2021/23 In Color 6x6 stack.

The colors I used to create my scrapbook page and card are Fresh Freesia, Pale Papaya, Garden Green, Flirty Flamingo and Basic Grey. Black felt like too much of a contrast for the ladybugs so I softened them a bit by using Basic Grey.

Top Tip: Did you know that the daisy in the Hello Ladybug stamp set can be cut with the Medium Daisy Punch in the annual catalogue? I was so excited about that!

I did hand trim the leaves and the flowers to add as accents onto my scrapbook page. I added some of the Polished Dots as embellishments. They are such a great embellishment as they coordinate with everything!

I hope my projects have inspired you to think about using this cute little bundle for card making and scrapbooking! Make sure to check out the whole Artisan Design Team’s projects this month. You will be amazed at what everyone has designed!