Holly Jolly Santa

I was recently asked to be a guest designer for a super exciting Instagram account that I follow and many of you know and love! This is actually my OUTTAKE project as when they approached me and gave me a list of stamp sets to chose from, I choose this set—or so I thought! haha! Turns out I had my stamp sets mixed up! So this project is now going to be inspiration for you!

The best part is I spent quite a bit of time thinking about this card and the design, so I cannot let it go to waste! This was actually the first time I broke the seal on the Picture This Dies even though I have had them since June! Does that ever happen to you? You buy something and then get distracted from using it?

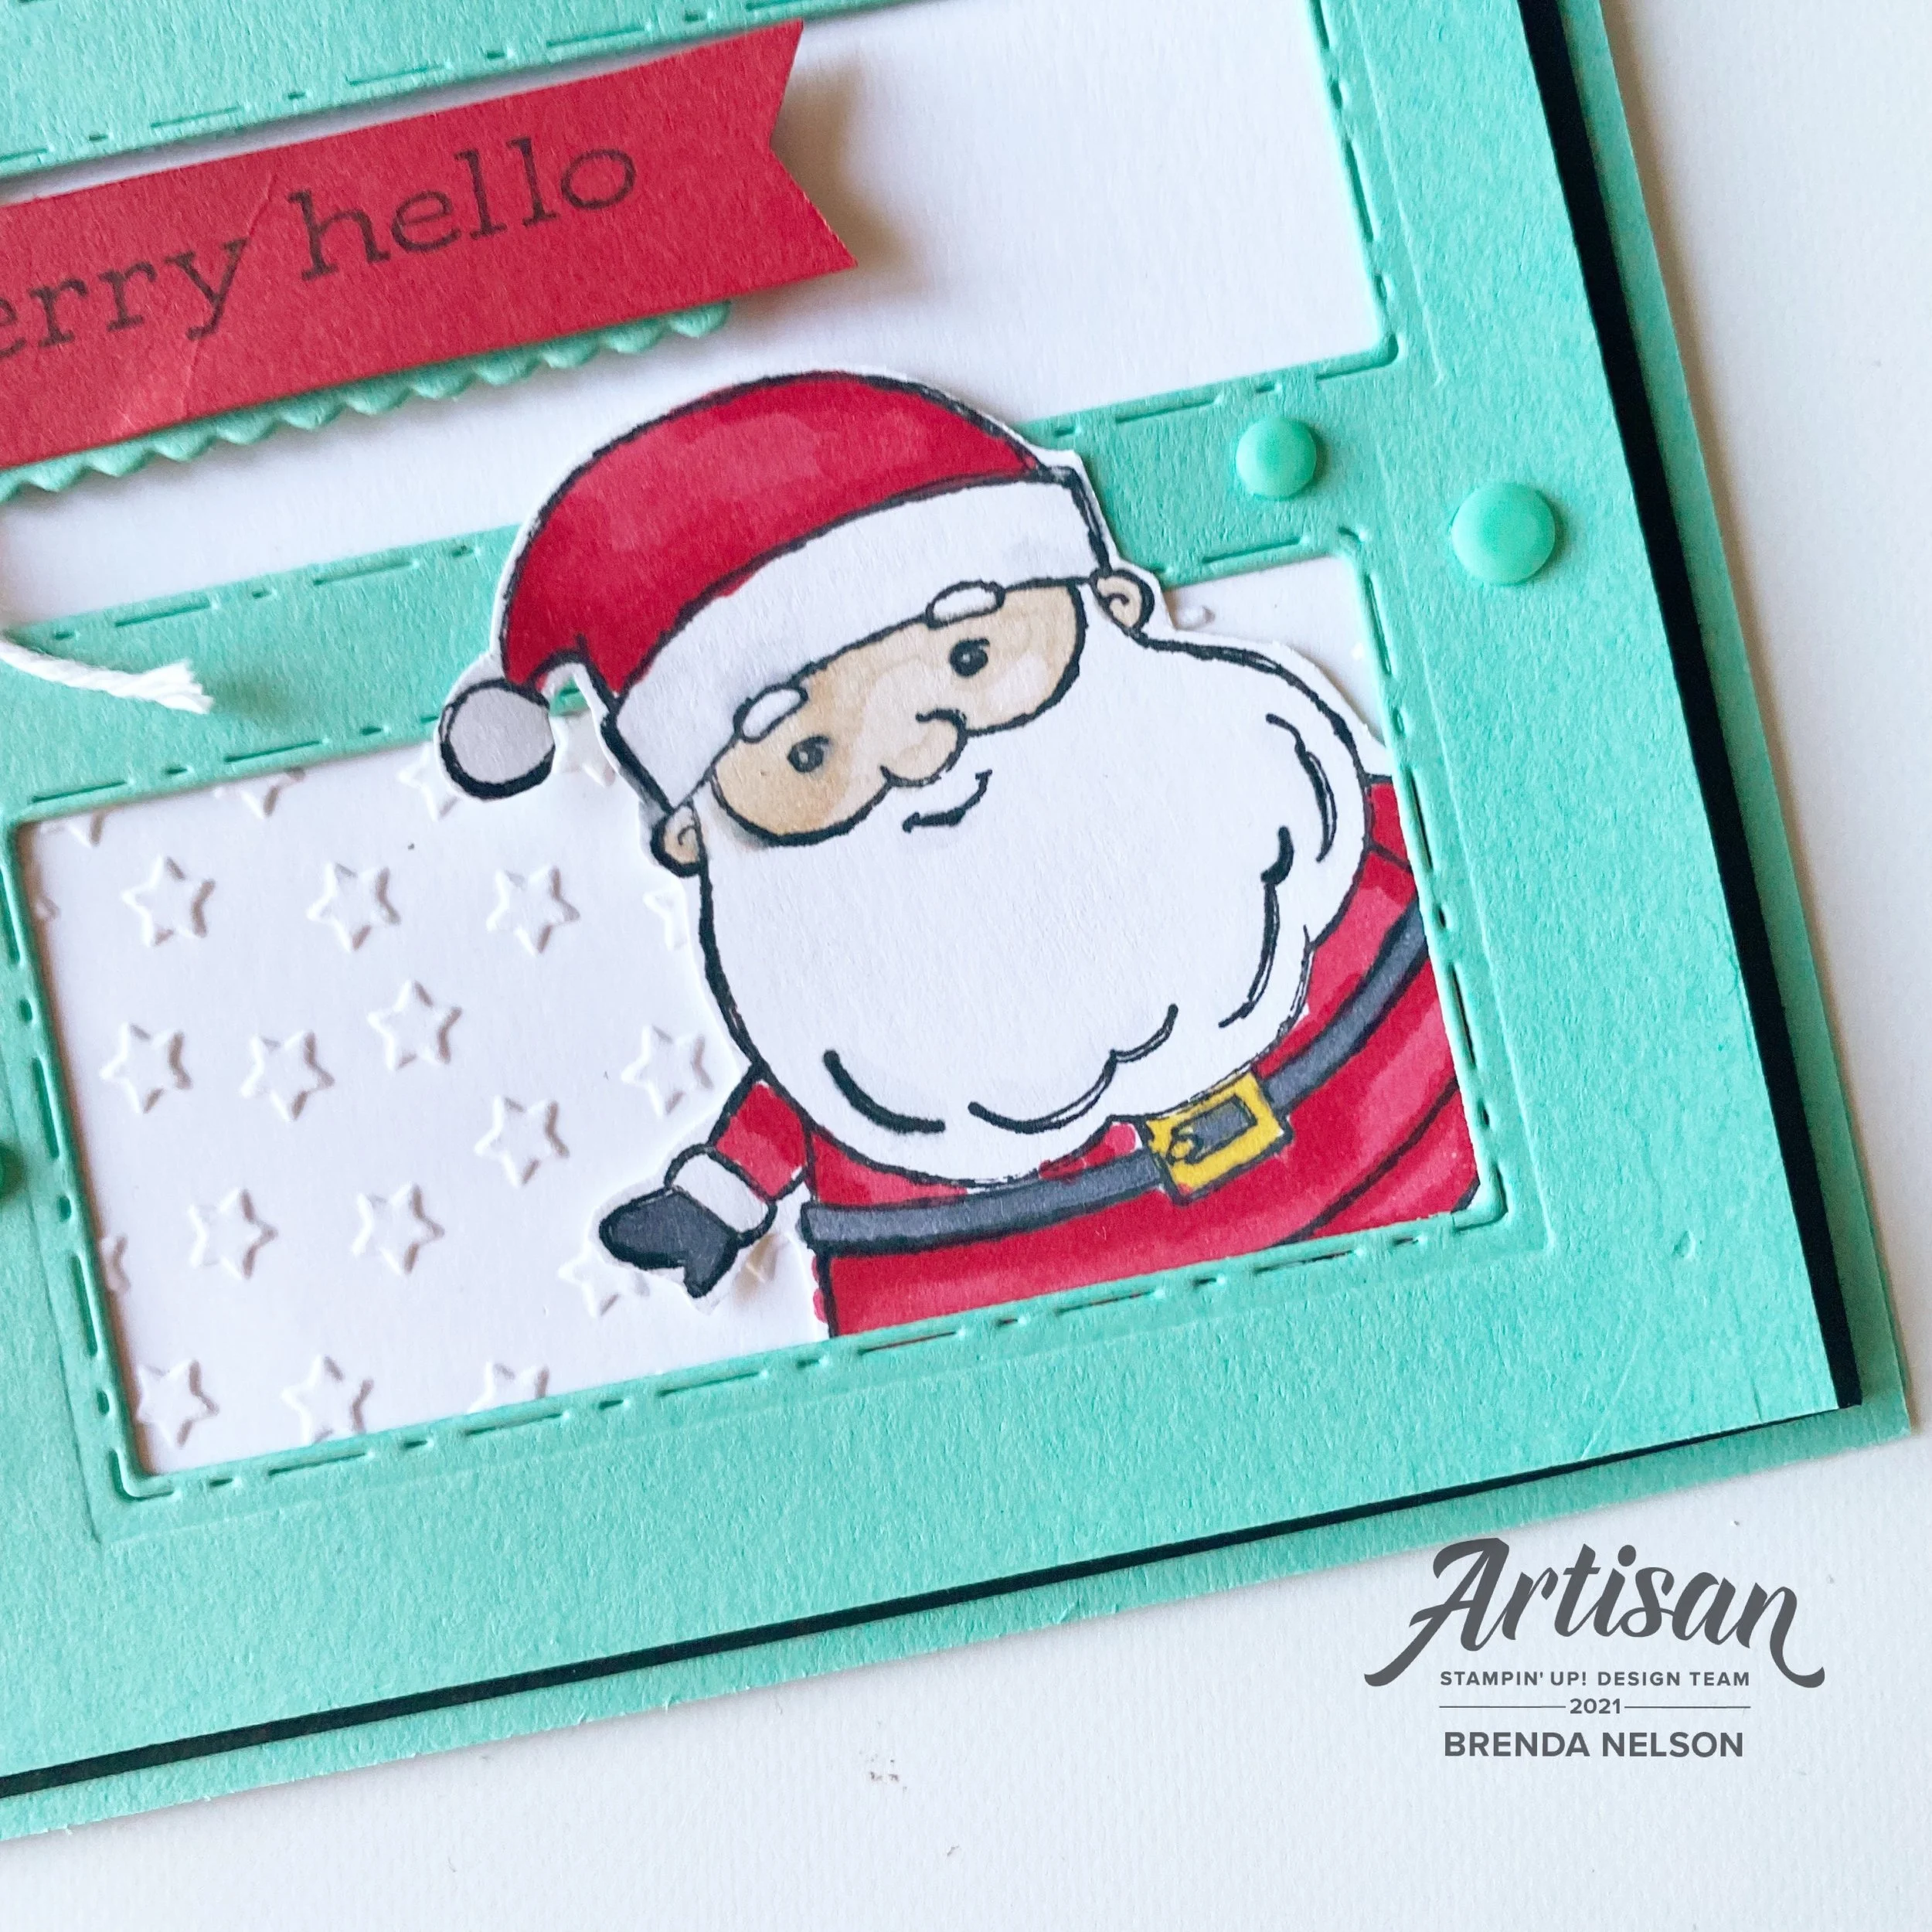
Well I do LOVE how this project came out in the end. I tried to create 3 little panels that felt unique. The base of the card is my favorite color Coastal Cabana. The first layer is black and then a layer of Basic White was added in after another layer of Coastal Cabana was die cut with the Picture This Die.

In the first panel I stamped the little star from the Be Jolly stamp set on the Basic White layer using Smoky Slate ink. My first Santa is stamped with Momento Ink and colored with the Stampin’ Blends markers in Real Red, Ivory, Basic Black and Petal Pink. I use the Petal Pink chubby tip to add a dot too each of Santa’s cheeks for a hit of rosy. I also use the light Smoky Slate Stampin’ Blend to add detail to his beard and hat pom pom.

I love how the Picture This Dies leave a stitched detail behind. And do throw away all the little bits that get cut out, those can definitely be used on a new project!

I like to add details to my sentiments so for this project I added a little bitty scalloped detail underneath the “A Merry Hello” by using a die from the Stitched So Sweetly Dies and a bit of white twine from the Bakers Twine Essentials Pack!

You can see just a hint of the bottom panel—I ran it though the Star-Crossed Embossing Folder, focusing just on the star half of the folder. I added a ton of Coastal Cabana Playing with Patterns Resin Dots to my card to play up the fun and whimsy feel! This Santa is colored with the same Stampin’ Blends and both are hand trimmed with paper snips to tuck into the little panels.

So even though this card is my OUTTAKE I think its pretty damn cute! And I am wondering why the heck it took me so long to use the Picture This Die set! You will definitely be seeing it in the future! I hope everyone has a merry day and if you are inspired to create your own project, please consider shopping my store if you live in Canada!


Comments are always welcome and appreciated!

Happy 50th Anniversary!

Did you know that can make Custom Cards? It is a service that I offer if you do need an extra special project! I have experience designing custom wedding invites, baby shower invites and even anniversary cards like this extra special one I made for my friends parents!

The only request my friend had was that I used some gold on this special card for her parents. I incorporated it on the 50 using Gold Foil paper and on the inside layer with the Shimmery Gold Vellum. Because the rest was left to me I decided to use brand new upcoming products with a bunch of favorites and retired products.

The star of this card though is the flower from the Blessings of Home stamp set. This set will be released in the upcoming January-June catalogue and I know you will love it as much as I have already! I colored this in using ink pads and a Water Painter and my lazy watercoloring technique. The stamp was stamped using Basic Grey ink in place of traditional black to give it a bit of a softer touch.

The sentiment is from a favorite retired stamp set of mine, Many Mates and is punched using the Label Me Fancy punch. I added a little bit of gold thread behind the sentiment. The card is a “fun fold” and is elegantly tied together with some of the White Crinkled Seam Binding Ribbon.

I added an extra panel of Basic White card stock to the front panel of the card. The fun flap is in Soft Seafoam card stock and the flap part was run through the Timeworn Type 3D Embossing folder to a add a subtle bit of textrure.

When you open the card you see a gorgeous panel of Shimmery Gold Vellum which I just love. You can see a tiny bit of a scalloped edge along the fun fold panel. I cut this with a die from the Peony Dies.

I stamped another floral image from the Blessings of Home stamp set and colored it with the same technique as the front. “Congratulations” is from the stamp set Inspired Thoughts in the Annual Catalogue. I added a few retired little pearls from the Share What You Love collection to complete this project.

I was told my friends parents absolutely loved their card and I was so happy to create it for them!

If you are ever in need of something extra special, please reach out to me, I would love to design and create something for you too!

Color Fusers November 2021

Hello friends! Wow, did October ever go by quickly! Its now November 1st and officially Christmas season. Fall and halloween are dead, bring on the holiday! Although that is NOT what I am sharing with you today! Our color combo this month could be viewed as a tricky one as the 4 tones are all quick dark, however I had the best pictures to work with this color theme!

IMG_3964.jpg

This month our crafty group is creating projects with Merry Merlot, Misty Moonlight, Cinnamon Cider and Early Espresso. Back in July I had a Besties Photo shoot with two of my long time friends and we did a little picnic afterwards. The picnic set up totally reminded me of Misty Moonlight and a pattern from the In Good Taste Designer Series stack so I used that as my inspiration to design this page.

These are two of my besties I met while in University! We hit things off working at a restaurant together.  We have actually not all lived in the same city for over 20 years but despite the distance I know they would have my back always and no matter what #friendsforever

These are two of my besties I met while in University! We hit things off working at a restaurant together. We have actually not all lived in the same city for over 20 years but despite the distance I know they would have my back always and no matter what #friendsforever

I started with a 12x12 in Misty Moonlight and on the top half of the page I stamped the large flowers from the Blossoms in Bloom stamp set. I actually love this stamp set as I love a good image that can fill in space. I stamped it in the same ink color for a tone on tone look.

The bottom of my page features the In Good Taste DSP with a couple of strips of Cinnamon Cider DSP from the retired In Color 6x6 stacks (last years design). Adding this strip felt like a natural way to incorporate this color and create division between the two sections of my page.

Are you an F Bomb kind of mom? Hahaha, we are and my friend had these cups designed especially for us!

Are you an F Bomb kind of mom? Hahaha, we are and my friend had these cups designed especially for us!


I used Early Espresso card stock as my photo mats and I ran them both through the Timber 3D Embossing Folder for a subtle effect.

It was easy to add in Merry Merlot by die cutting some flowers from the Pierced Blooms Dies. This is one of my favorite die sets in the Annual Catalogue!

I added some retired In Color Enamel Dots and the sentiment is from the Blossoms in Bloom stamp set.

final (4).jpg

You can find the sentiment “Friends Forever” in the Lighthearted Lines stamp set. NOTE: Friends Forever is part of a phrase and l used my Paper Snips to do some Stampin’ surgery on this rubber stamp as I really wanted to use this part of the phrase all on its own.

The label is also a die from the Pierced Blooms Dies and I added a bit of retired Cinnamon Cider ribbon behind and some gold thread.

final (1) 3.jpg

I am so pleased with how this page turned out using this color combination! I cannot wait to see what the other girls create this month! Please visit everyone’s blogs and share some love and comments! And if you don’t follow me on Instagram you can find me @stampwithbrenda

You can go backwards to see what Melissa has created and forwards to see what Melanie has designed! I know they will both wow you with their creativity!

Have an awesome November and see you next month! If you live in Canada and are looking for some creative inspiration I would love you to stamp with me! Please reach out at any time!

31 Boo's to You

This is a little twist on Halloween because this card doesn’t actually say…Happy Halloween but its implied! Hahaha! I thought it would be fun to focus on ‘31’ as its the date of this fun holiday!

final (4) 3.jpg

The background of this card is created using the Alcohol Blends technique again and it really pops to have the vellum on a Basic White background! I used Rich Razzleberry, Basic Black and Night of Navy Stampin’ Blends to create this custom background.

I cut the glittery wreath and the tag using the Frightful Tags Dies. Have I ever gotten my money’s worth this holiday season! I have made countless projects using this die set!

The ‘31’ is cut using the Playful Alphabet Dies—-if you haven’t looked that closely at them, they do contain numbers as well. This is a great die set to have in your collection.

final (7) 4.jpg

I added the ‘Boo’ from the stamp set Thinking Thanks & Peace which is in the Holiday Catalogue. I love how the ‘Boo’ has a little ghost floating above. It reminds me of the ghosts in Pac Man!

The twine is from the Playful Pets Trim Combo Pack which also has a thin red and white ribbon—great for that upcoming other holiday!

shop with me

If anything has inspired you today or on any of your other visits to my blog, please consider supporting me if you live in Canada! I would love to keep doing what I love! Thank you!

Happy Haunting!

Hello friends! I offer 3 different scrapbook classes each month so of course for October we had to make some spooky layouts! I wanted to share one with you today that is a little more traditional Halloween than my pink and gold pumpkin page!

final.jpg

The base of this page is Pear PIzzazz and when I think of this color I picture the Wicked Witch of the West from the Wizard of Oz! Hahaha! I love how a color can evoke certain memories!

In a few select spots on the background I stamped some bats from the Sparkle of the Season stamp set in Pear Pizzazz ink.

Happy Haunting is from the Banner Year stamp set and is on a label found in the Pretty Pillow Box Dies. When you go through your dies you never know what you might find! Behind the sentiment I layered some Linen Thread and some of the Black & White Gingham ribbon! I just love that ribbon!


The Trick or Treat area is actually my favorite on the page as I incorporated ‘October’ from the Days to Remember stamp set is a really unique and subtle way that I love.

I die cut a label from the Seasonal Labels Dies and I ran it through a retired spiderweb folder, I just can’t part with it! Behind it I added a spooky black wreath from the Seasonal Swirls Dies.

The pumpkin is die cut using the Detailed Pumpkins Dies and I brought the sentiment to life by stamping mini spiderwebs on it (from the Banner Year stamp set) and adding some Black Glittered Organdy Ribbon.

final.jpg

Because I am obsessed with the spider web from the Frightful Tags Dies I had to add it onto this page too with a little “Happy Halloween” found in the Sparkle of the Season stamp set.

I added some Cute Halloween elements too—Trick or Treat and the little strip of DSP! And by having two placed to add photos I can snap two Halloween selfies!

If this page has inspired you at all, please reach out to me to see how you can join in my scrapbook classes! They are my absolute favorite and I am always excited to stamp with new friends!

You can message me at stampsandstretchypants@gmail.com