So Happy...

Today I committed to making a project that was just for myself—this might sound crazy but with all of my Artisan commitments and the various classes and groups I offer, most of my creative time is designated to that. So it was refreshing to make a scrapbook page, my favorite thing, for just me and to display in my crafty space!

IMG_4767.jpg

This is a picture from a family photo shoot 2 years ago already! Sometimes, moms can relate, I just can’t wrap my head around the passage of time. The days can be long but the years go fast, is such a perfect way to describe ‘time’ and this motherhood journey!

I started with a base of Basic White because I really wanted to use the So Happy bundle. I have had it sitting on my craft table for the last month and was itching to create a stencil of sorts to create some clouds. I also wanted to use this set in a non-traditional way as at first glance it looks like a birthday set. With a little creative design I think I did create a page that has nothing to do with birthdays!

I used Pool Party and the new Blending Brush to create the clouds. You could use any of our amazing blues, but I find Pool Party and Pretty Peacock look amazing together. I will be sad to say goodbye to Pretty Peacock next month but I am also excited to see the new In Colors that will be released.

I cut a ‘stencil’ using the cloud die from the Happy Die Set and then used its edge repeatedly create a cloud like look on my page.

I cut a ‘stencil’ using the cloud die from the Happy Die Set and then used its edge repeatedly create a cloud like look on my page.

I blended the clouds about half way up my page and added two feature areas to the page. The top left little area is where I was able to introduce Calypso Coral and Petal Pink—two other colors that I find look amazing together. The half 2 inch circles are from the new and exclusive Butterfly BIjou DSP and had a similar shape to the clouds which I liked.

Using the dies I was able to cut out the little banner in the Natural Touch Specialty Paper. I sniped it apart so it looks longer than it is in reality. “Happy” is stamped in Pretty Peacock and then cut with a Stitched Rectangular die.

I love to add texture and interest to my sentiments by combining different ribbons. Here i used the Polkadot Tulle ribbon and the gold thread from the Forever Greenery Trim Combo Pack.  The Gilded Gem and itty bitty gold star (from the dies) just ad…

I love to add texture and interest to my sentiments by combining different ribbons. Here i used the Polkadot Tulle ribbon and the gold thread from the Forever Greenery Trim Combo Pack. The Gilded Gem and itty bitty gold star (from the dies) just add a fun element!

What I also love about this bundle is how the different phrases build off of the word HAPPY. I was able to cut the die down a bit from its initial form to change its appearance a bit too. I cut the ‘Happy’ out of the Natural Touch Specialty Paper as well. This helps tie the two feature areas together.

I also modified how the ‘Happy’ looked by trimming the top edge off of the die and shortening the edges.

I stamped ‘to have you in my life’ on Petal Pink Card stock and stamped the stars in the same color. I used Calypso Coral for the actual sentiment. The stars are stamped using the four colors that make up this page and also serve to create continuity across the page.

IMG_4768.jpg
 

Making this page just filled my cup today! I am so blessed that my hobby is something I love so passionately and has become a business that has allowed me to stay close to home to raise my kids.

If you are inspired by this page and want any of the project supplies I used, please feel free to shop my store or use my Hostess Code!

IMG_4770.jpg

Create with Connie and Mary--Punch Art!

Happy Saturday! Thank you so much for joining us today while we create some projects with PUNCH ART…I won’t lie, this is a challenging theme for me! However, I have discovered a really easy way to transform my Daisy Punch into something super cute!

21SPSatHopWelcome.png

I also wanted to combine our design theme of Punch Art into something with Easter as that holiday will be here before we know it!

I paired up my Daisy Punch with the Arrange a Wreath Bundle to create this adorable Easter Card!

Isn’t this card just the sweetest? I love how it turned out!

Isn’t this card just the sweetest? I love how it turned out!

Okay, let’s talk creative details!

The base of this card is So Saffron and I added a small strip of Flowers for Every Season DSP to the left hand side of the card base.

I cut a wreath from Soft Seafoam and flicked my Granny Apple Green marker over top to add a little texture. Flicking a marker is my favorite technique! It is the simplest way to add texture and interest.

The box is stamped in Cinnamon Cider and is hand trimmed. The eggs however are cut with a die and are stamped in So Saffron, Flirty Flamingo and Pool Party.

final 10.jpg

The Punch Art aspect of my card in the bunny I was able to create with the Daisy Punch! Its literally SO EASY! Just punch yourself a daisy in a bunny friendly color and trim away all of the petals until you have 2 bunny ears left! I then just tucked this into the box so it looks like the bunny is peaking out! CUUUUTE!

final+45.jpg

Happy Easter is stamped in Granny Apple Green on Soft Seafoam card stock (who says you can’t mix greens?) and the teeny flowers on the wreath are found in the die set! A little Elegant Faceted Gem was perfect for the center.

I can’t wait to see what the rest of the Design Team shares this week! You can go BACK to see Melissa’s design and NEXT to see what Connie has created! Please feel free to use my HOST CODE (on the side bar of my blog) if you live in Canada :)

Around the World on Wednesday--3D projects!

Hello friends! I love when I can participate in a 3D Design Challenge because I loosely interpret 3D as anything but a card—-so the sky is the limit with what you can create! I can’t wait to see what everyone has designed this month!

91442295_10216484369808661_2887014979863576576_n.jpg

The days are getting sunnier and the snow is melting here in Edmonton, where I live! So I have definitely been feeling those spring vibes and I wanted to create a wreath for my front door to welcome in the change in season!

IMG_4631.jpg
 

I picked up a twig style wreath from my local craft store. Typically these are pretty inexpensive wreaths that have a lot of creative options.

I used hot glue to pretty much assemble the entire project from the flower construction to adhering everything to the wreath itself.

IMG_4625.jpg

The Butterfly Brilliance Bundle is really exciting and new right now so I knew that I wanted my spring wreath tot have some butterflies on it. I stamped them with Momento Ink and colored them with a light hand using the Water Painters and the following ink colors—Calypso Coral, Mango Melody, Just Jade and Mint Macaron. I also added Wink of Stella over top of the butterflies to give them a little glimmer.

I love that you can stamp all these butterflies ONE TIME and then die cut them all in one go! It makes creative projects like this so much faster to put together.

IMG_4628.jpg

I cut the word SPRING out using the Playful Alphabet Dies and the Foam Adhesive Sheets. The letters are cut from the Butterfly Bijou Designer Series Paper and are placed on a Stitched Oval that is stamped with some of the butterflies from the Butterfly Brilliance stamp set in Soft Seafoam. Behind the sentiment I created an oversized bow with the Fine Art Ribbon from the Art Gallery Suite.

The large Calypso Coral flower is created using the Heart Builder Punch. The inside is just a strip of Bumblebee card stock that I cut little slits into and rolled up to add to the center. When its rolled you just fan it out!


I used both of the daisy punches (original and medium) along with the Perennial Petals Dies to fill in my wreath. I stamped some medium daisy’s in Pool Party from the Daisy Lane stamp set.

The Blushing Bride and Calypso Coral flowers shown beside are created by cutting the flower 5 times and then stapling them together. You can then fold and squish them together and add a smaller flower into the center to hide the staple.

IMG_4626.jpg
IMG_4627.jpg

I love how the Perennial Petals Dies layer up so well to create so much dimension! The Pool Party flower shown here has 4 layers with an Elegant Faceted Gem in the center.

I am really happy with how this spring wreath project turned out and I can’t wait until I can display it on my door full time. Living here you never know when 3rd, 4th or 5th winter might kick in again! Hahaha! Probaby after May long weekend we should be safe.

Next up on the hop you will be visiting the awesome Tricia Butts in the United States! I love how our hop takes you all around the world!


Create with Connie and Mary--St. Patrick's Day!

Welcome to another Create with Connie and Mary blog hop! This week we are all sharing projects with St. Patrick’s Day in mind. Now you might think that Stampin’ Up! doesn’t have a lot to offer to support this theme but I think you will be pleasantly surprised with what we have created for you.

I just love our new spring imagery! This is something that Connie designs for us! She is one talented lady!

I just love our new spring imagery! This is something that Connie designs for us! She is one talented lady!

final (5) 2.jpg

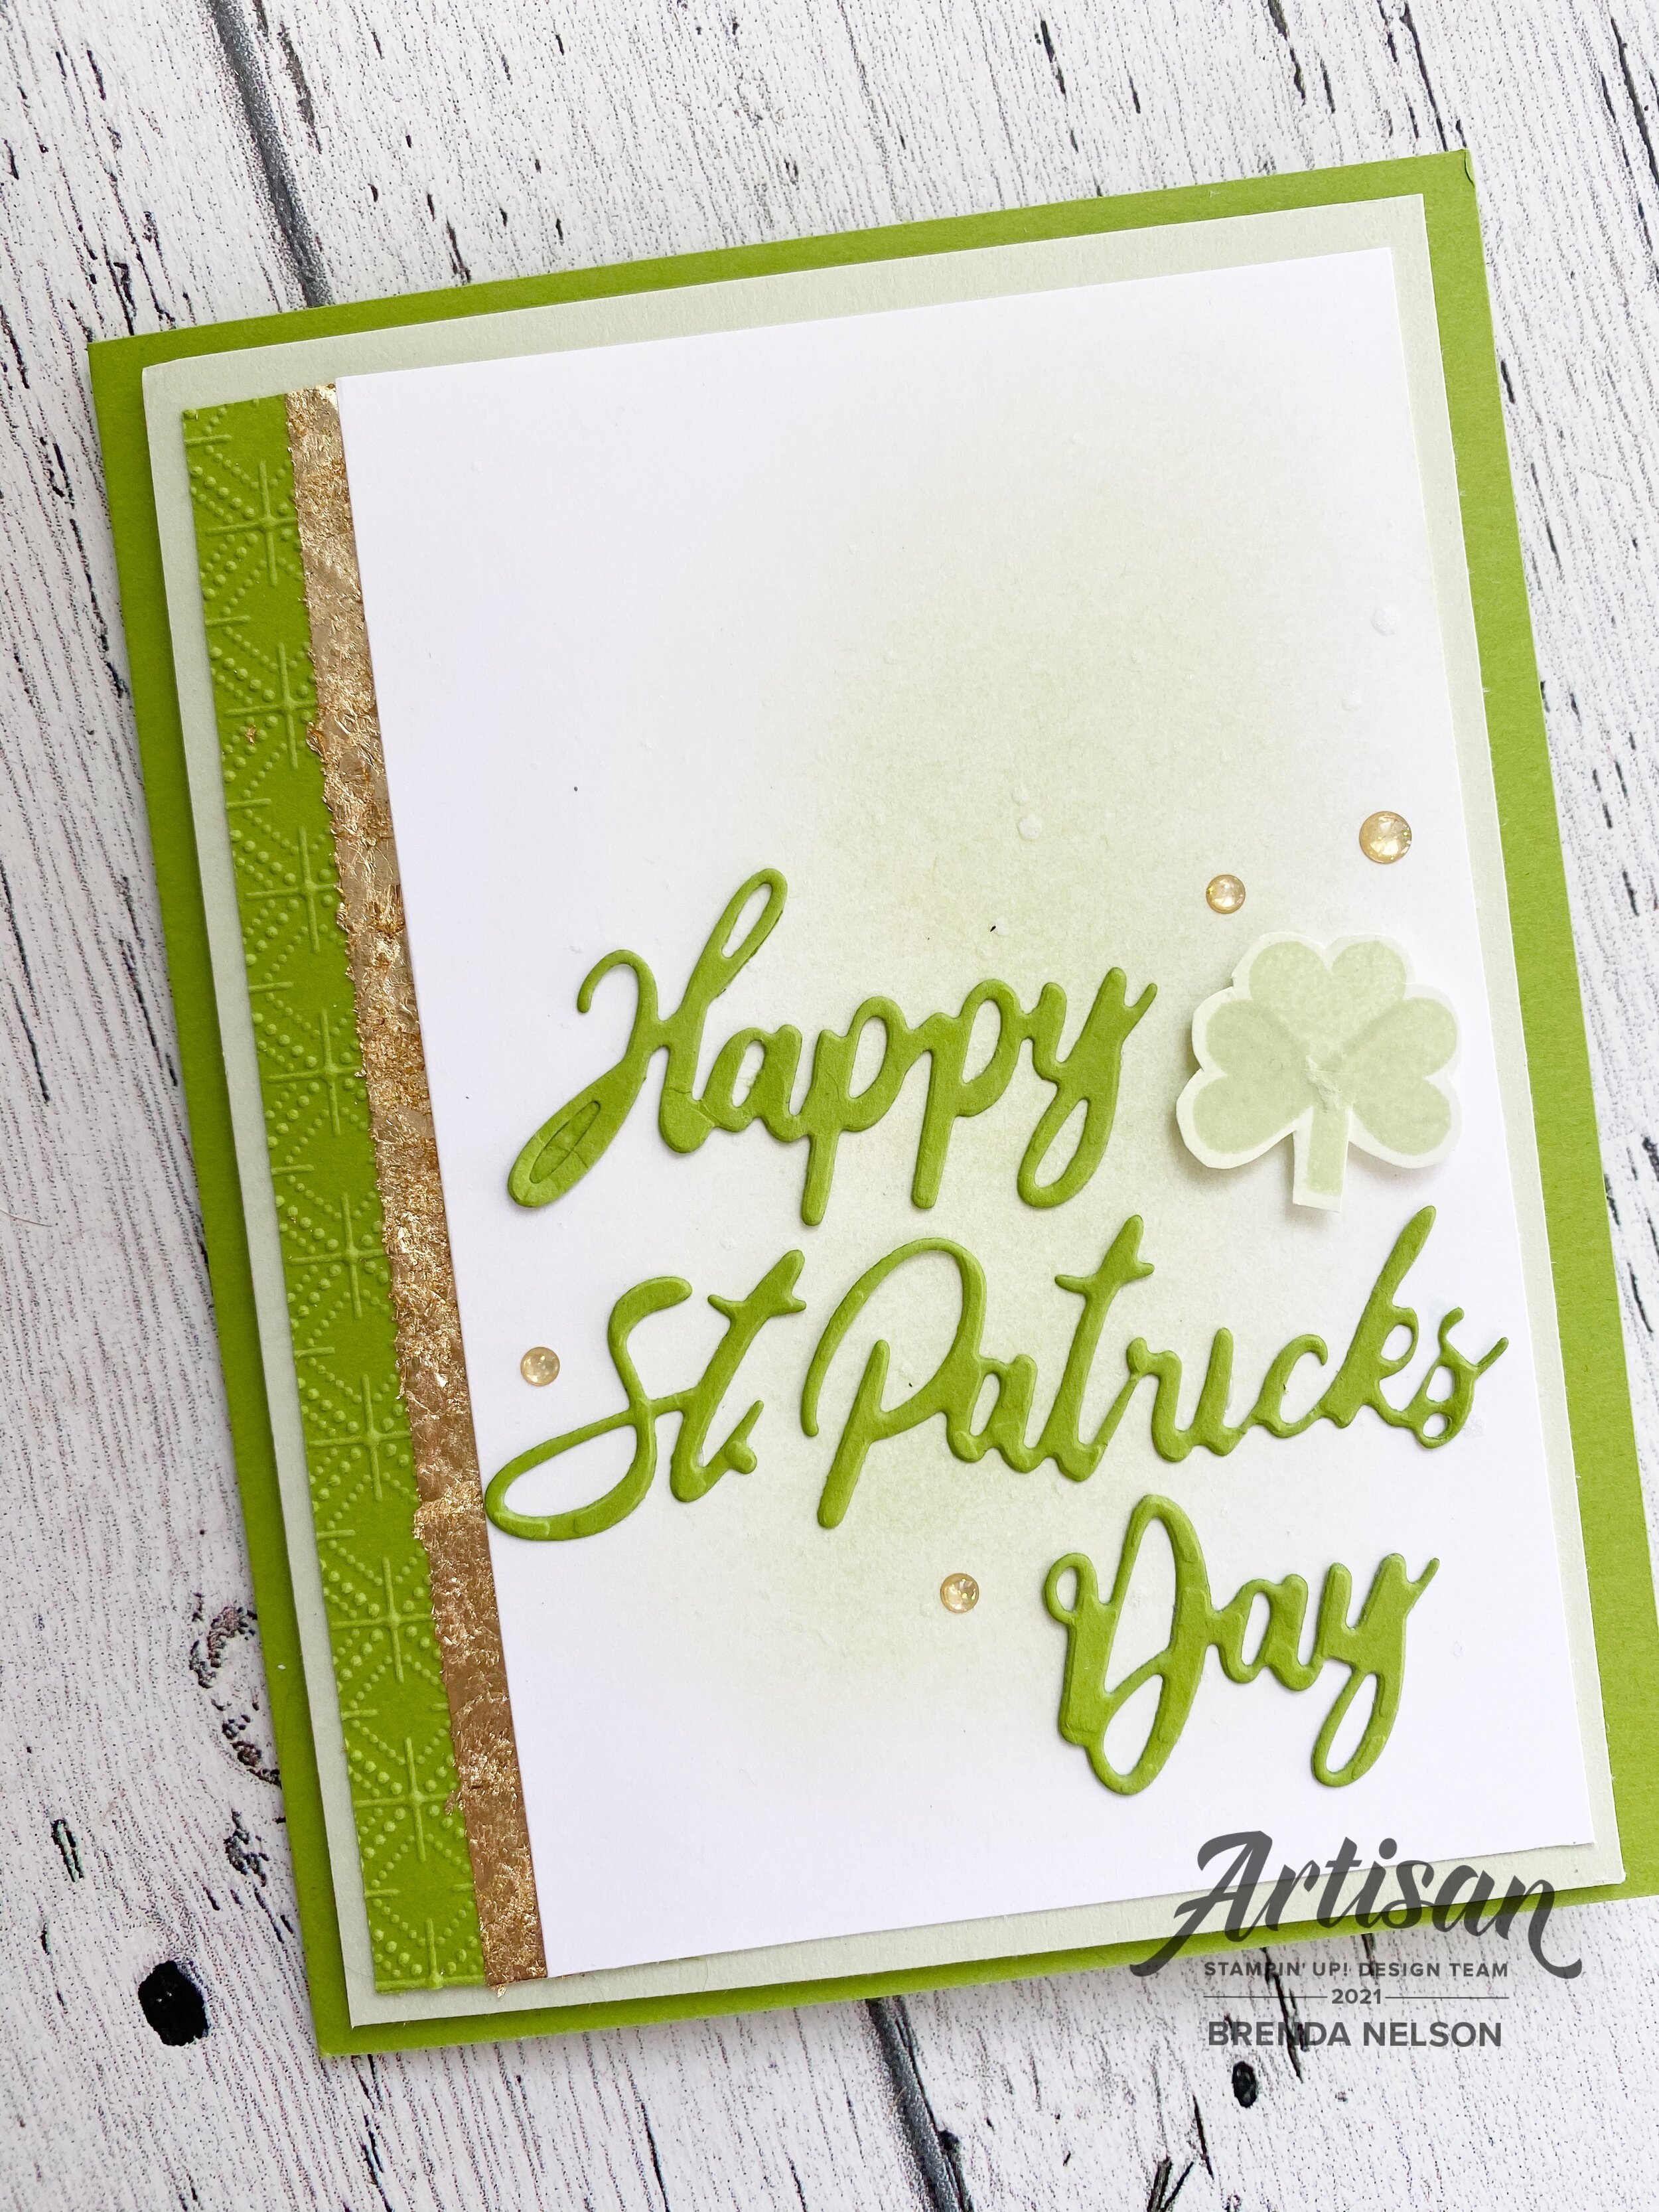
Did you know that we sell dies that have Happy St. Patrick’s Day as an option? It is actually one of the die sets that I like to suggest to new stampers because it has a lot of holiday options. It is called Word Wishes and can be found in the Annual Catalogue.

final (1) 25.jpg

I actually only used a few supplies to create ths card—-but there is some stamping! I began by lightly blending the background with Soft Seafoam ink and our amazing new Blending Brushes. I then flicked my Wink of Stella pen across the background to give it a fun shimmer. I die cut the sentiment in Granny Apple Green which is also the base of my card.

This initial layer is also on Soft Seafoam. I liked the idea of blending our softest green with our brightest green.

I wanted to add a shamrock because its synonymous with the holiday so I made my own with a small heart from the Lots of Heart stamp set and a Stampin’ Write marker for the stem! I hand trimmed it and added it by my sentiment with a Mini Dimensional.

final (10) 2.jpg
 

Gold is also an awesome accent for this theme so I added in some of the Gold Glitter Enamel Dots around the sentiment.

I wanted a little bit of detail along the edge of my card so I embossed a strip of Granny Apple Green card stock in the Dainty Diamonds 3D folder. Using my Tear’n Tape adhesive, I ran it the length of the card stock and pressed it into the Gilded Leafing embellishment for that amazing gold pop.

final (9) 2.jpg

I hope you enjoyed my card project, I had alot of fun designing it and I know the other girls with also inspire you with their creations! Please feel free to leave a comment and if you are in Canada you can shop with me anytime by using my Hostess Code shared on my main page!

Easy Watercolor with the Butterfly Brilliance Bundle

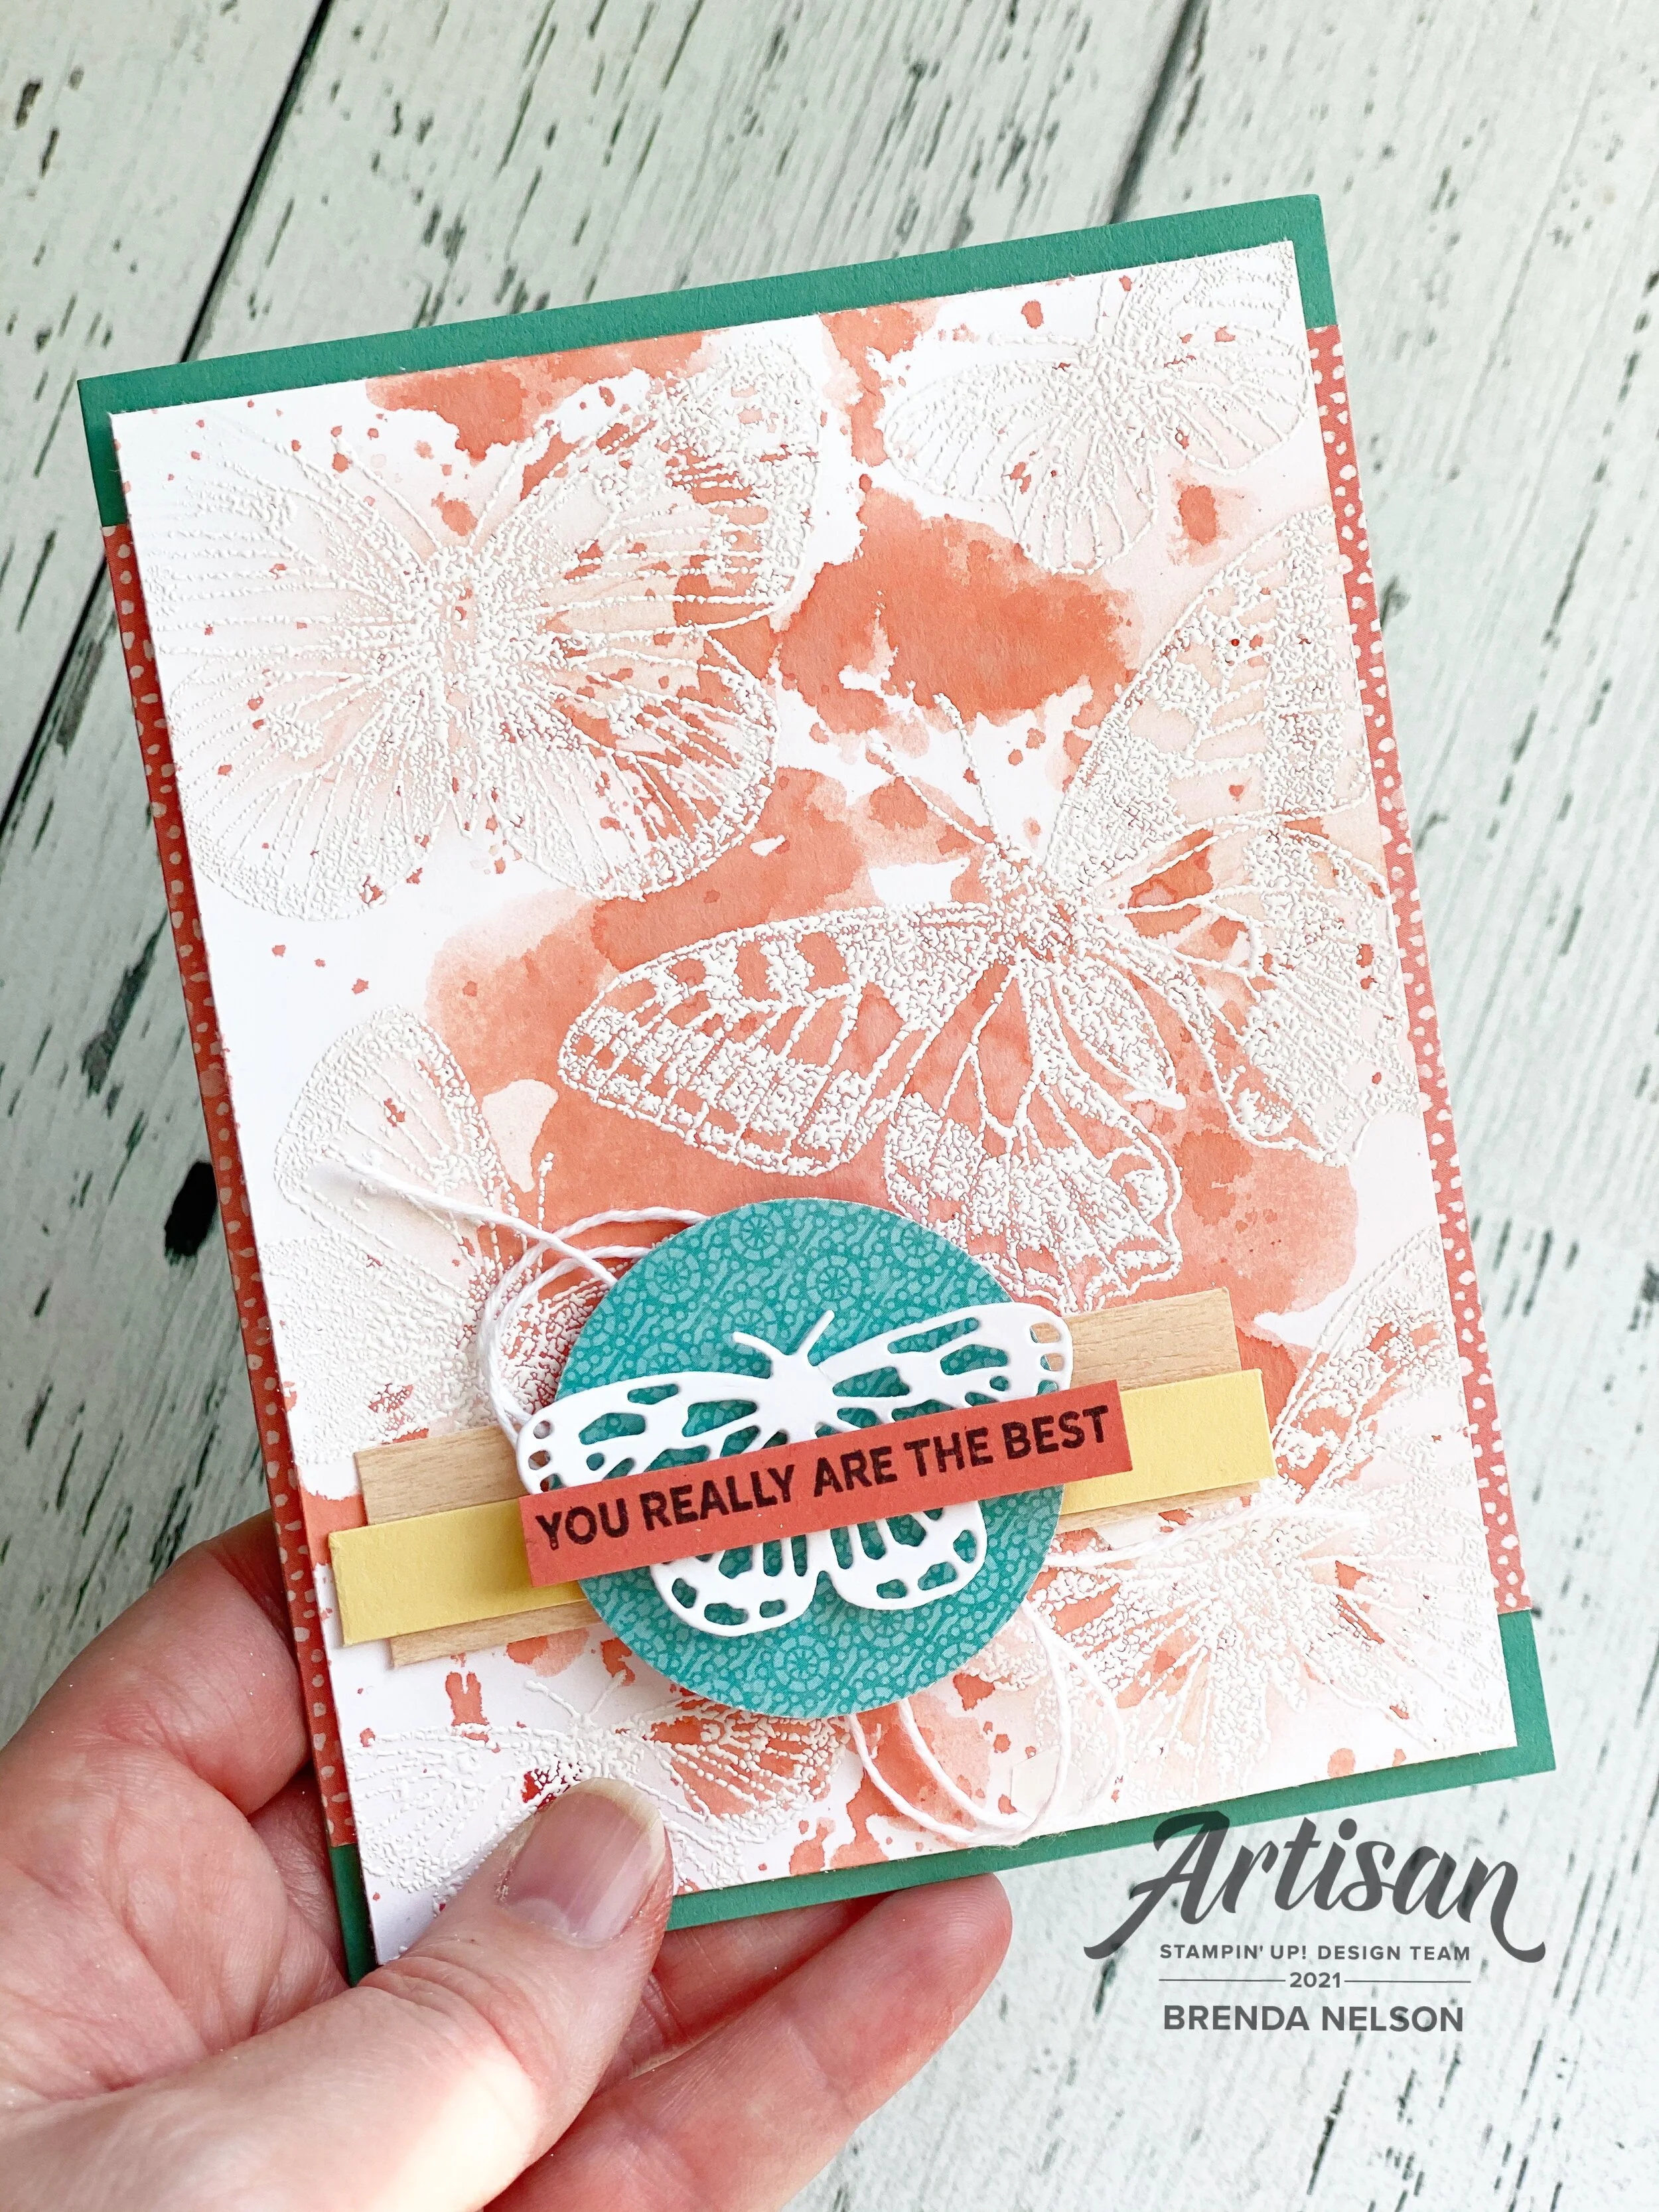
Hello friends! I am always looking for an easy way to create a fantastic background, especially if it can be watercolored! I decided to pair up this easy watercoloring technique with the new Butterfly Brilliance Bundle! It is an awesome bundle with a stamp set and coordinating dies that is an early release product from Stampin’ Up!

final (1) 22.jpg

I started with a base of Just Jade card stock and added two little strips of DSP from the Butterfly Bijou collection. This 6x6 stack of paper is only available this month! So it is a fun exclusive offering!

I order to do water coloring I would suggest using Shimmery White, which is what I used on my card, or water color paper. Shimmery White is a little more cost effective if you are planning to make a bunch of cards and it is thicker than Basic White so it allows more water to be used on the card base.

The Stamparatus will be your best friends with this large stamp! You can use the stamp on the plate either attached to the base or separate like I did here.

The Stamparatus will be your best friends with this large stamp! You can use the stamp on the plate either attached to the base or separate like I did here.

To start creating my background I began by inking of the stamp with White Craft ink and stamping it on my Shimmery White card stock. I added white embossing powder on top and heat set it.

This step helps create an ‘ink resist’ technique as the water coloring will not take where the butterflies are stamped.

This step helps create an ‘ink resist’ technique as the water coloring will not take where the butterflies are stamped.

I cut a piece of our Window Sheets to the same size of my card base. You can also use one of our cello bags too if you do not have access to a Window Sheet.

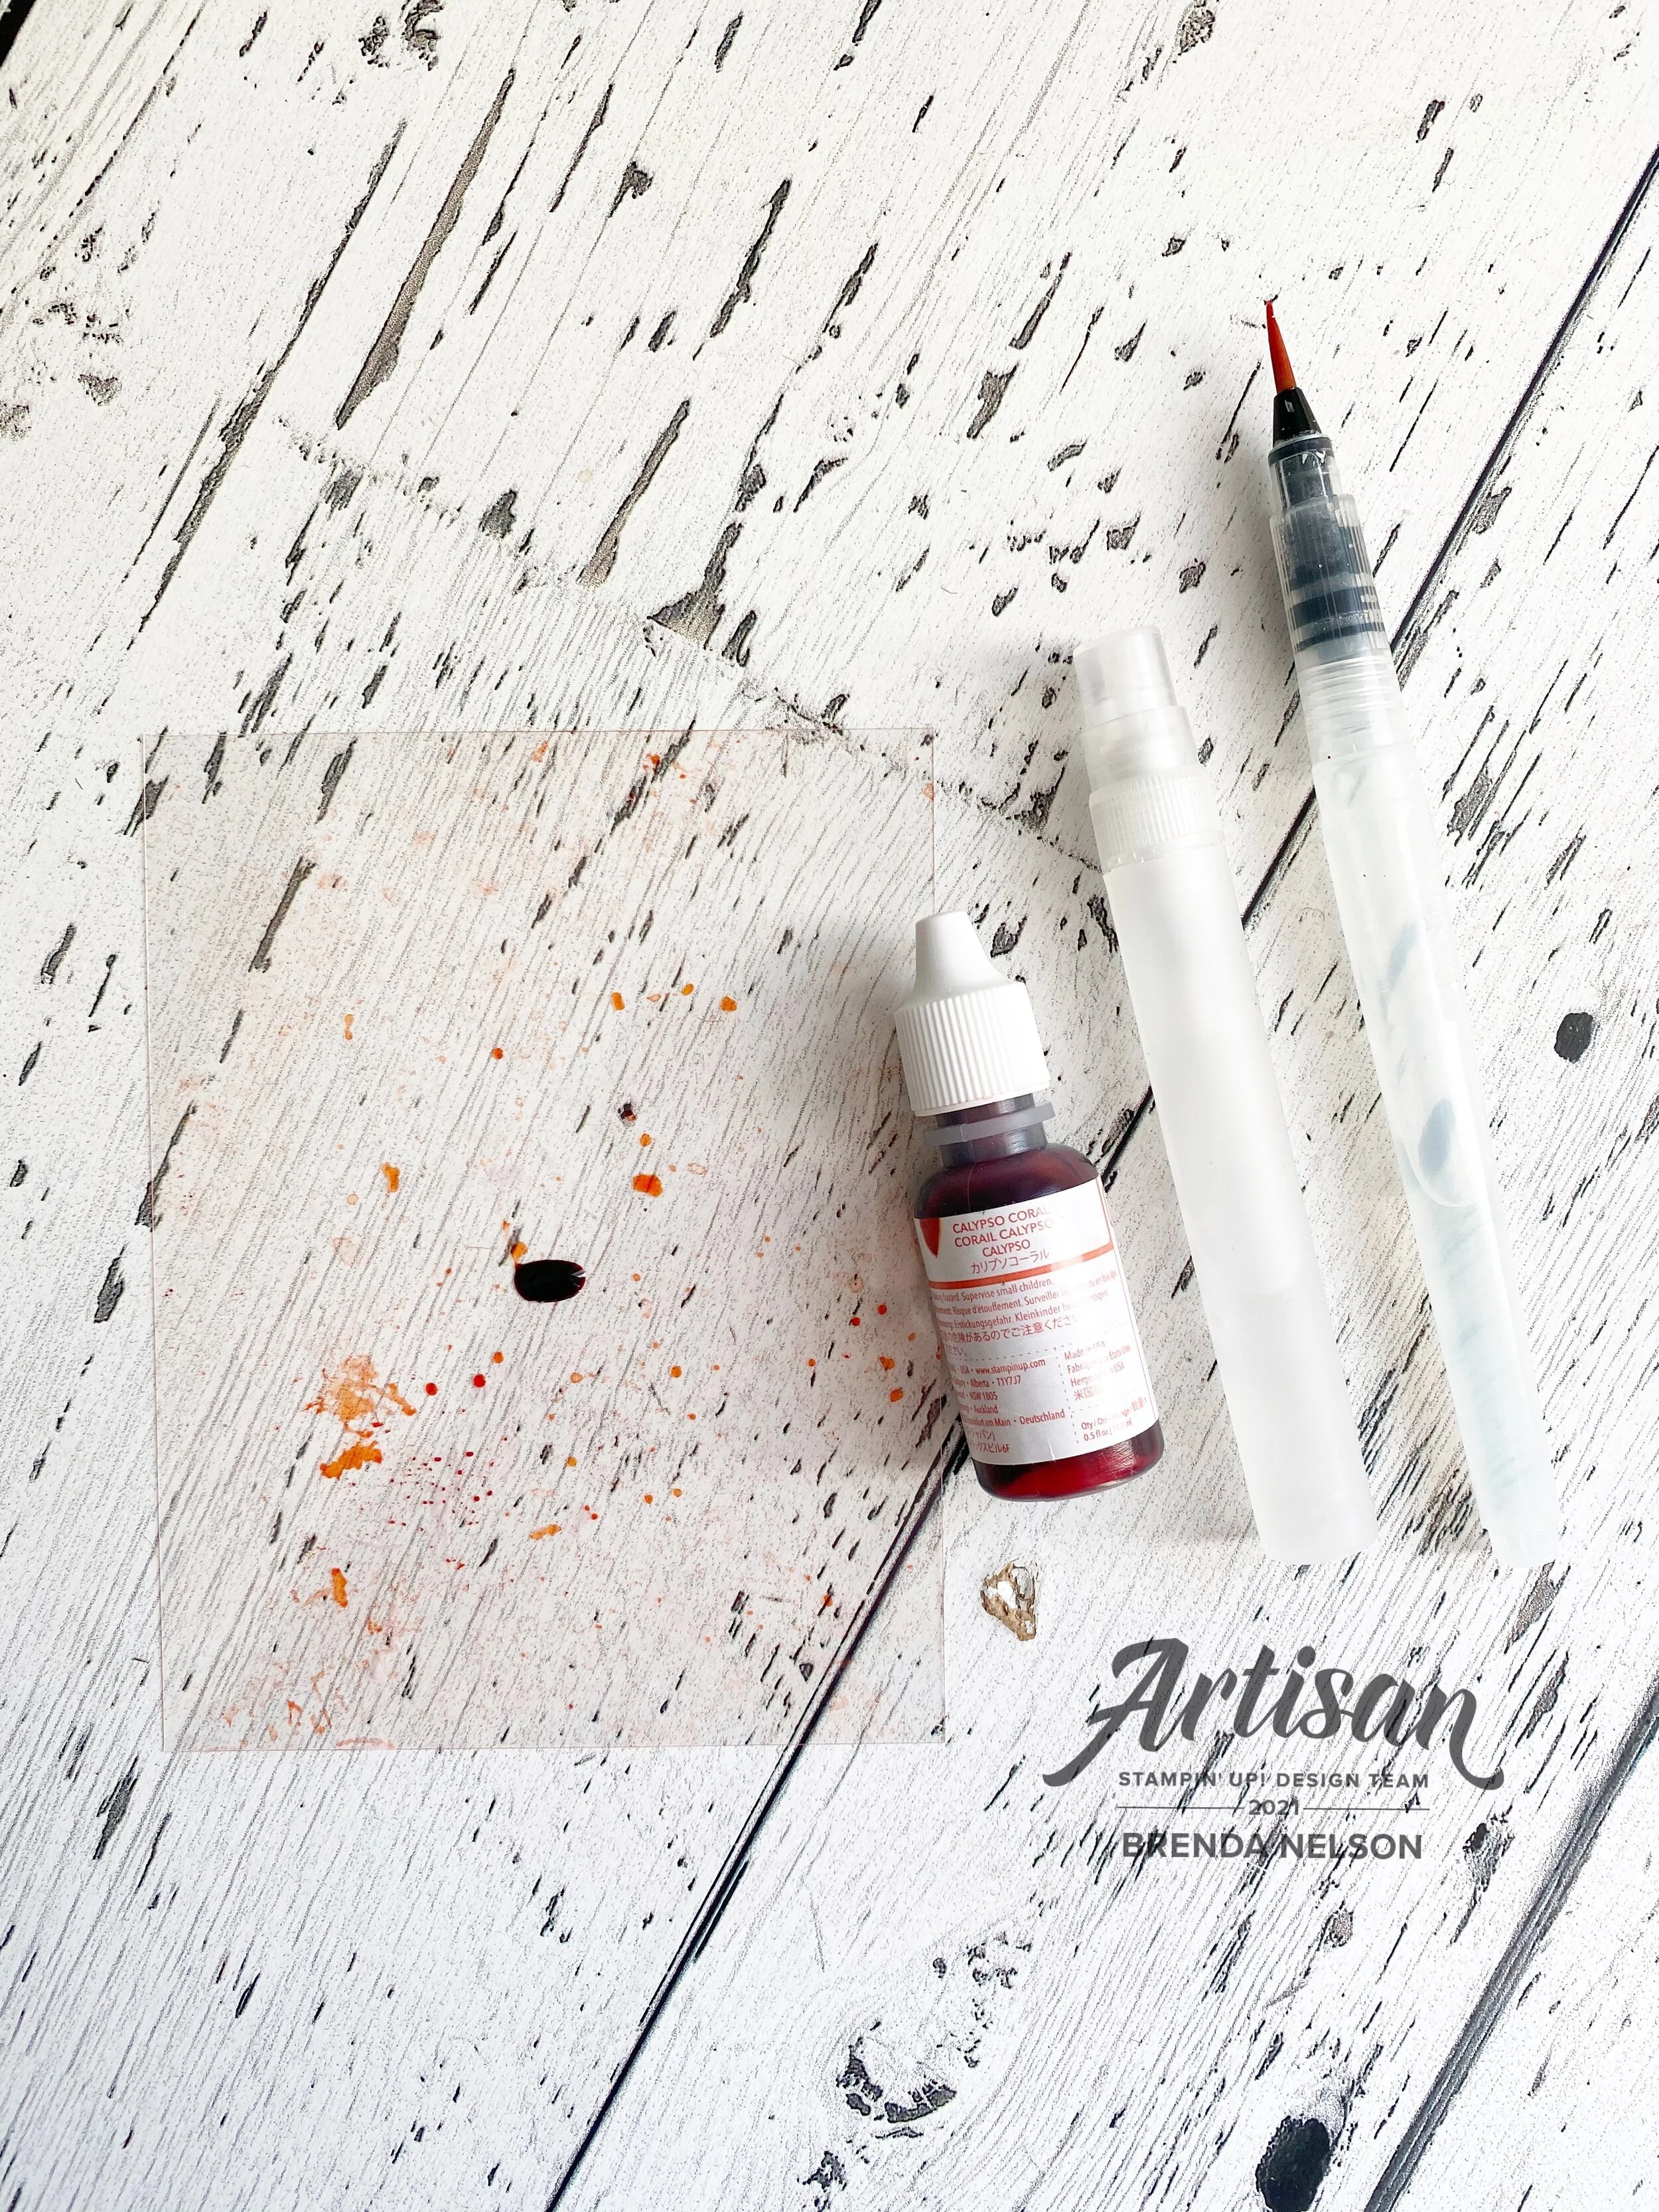
Choose an ink refill of your choice, I decided on Calypso Coral for this project. You will also need a water mister and a water painter. The water painter just helps spread the ink around on the window sheet if you need to.

final (1) 20.jpg
 

Start by adding a drop of ink onto the window sheet. You will then spritz some water on top and if you need to use the water painter to move the inky water around to cover a larger surface area on the window sheet.


Once you have your window sheet ready you are going to take our butterfly shimmery white card stock layer and flip it over so that the stamped side is going to touch the inky window sheet.

I tapped my paper around using my fingers to press the paper into the ink in different spots. I did not just lay this shimmery white piece on top.

The idea behind this method is that you only want the inky water to touch your paper in select spots.

Each background will be unique and different!

final (1) 21.jpg
I just think this looks so cool and I love how every single piece will look different! And to clean the window sheet when you are done just. grab a tissue or baby wipe! Easy peesy!

I just think this looks so cool and I love how every single piece will look different! And to clean the window sheet when you are done just. grab a tissue or baby wipe! Easy peesy!

final+36.jpg

To finish off the front of my card I added a small piece of the Natural Touch specialty paper and a small strip of So Saffron card stock over top. I punched a circle from the Butterfly Bijou DSP and I cut a white butterfly from the dies.

The sentiment is from the In Bloom stamp set and is trimmed down by hand from its original form.

I really love this technique and I hope you are willing to give it a try!