A Card a Day in December--Day #30

The end of 2020 is so near we can almost start celebrating! So of course I had to design a page layout to capture our celebrations tomorrow as we say Hello to 2021! I think this page is simple and sophisticated and won’t take you long to assemble. You can substitute any stamps that you have too as you will see that I combined retired, current and BRAND NEW stamps all on this layout with a mixture of fonts and design styles.

final (57).jpg

I designed this page on Very Vanilla 12x12 because I new that I wanted to use gold accents and Very Vanilla has a warmer tone to it. I used a photo mat of Basic Black to accommodate a future 5 x 7 photo. I can anticipate my family taking a selfie so this photo orientation supports that better.

The sentiment ‘Cheers…’ is from a retired set called Cheers to That. It is a set that I will keep in my collection as I do find that sets to do with New Years do not come around very often. It is stamped in Versamark with gold embossing powder on Very Vanilla. Behind the sentiment I added some retired black twine and some new gold hued ribbon called Fine Art Ribbon. And of course I had to add the Matte Black Dots from the Love You Always suite—love! A few glittery stars and this little section is perfect.

final (56).jpg

I wanted to use a Gold Hoop as well on my page to highlight the word Hooray. I used my Stampin’ Write Basic Black marker to highlight the word Hooray from the rest of the stamp as it is a part of a phrase. This stamp is from the You Are Amazing stamp set which is the stamp set designed to complete the You Are Amazing Project Kit.

final 2.jpg

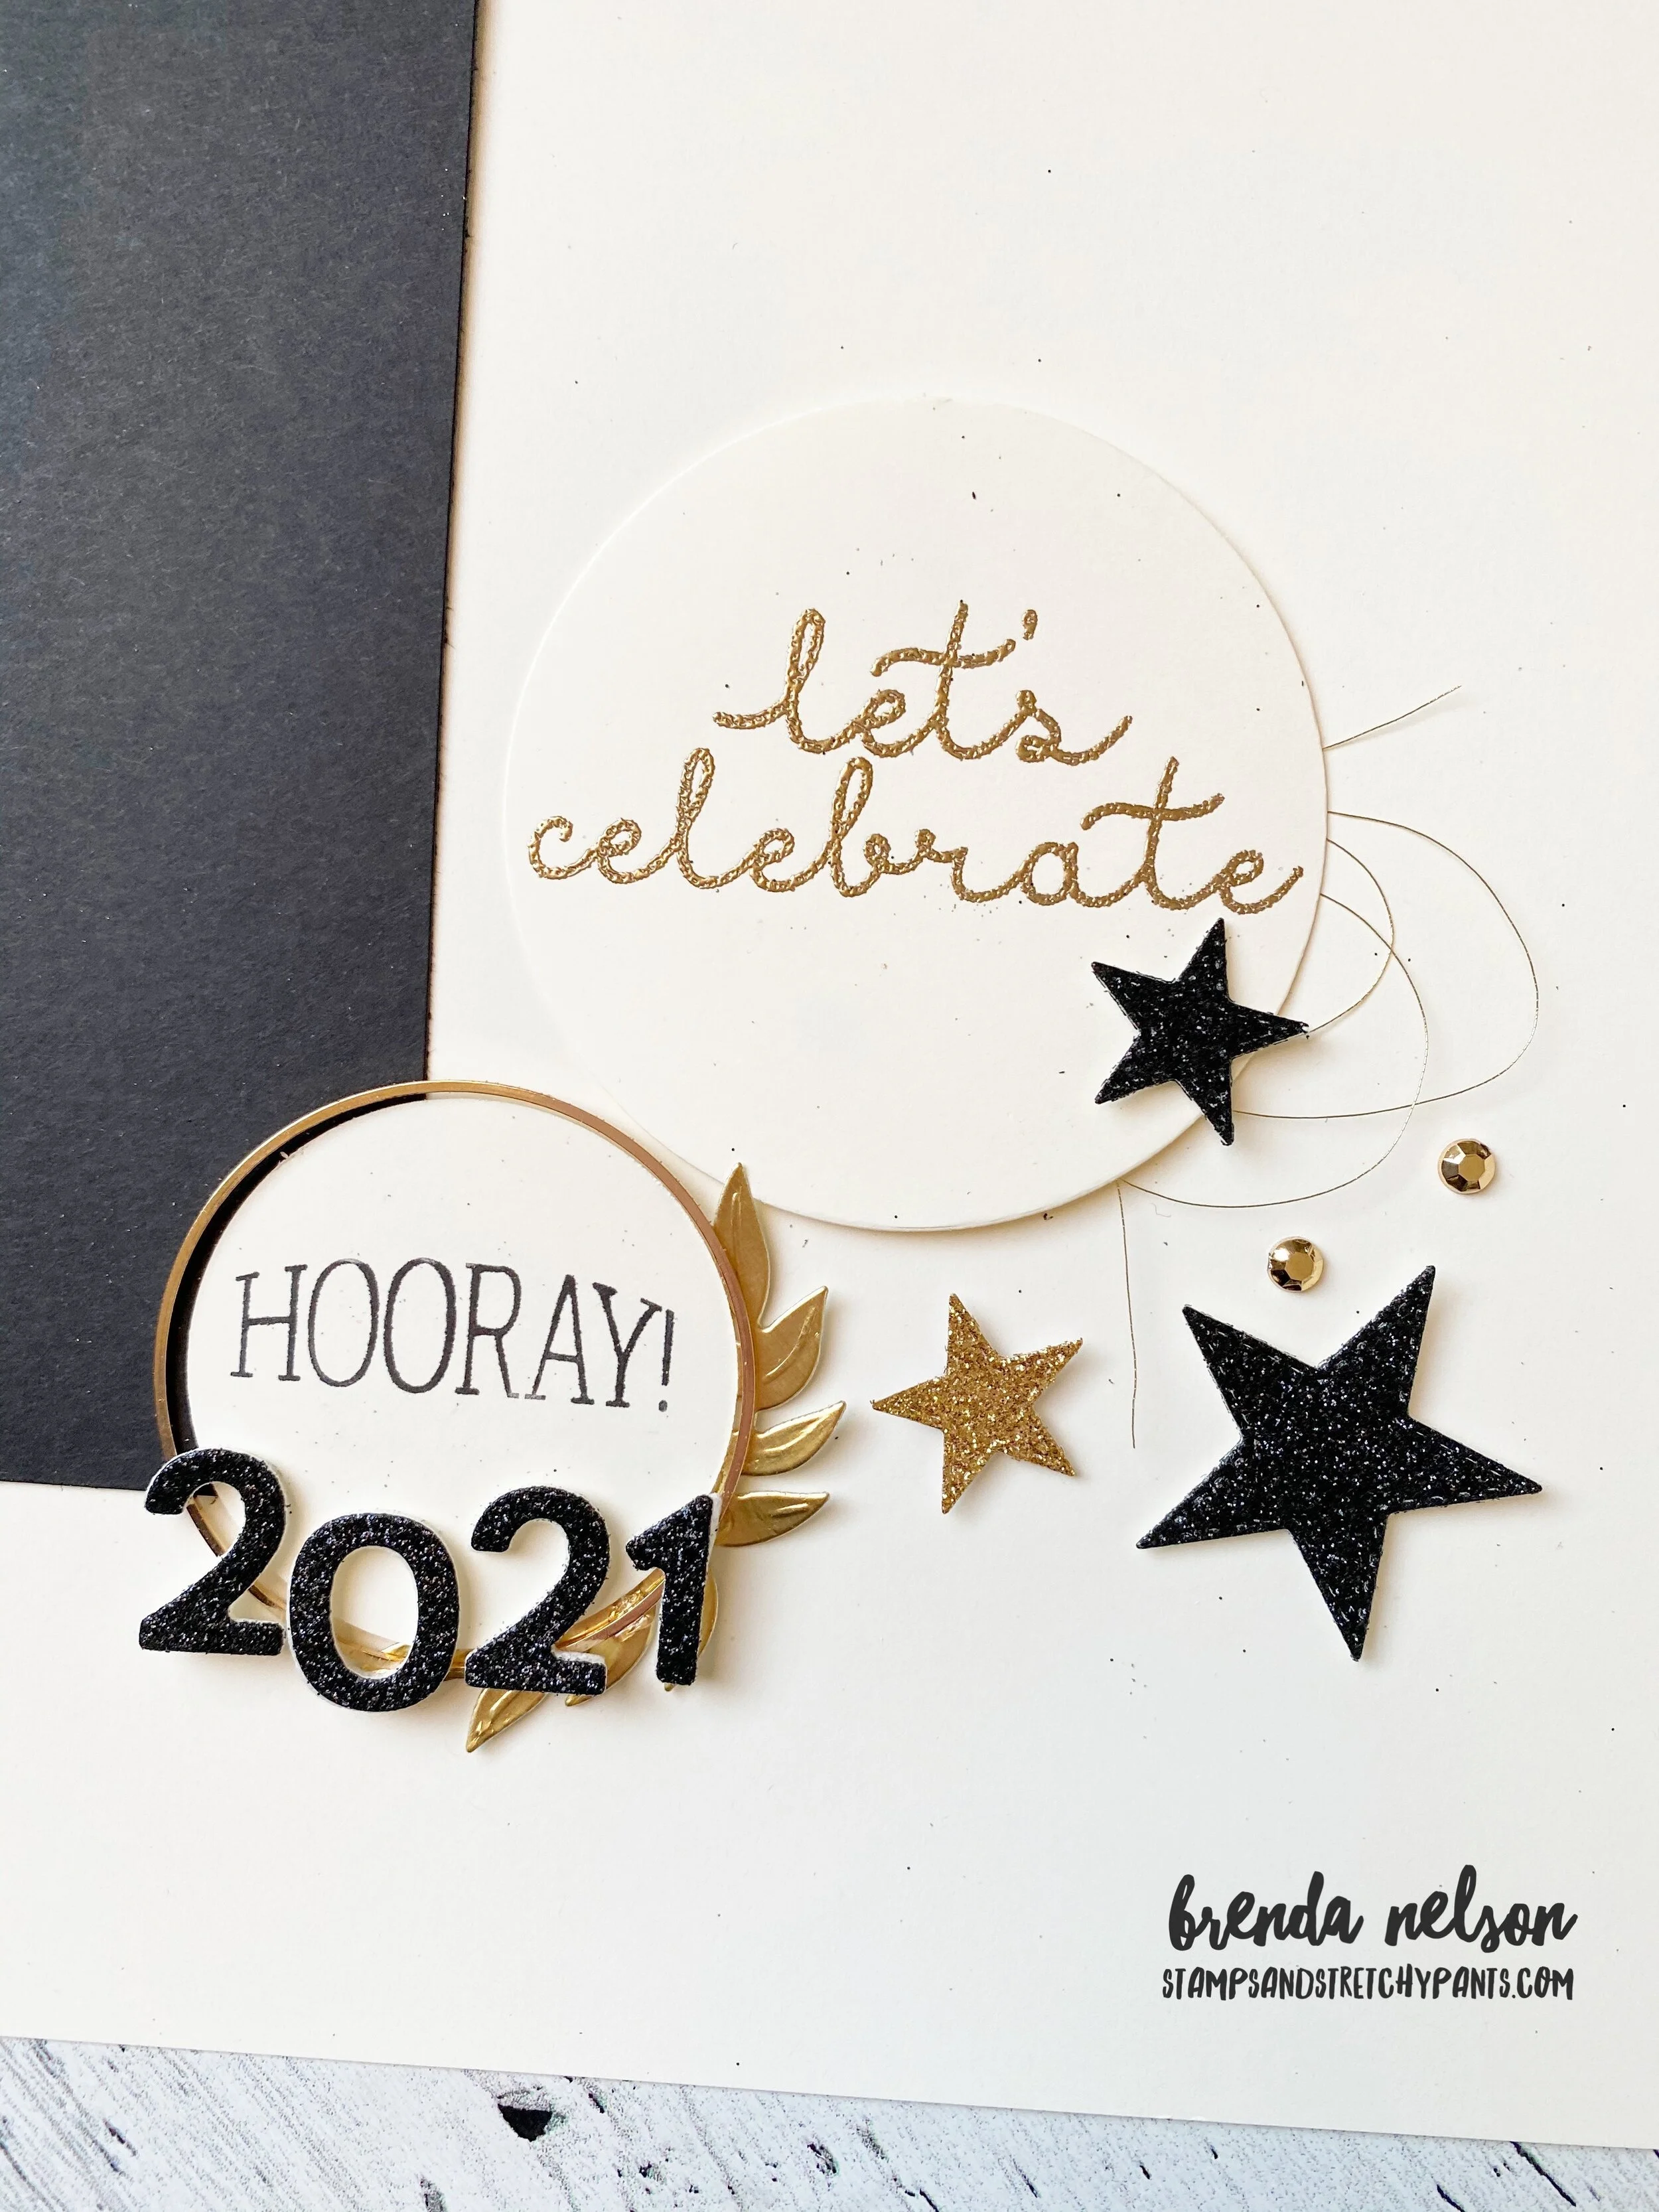
I added a gold leaf behind the hoop which is cut from Gold Foil paper and the Forever Flourishing Dies. 2021 is cut from black glitter paper using the Playful Alphabet dies and Foam Adhesive Sheets. I really like this little vignette!

Let’s Celebrate is from the Bloom & Grow stamp set in the annual catalogue. It is also modified from its original form and is embossed with gold embossing powder and cut using the largest circle from the Circle Dies. I added a little gold metallic thread behind and a couple die cut starts from the Stitched Stars dies. Gilded Gems were the perfect accent here!

I hope you and your family have a wonderful New Years however you are celebrating and can capture a memory together!


A Card a Day in December--Day #29

Hello friends! I wanted to create a New Years card that featured my favorite product suite of 2020—Playing with Patterns. I just love the color combo in the DSP and the Playful Alphabet dies basically live beside my Stampin’ Cut & Emboss machine! I use them all time on everything from cards to scrapbook pages to 3D projects.


I also wanted to design a card that was EASY and one that you could quickly make a few of to get into the mail right at the start of the year.

I used one small strip of the Playing with Patterns DSP as this allowed me to introduce all of the colors in the collection.

I went with a base of Purple Posy as I just love this color. I added a half panel of the same color to build my card on.

Happy New Year is cut from Misty Moonlight card stock, the Playful Alphabet dies and Foam Adhesive Sheets (a MUST HAVE combo)!

final (49).jpg
final (48).jpg

I wanted this card to be fun and whimsy (which I am hoping can be my theme for 2021) so I borrowed a couple of stamps from the new Hey Birthday Chick stamp set. The font in the Let’s Celebrate and Hello matched that fun feel that I was going for.

I added a few embellishments from the Playing with Patterns suite and the All the Trimmings (retiring soon!).

I hope you have enjoyed my 29th project in my A Card a Day in December series!

final (50).jpg

A Card a Day in December--Day #28

Well here he is, the cutest little snowman in all the land! Here to wish you a happy 2021! I created this card earlier this month for a card swap and actually had quite a laugh putting him together. This card marks my 28th project share this month! The majority of my shares have been cards but I have snuck a few other things in this month as well, so if you haven’t been following along daily, make sure you go back and see all of my creations!

final (43).jpg

I used the Snowman Season stamp set for the cute snowman image and the little snowflakes in the background. My cute snowman is colored with Stampin’ Blends in Calypso Coral and Just Jade and the snowflakes are stamped in Seaside Spray. I LOVE this blue! Its just the perfect blue as it coordinates with so many different colors and is such a fantastic way to color glass (think windows) or air elements (think sky and snow) or give highlights to colored shapes and images. I will be sad to see it retire when its turn comes.

2021 is cut from Just Jade card stock with the Playful Alphabet dies and Foam Adhesive sheets…incase you have not noticed, I adore this combo. I think the Foam Adhesive sheets are the TOP product of the Annual Catalogue.

final (42).jpg

I added a hint of blue behind the snowflakes using the new Blending Brushes which are coming out in the new January to June (or JJ catty).

The ‘Happy’ and ‘Good Luck’ are stamped in Calypso Coral ink from the Art Gallery stamp set—another new release! I thought this card had a whimsical feel with a touch of happy sarcasm to it!


A Card a Day in December--Day #27

Hello friends! Well I am officially shifting gears from Christmas to New Years and am going to share some New Years projects now through Dec 31st. I am sure we will all be happy to say goodbye to 2020. It was a year of trials and tribulations and SO MANY AWESOME THINGS!! I think there are many things that are better and improved in my life! I hope you have a few of those things to add to your list too when reflecting on 2020.


I made this cute, STAMP FREE, celebration wand with my team at our last zoom party!

Some people call them lolli’s, some people call them rosettes, but no matter what you call them they are a just FUN!

Because this is a stamp free project it could be a great idea to make a version to create with your team in the future!

final (38).jpg

I started with two strips of 2 1/4 x 11 Smoky Slate card stock that I scored at 1/2 increments. You may have a slight piece to trim off at the end. Attach these two strips together with a strong adhesive. Now you should have one long strip of accordion style card stock.

HOT TIP: I think this tip might actually change your life (bold statement right?) as far as rosette assembly goes! Once you have your rosette scored, heat your hot glue gun. You will need a silicone mat. Pinch your paper closed as tight as you can and put a big glob of hot glue on the end of the squashed card stock—-as shown below and press the hot glue into the silicone mat to set. Once set remove and the glue will help your rosette stay flat (once you push the center).

final (40).jpg

You will also want to reinforce your rosette with a circle on the front and back.

final (41).jpg

After your have your basic rosette constructed you can decorate as your heart desires! Because I wanted to celebrate the NEW YEAR with my team and I wanted them to play with new stuff I decided to use the Snail Mail Designer Series paper from the upcoming January to June Mini Catalogue (or the JJ Catty as its been nicknamed).

final (9).jpg
 

I started with a large circle in Silver Foil and then layered a circle from the Snail Mail DSP.

I cut the ‘hello’ from the DSP! Isn’t that fun?

The label that 2021 is on is from the Potted Succulent Dies and the numbers are cut in Mint Macaron card stock using the Playful Alphabet Dies and Foam Adhesive sheets with some Wink of Stella on top (of course!)

I tied some ribbons around the handle (a basic dowel that is hot glued in place) to fancy it up and voila! The cutest little rosette you ever did see to welcome in 2021!


A Card a Day in December--Day #26

I hope everyone had an amazing holiday and is enjoying all of their new gifts that Santa brought! Today I want to share a winter scrapbook page with you. I know NOT A CARD, but I figured we will all have winter photos that we want to save so hopefully this page provides you with some inspiration!

final (8).jpg

This double page layout is on a base of Pool Party 12x12 and is accentuated with colors found in the Snowflake Splendour Suite. I LOVE this designer series paper and how many different tones of blue and purple there are to work with.

I added two different 3 x 12 strips of the DSP to each page to bring in some of these colors so that I could in embellishments in a variety of colors.

I used the So Many Snowflake, Peony and Beautiful Bows dies on these two pages.

Winter and Wishes are cut using the Playful Alphabet dies with the Foam Adhesive sheets and the Well Written dies.

Winter and Wishes are cut using the Playful Alphabet dies with the Foam Adhesive sheets and the Well Written dies.

“In the Coldest Moments…” is stamped in Pacific Point ink on Whisper White and is punched with a 2 1/2 circle punch. The Stitched Circles were perfect to cut a layering piece out of another selection of DSP. In between I added some In Color ribbon and Playing with Patterns ribbon.

Adding some Highland Heather snowflakes along with boughs cut in Whisper White were perfect.

You will notice there are a bunch of snowflakes stamped in the backround.

Here is fun tip: Place all of your desired stamps onto one of our larger blocks. I used the E block for this. Then you can stamp a bunch of images at one time and slightly rotate the block each time so they look different.

final.jpg
 

The second page of my layout has many of the same elements but in a vertical presentation instead. Not only does this allow for a photo going in a different direction (consider that most selfies are this orientation) it allows for a different look while feeling unified.

The sentiment on this page is from the Snowman Season stamp set. A returning favorite from last holiday! It is cut with a Stitched Circle and the DSP behind it is cut with a punch. A reversal from what you found on the other page.

Once again I added in Highland Heather snowflakes and a border with the Peony die in Misty Moonlight.

final (7).jpg
final (2).jpg

Both pages have some Blue Backed Gems and Rhinestones. The sentiment on this page also has some Pool Party Sheer ribbon behind it to mimic the other page.

I really love how these two pages turned out. I hope you will try your hand at some memory keeping if it is not something you already do! If you live in Canada please feel free to SHOP by online store direct to Stampin’ Up! Thank you in advance!