Joy of Sets--Harvest Time!

Welcome to the Joy of Sets monthly blog hop! So happy to have you hopping along with us checking out all of our “Harvest Time” themed projects! This month I knew I wanted to create a scrapbook page. We have some beautiful wheat sheaves dies that I knew I wanted to incorporate.

81259502_10215727473486726_1409492916610531328_o.jpg
final.jpg

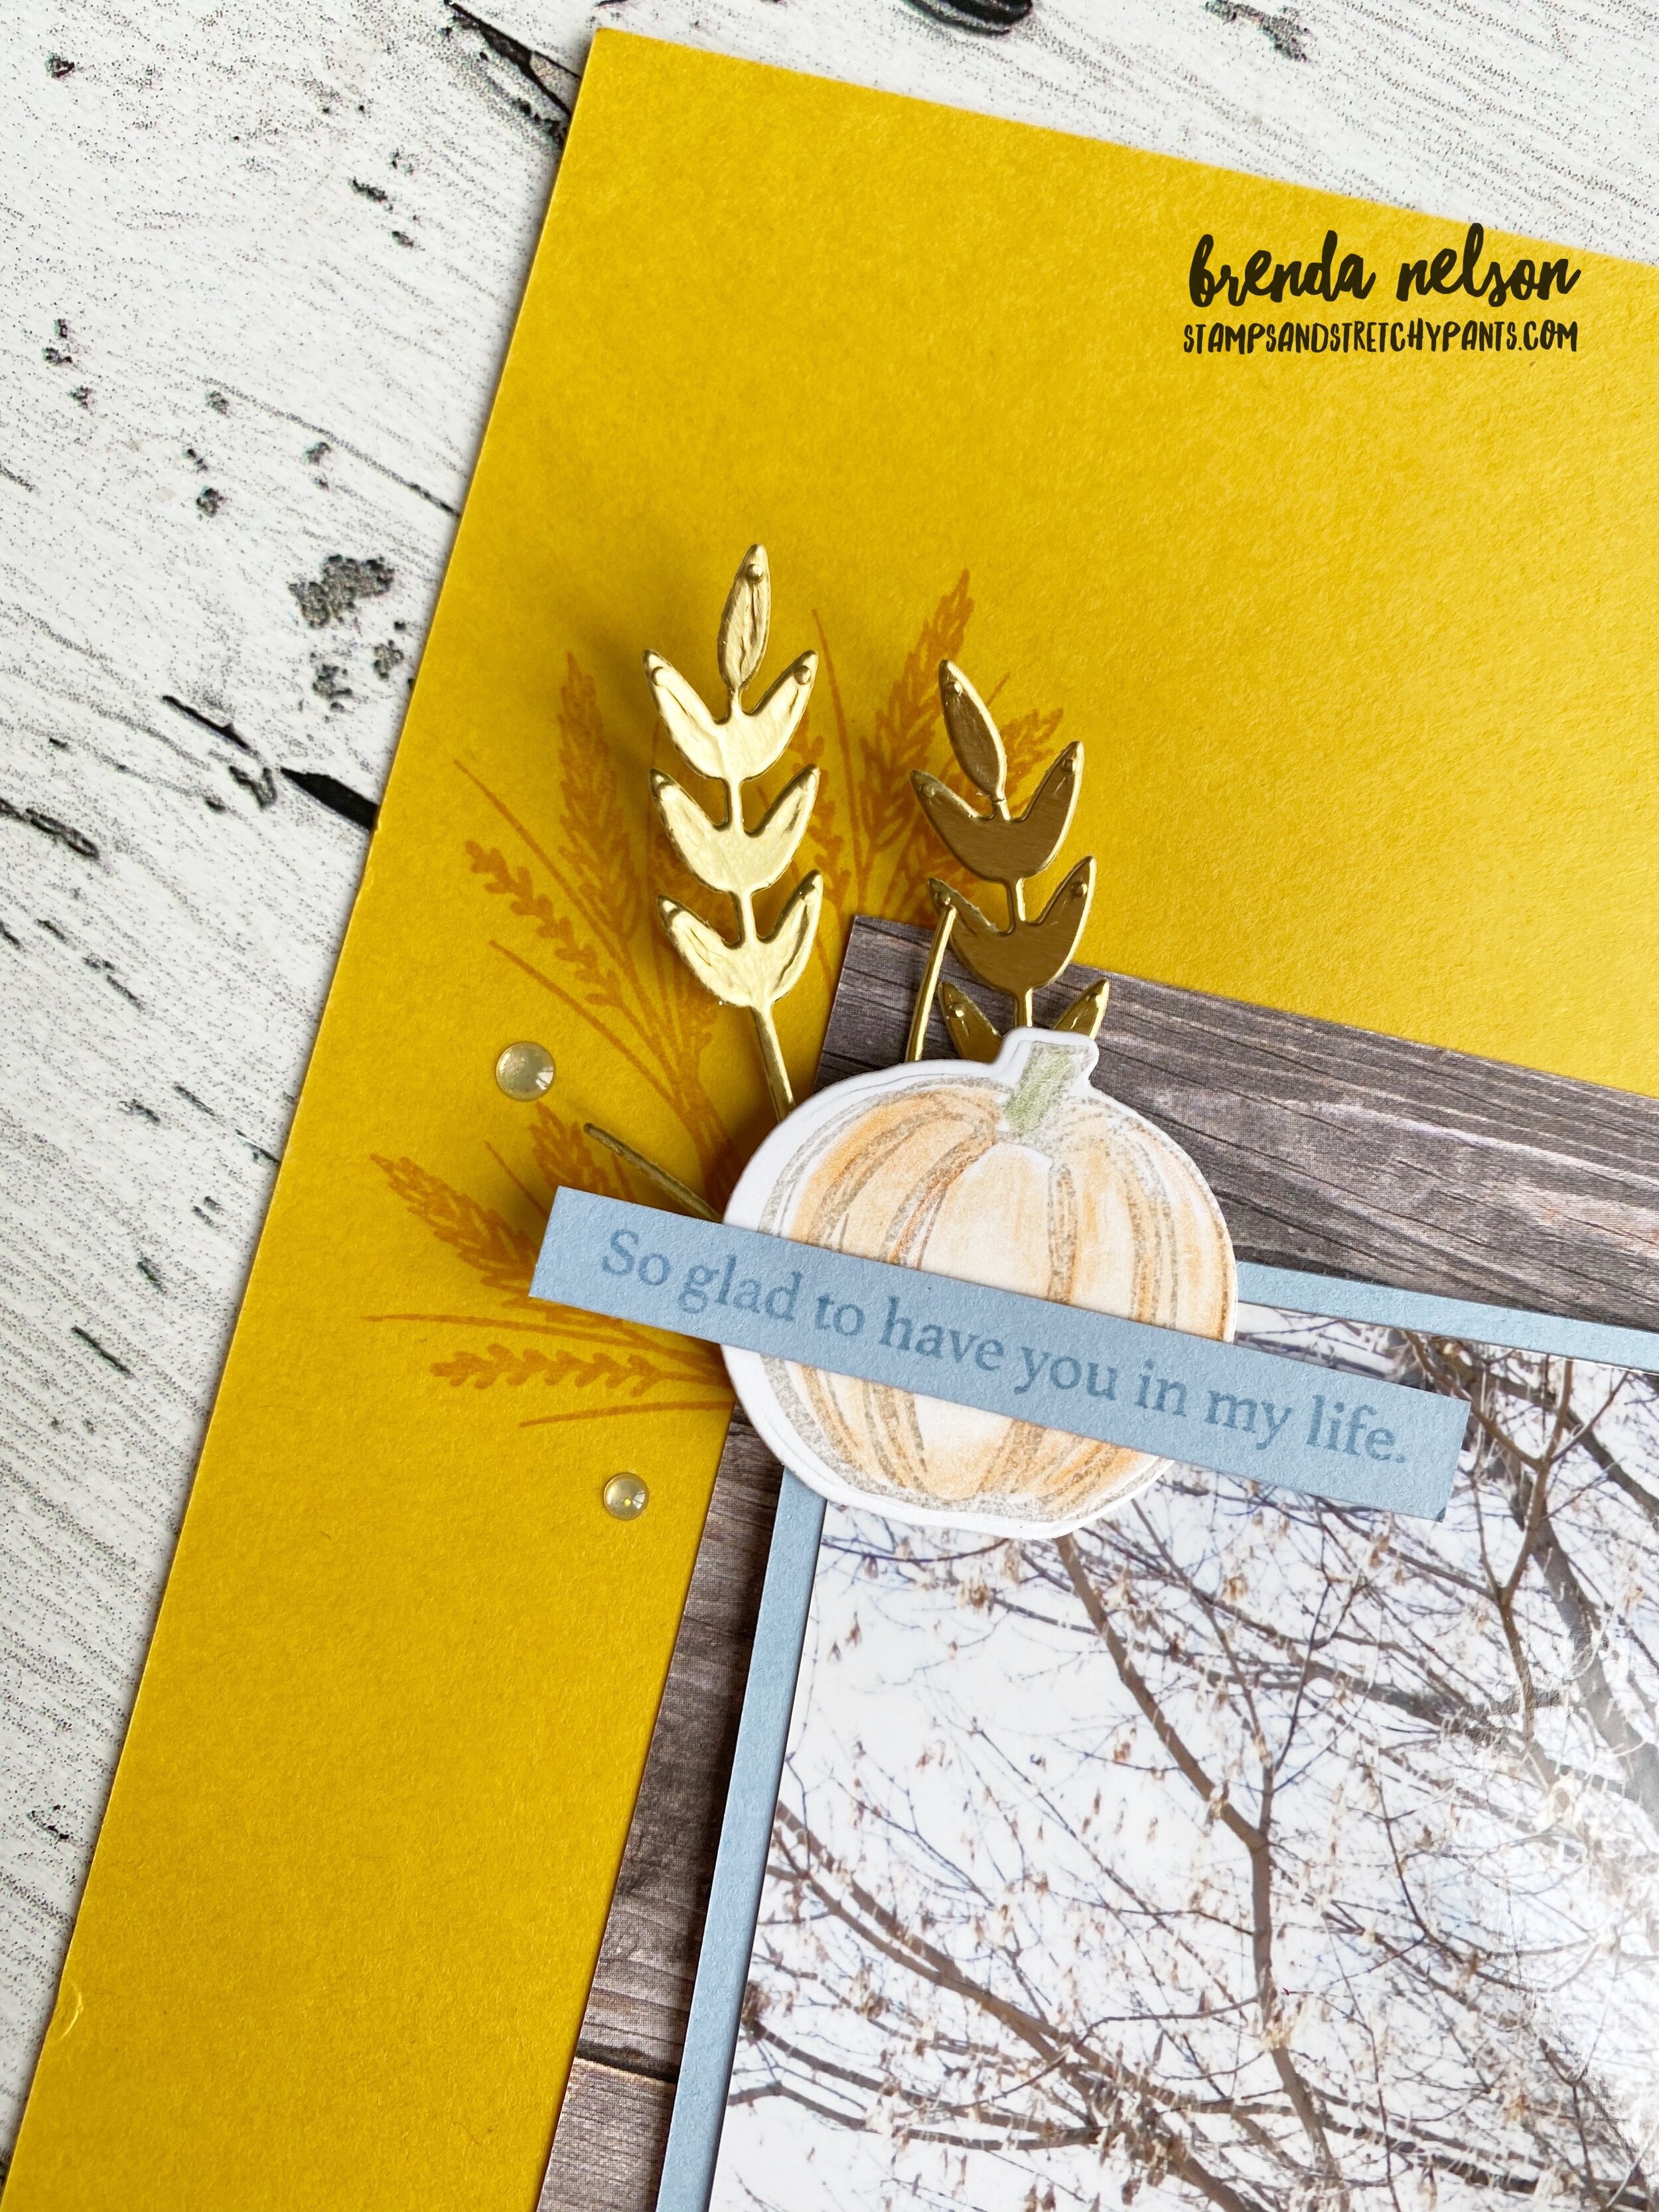
I started with a base of Crushed Curry because I saw that color represented in the field in front of us and I accented our photo with Seaside Spray because I picked up that tone in the sky. While our outfits have grey, I also feel that Seaside Spray has a grey undertone to the blue. I don’t always match my pages to the colors in my photos but it worked out so beautifully this time.

This picture was taken about 4 years ago and my kids have just changed so much! I can hardly believe it and I am so thankful that I have made memory keeping a priority in my life.

I took the theme of “Harvest Time” literally as I added the word right into my main title. The term harvest immediately made me think of wheat sheaves and I wanted to highlight them on my page in the Crushed Curry and golden tones.

final.jpg

The Gather Together stamp set was a perfect fit for my design as it has a wheat sheaves image in the set and a cute little pumpkin.

The die cut wheat sheaves are from the Autumn Essentials dies. I have really gotten my value out of this die set. If you go back through some of my posts you will see how many times I have utilized it.

I cut the word “harvest” using the Playful Alphabet dies (another MUST HAVE) out of Soft Suede card stock and stamped them with the little collection of ‘spots’ that was also in the Gather Together stamp set. And of course I used the Foam Adhesive sheets with my letters. The word also pops because it is partially layered on a strip of DSP from the In Color 6x6 stack.

The log slice image is from the classic Rooted in Nature stamp set found in the annual catalogue. I cut it by hand. The words ‘happy’ and ‘blessings’ are from the Country Home stamp set, they are a part of single stamp that says “Happy Harvest Blessings”.

The pumpkin is stamped in Grey Granite and coloured with our water color pencils in Pumpkin Pie and Old Olive. I wanted the pumpkins to be subtle which is why I coloured them with the water color pencils.

final.jpg

My photo is also layered on a large piece of DSP from the Taste of Good DSP stack. I LOVE this paper, I would definitely recommend investing in it.

The sentiment “So glad to have you in my life” is from the Gather Together stamp set. I finished off the page with a few Gold Glitter Enamel Dots!


I really love how this page turned out. It has all the feels of fall and harvest and when I look at the photo I have so many wonderful memories of having these pictures taken with my In Laws. And I especially love my youngest sons hand on his chest as he had a piece of gum in his pocket he was allowed to have after the pictures. Haha. I love that he is making sure its still there!

I hope you enjoy all of the projects that everyone shares this month!

You can keep going NEXT to see the fabulous Angie Mackenzie!

final.jpg

Create with Connie and Mary--Cute Halloween

Welcome to our blog hop! This month we are going to be showcasing a variety of Halloween projects. Halloween is actually my favorite holiday, after my birthday as I consider that a holiday! hahaha!

Every year we host a kids Halloween Party and I always try and get a few great pictures of the kids in their costumes. So naturally I wanted to make a Halloween scrapbook page for our theme of ‘cute’ halloween because the subjects in my upcoming photo will no doubt be cute!

fullsizeoutput_12d57.jpeg

If I could ask Shelli or Sara for ONE WISH it would be to bring back 12 x 12 Basic Black card stock. It is a bizarre mystery as to why we do not sell this. I did stock pile some before it was retired but I do use it sparingly!

The base of my page is on a piece of 12x12 Basic Black with a large section of DSP from the Magic in This Night collection. I really loved this paper with the bats!

Rich Razzleberry is my purple of choice for when I create Halloween projects. It looks so good with blacks and greys and all the different orange tones that we have to choose from!

Rich Razzleberry is my purple of choice for when I create Halloween projects. It looks so good with blacks and greys and all the different orange tones that we have to choose from!

final.jpg

When I am creating a scrapbook page I try and create little vignettes to help draw your eye and create areas of interest. This little section anchoring my photo is so cute, I just love all the details. I decided to use gold as my accent color so I cut the word “BOO” out from using the Playful Alphabet dies and Gold Foil paper. I popped them up using the Foam Adhesive Sheets (this item has become a craft room must have)!

I started by stamping the “October 31” from the Festive Post stamp set in Pumpkin Pie and then used a sponge dauber in Cajun Craze to color the bottom half of the stamp. I stamped just “October” in Momento ink on Smoky Slate ink and hand trimmed it to add over top of the main image with a Dimensional. It is punched out with the Rectangular Postage Stamp punch from the main catalogue.

I cut a label using the Celebration Label dies from Smoky Slate to act as the base of this little vignette. The pumpkin is cut using the Autumn Essentials dies in Cajun Craze and Terracotta Tile. The little bats are stamped in Momento Ink on Smoky Slate card stock and then hand cut. You can find them in the Banner Year stamp set along with the little spider webs at the top of my page!

final.jpg

The gold cord I used in both vignettes is from the Wonder of the Season ribbon combo. You are going to find the “Happy Haunting” sentiment the Celebration Tidings stamp set. It is stamped in Momento Ink on Smoky Slate card stock with a splatter of ink over top. I used the Timeless Label punch to punch it out. There are two little banners tucked behind from the Magic in the Night DSP. This whole label is added onto a larger label cut from the Celebration Label dies in Terracotta Tile and then sniped in half.

I gold embossed the spider webs and added some bling with the Holiday Rhinestone Basic Jewels.

I used the ‘spiky’ border die from the Autumn Essentials dies along the side of my 5x7 photo mat

I used the ‘spiky’ border die from the Autumn Essentials dies along the side of my 5x7 photo mat

I am going to be offering this page as a class, so if you are in the YEG area and are interested let me know! I would love to stamp with you!

I hope you enjoy all of our ‘cute’ Halloween projects as you hop along with us today! You can go BACK to visit Melissa or NEXT to see what Connie has created for us. Have fun!

Stampin' For Christmas-Let's get Christmassy!

Stampin' For Christmas .jpg

Thank you for joining us on this monthly Christmas themed blog hop featuring the many fabulous Stampin’ Up! products we all have to choose from! Sometimes it is hard to pick just one set to focus on! I did narrow it down to the Coming Home Bundle as I am having too much fun colouring all of the houses and trees. Colouring can be so relaxing and its so easy with our Stampin’ Blends! This bundle is part of a larger suite called Trimming the Town.

final.jpg

This stamp set does not have any sentiments to it, which is sort of unique to Stampin’ Up! It is all images. So I pulled in a nice sized ‘Merry Christmas’ from the Tag Buffet stamp set.

I used Balmy Blue as my card base and stamped the sentiment in the same color. The house is coloured in Real Red with Crumb Cake accents and Balmy Blue on the windows. The trees are classic Old Olive and Crumb Cake.

final.jpg

I used one of the dies from the Home Together Dies that has the trees and the snow drift shapes. It created a great background and I stamped directly to this piece. The house and trees are layered over top.

I wanted the illusion of a snow storm too so I stole a snowflake from the So Many Snowflakes dies and added those in. I then created a spray with my Wink of Stella and Balmy Blue markers to add to the snowfall feel.

final.jpg

I think this is a great card that you could easily mass produce and enjoy the relaxing creative benefits of colouring!

You can visit Sue Allen’s blog next to see what her crafty Christmas creation is! I hope you hop all the way through so you do not miss anyone’s creativity!


Create with Connie and Mary--Fall Essentials!

Welcome friends! It is officially FALL and the most gorgeous season of all. While I LOVE summer, the sunshine and heat, bbq’s and all the fun stuff, I do truly love the beauty of fall. The changing colors of the leaves, the crispy touch to the air, pumpkins and sweater weather! And I find fall one of the greatest themes to design and stamp with. There are so many techniques to creating leaves and so many fantastic products to create amazing projects like this fall sampler!

Our blog hop theme this week is Fall Essentials—so creating a sampler was a great way to include many of my favourite fall things on one project!


Have you ever tried to create a sampler? There are so many possibilities! However, the easiest way to begin is to just use 3x3 squares and decorate them as you desire. It is like creating mini card fronts.

fullsizeoutput_12d57.jpeg
final.jpg

I started with a 12x12 base of Early Espresso and layered a piece of Whisper White over top. I used DSP from the Poinsettia …..and In Good Taste and then squares in many of our neutrals—Crumb Cake, Sahara Sand, Soft Suede, Early Espresso and some regals—Pumpkin Pie and Cajun Craze.

I leaned into two of my favourite fall stamp sets Love of Leaves and Gather Together. I stole the world ‘Autumn’ from the Autumn Greetings stamp set along with the cute little leaf clusters under the word FALL.

final.jpg
 

Here is a fun tip to try with the leaf dies from the Gathered Leaves dies. This dies cut and emboss at the same time so if you take the die and press it into your ink pad before placing it on your paper and running it through the Stamp Cut and Emboss Machine it will also transfer the ink onto the paper giving you leaf a really cool two tone effect!

I love how Stampin’ Up! has so many embellishments to choose from to help bring our projects to life. The Gold Hoops Embellishments are perfect to add a little flair. I loved adding a little gold bow onto the leaf above using the thread from the Forever Greenery Trim Combo Pack.

The Elegant Faceted Gems are the perfect touch to the square below with the pumpkins.

final.jpg

I really encourage you to give creating a Sampler a try. Its a wonderful way to showcase a lot of products and I love having one for every season to display in my craft room. They also make amazing gifts for those who love a handmade project.

I know the other girls have some amazing things to share with you! I can’t wait to see what their ‘autumn essentials’ are! You can visit Mellisa by going BACK and check out Connie by going NEXT.

Have a wonderful Saturday!

Christmas Coffee Explosion Box

This project is definitely in my top ten favourite things I have EVER made! I just couldn’t love it any more and definitely know its the gift I am making for my kids teachers this Christmas!

If you haven’t tried making an explosion box, don’t be intimated, its actually quite simple. You can look at each panel as a mini card and let your design inspiration go from there! This overhead shot shows you what it looks like once you take off the top and the sides ‘explode’ down.

There are tons of tutorials out there and almost all of them start with a 12x12 piece of card stock which is what I used here. I scored it at 4 inches on all sides and then cut some of the panels at a diagonal to create the two ‘pocket’s. I wanted a couple spots to add in some gift cards (one for coffee, one for booze!).

final.jpg

I used the two stamp sets Warm Hugs and Wrapped in Christmas from the Heartwarming Hugs Suite to decorate and embellish this project. These two sets work so well together!


This is the top of the box. I just love this mini coffee cup that fits inside the For You… it gives a little hint of what might be inside.

You can also use the Glitter Star Ornaments as a stationary embellishment by cutting the string and tucking the hook behind something.

final.jpg

I used the Heartwarming Hugs DSP and used the same pattern on the lid and on the inside panels and decorated the box with colors that coordinate with the DSP. I love the options of using Mossy Meadow, Old Olive, Crumb Cake, and Soft Suede. I used white embossing powder on many of the sentiments to help them ‘pop’.

The pull out pockets also have some stamping and you easily have enough to add a gift card.

I sacrificed one of the cups by carefully taking it apart to trace it onto the DSP so that the shape would be perfect to wrap around the cup. I used Tombow adhesive so it would stay adhered until the end of time! I decided to hot glue the cup to the base of the box. This way you can add some little treats inside the cup too and won’t move around in the explosion box.

I love how the Warm Wraps dies have such great layering options. The top of the coffee cup illustrates this perfectly and I used this layering option on all of the panels.

final.jpg

I would love to share this project with you! I will be offering it as a class on October 21st at 12:30 and October 23rd at 7pm. If you are in the Edmonton area please feel free to reach out if you would like to come stamp with me, or order any of the supplies by following the link to my store. Click on the button below to contact me to sign up for this class!

sign up now