Around the World on Wednesday--3D projects!

Hello friends! I love when I can participate in a 3D Design Challenge because I loosely interpret 3D as anything but a card—-so the sky is the limit with what you can create! I can’t wait to see what everyone has designed this month!

91442295_10216484369808661_2887014979863576576_n.jpg

The days are getting sunnier and the snow is melting here in Edmonton, where I live! So I have definitely been feeling those spring vibes and I wanted to create a wreath for my front door to welcome in the change in season!

IMG_4631.jpg
 

I picked up a twig style wreath from my local craft store. Typically these are pretty inexpensive wreaths that have a lot of creative options.

I used hot glue to pretty much assemble the entire project from the flower construction to adhering everything to the wreath itself.

IMG_4625.jpg

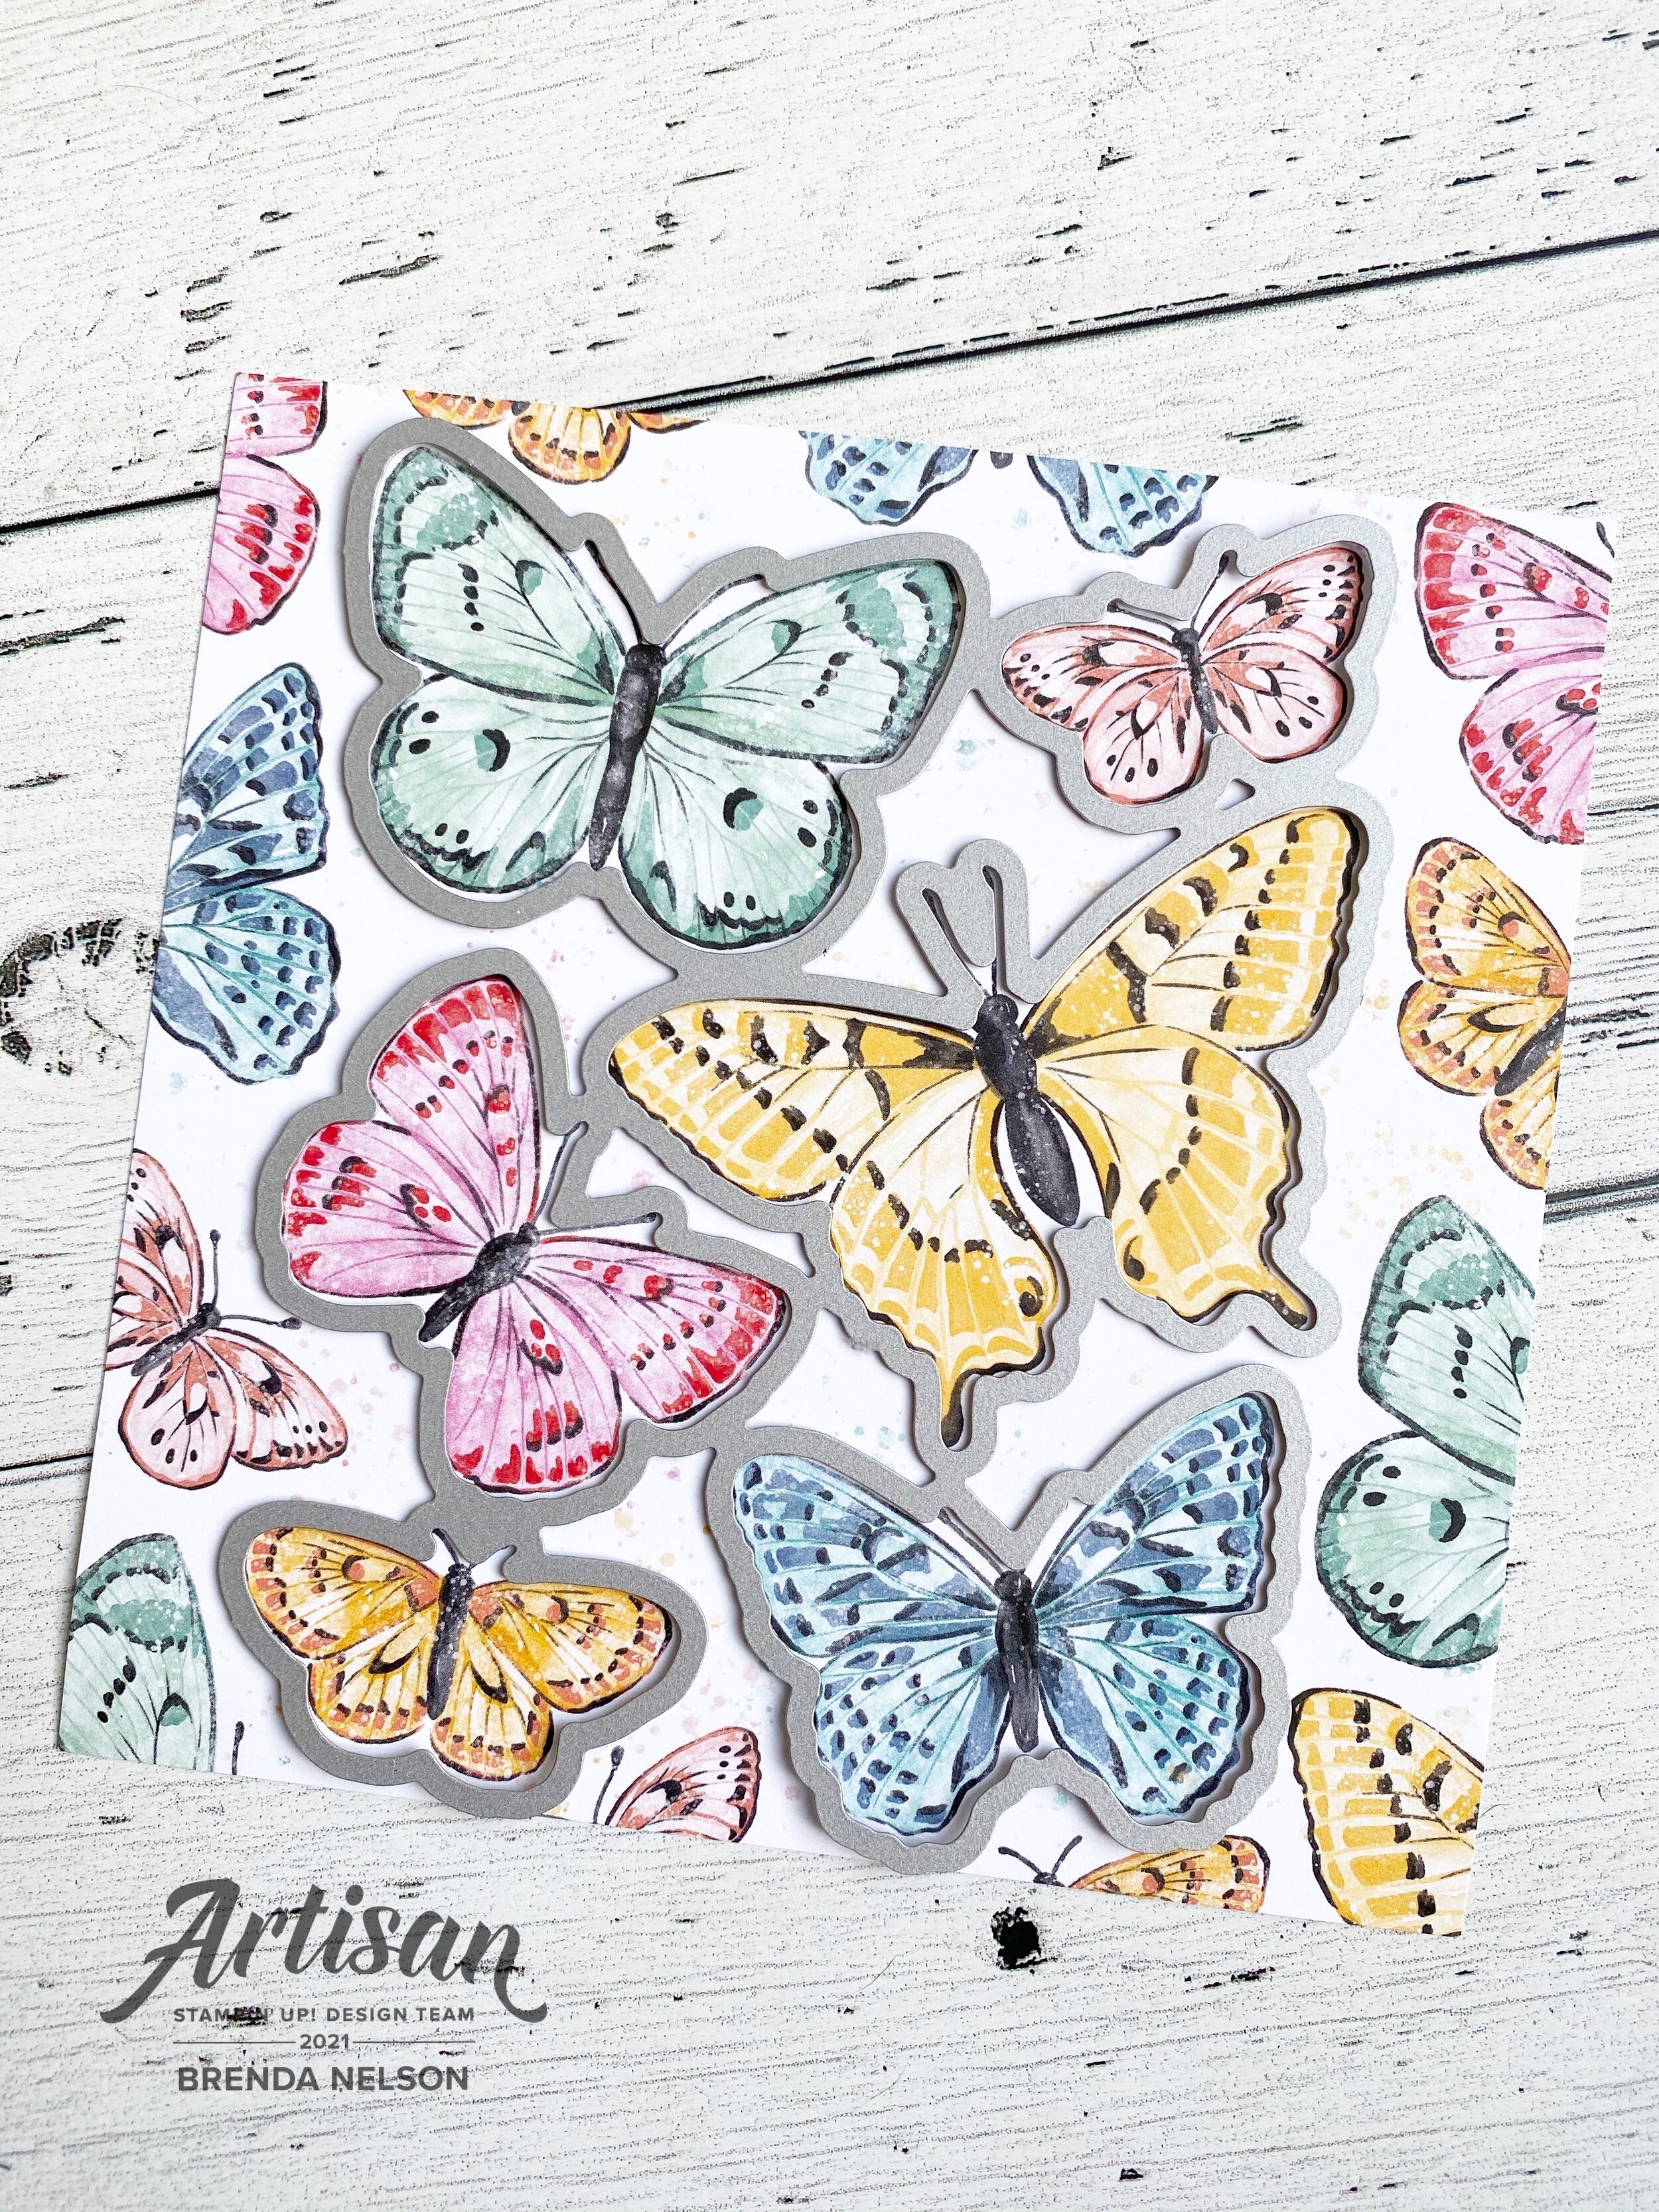
The Butterfly Brilliance Bundle is really exciting and new right now so I knew that I wanted my spring wreath tot have some butterflies on it. I stamped them with Momento Ink and colored them with a light hand using the Water Painters and the following ink colors—Calypso Coral, Mango Melody, Just Jade and Mint Macaron. I also added Wink of Stella over top of the butterflies to give them a little glimmer.

I love that you can stamp all these butterflies ONE TIME and then die cut them all in one go! It makes creative projects like this so much faster to put together.

IMG_4628.jpg

I cut the word SPRING out using the Playful Alphabet Dies and the Foam Adhesive Sheets. The letters are cut from the Butterfly Bijou Designer Series Paper and are placed on a Stitched Oval that is stamped with some of the butterflies from the Butterfly Brilliance stamp set in Soft Seafoam. Behind the sentiment I created an oversized bow with the Fine Art Ribbon from the Art Gallery Suite.

The large Calypso Coral flower is created using the Heart Builder Punch. The inside is just a strip of Bumblebee card stock that I cut little slits into and rolled up to add to the center. When its rolled you just fan it out!


I used both of the daisy punches (original and medium) along with the Perennial Petals Dies to fill in my wreath. I stamped some medium daisy’s in Pool Party from the Daisy Lane stamp set.

The Blushing Bride and Calypso Coral flowers shown beside are created by cutting the flower 5 times and then stapling them together. You can then fold and squish them together and add a smaller flower into the center to hide the staple.

IMG_4626.jpg
IMG_4627.jpg

I love how the Perennial Petals Dies layer up so well to create so much dimension! The Pool Party flower shown here has 4 layers with an Elegant Faceted Gem in the center.

I am really happy with how this spring wreath project turned out and I can’t wait until I can display it on my door full time. Living here you never know when 3rd, 4th or 5th winter might kick in again! Hahaha! Probaby after May long weekend we should be safe.

Next up on the hop you will be visiting the awesome Tricia Butts in the United States! I love how our hop takes you all around the world!


Create with Connie and Mary-Valentine's Favors!

I am super excited for Valentine’s Day this year and I plan on spoiling some of my favorite Galentine’s with a super cute project! Valentine’s favors happen to be the theme for this week’s Create with Connie and Mary challenge!

Design Team.jpg
final 15.jpg

I was super excited about the Hearts & Kisses stamp set in the January to June catty as I loved the sentiments “Happy Galentine’s Day” and “You go, Girl!. I knew right away I wanted to make a special gift with this set.

I honestly think the stand out feature of this card is the True Love Designer Series Paper—don’t these hand trimmed flowers look AMAZING when paired agains the blended Flirty Flamingo background? This paper has unlimited potential as you can feature black & white imagery on literally anything or color this paper with thet variety of color tools we have at our disposal.

For the background, sentiment tag, and heart border (cut with the Floral Heart Dies) I used Flirty Flamingo ink with our new fabulous Blending Brushes.

I tied Blushing Bride twine around the front panel with a Heart Charm attached (LOVE!) and added some Matte Black Dots. This entire product suite is phenomenal!

final+%281%29+8.jpg

My coordinating Love You Always Treat Box is my favorite of this duo. I am going to fill this box with some of my Reese’s Valentines Surprise Cookies that I shared on my blog last Valentine’s Day! You can click this link to go to my recipe or click on my Lifestyle Tab and then Favorite Recipes and you will find it there! Your welcome in advance, these cookies are AMAZING!

Cookie Recipe

I wrapped the box with another pattern from the DSP and added some more of the flowers that I hand trimmed from the paper. This time I also used my Blending Brush to add a pop of color with the Flirty Flamingo ink.

I added some Blushing Bride Metallic Ribbon and some sliver metallic thread to the back of my label. The sentiment is from the Always in my Heart stamp set and the tiny heart is cut using the Kangaroo dies.

I love this project combo and cannot wait to deliver these to some of my special Galentine’s this year!

I love this project combo and cannot wait to deliver these to some of my special Galentine’s this year!

To see what Melissa has created you can click BACK and to see what Connie designed this week you can go NEXT. I hope you hop the whole way through so you don’t miss anything!

Butterfly Bouquet

Hello crafty friends! I am so excited about this brand NEW Butterfly Bouquet bundle that is just being released by Stampin’ Up! This is a limited time promotion available to Demonstrators today (another awesome reason to join my Glitter Girls Team—early access!) and customers on March 2, 2021.

As a member of the Artisan Design Team (dream come true) we were able to work with these fantastic products early so we can surprise and delight you with some fantastic samples!

final 21.jpg

I knew as soon as I saw this product offering that I wanted to create a scrapbook page. Its so easy too when your subject matter is so adorable—this photo is of my son and dog, often referred to as my Number One and my Number Two favorites…can you guess which is which? This is a hilarious inside family joke as I actually have two other kids! hahaha!

02.02.21_SHAREABLE_OOP_Q1_NA.jpg

This new product offering includes the Butterfly Brilliance Cling stamp set, the Brilliant Wings Dies, the Butterfly Bijou 6x6 Designer Series Paper stack and the Natural Touch Specialty Paper—you can order everything individually, as a bundle and as a collection. My understanding is that the two papers are also limited edition, meaning they will not be available like the stamp set and dies in the upcoming Annual Catalogue!


What I love about this new DSP is that the dies will cut out the butterflies from the paper! I used this tip on my page and embellished the butterflies by adding Fine Tip Glue on select areas of their wings. It is hard to capture in a photo but the glue dries shiny so it gives the wings a bit more depth and interest.

BrendaNelsonOOPJan2021.jpg
final (1) 10.jpg

I wanted to use a little bit of everything that was available in this collection. I stamped the butterflies in Whisper White Craft Ink on the background and embossed them with white embossing powder. I used the dies as I mentioned above to cut the butterflies from the DSP and I used the dies to cut out some white butterflies. I really wanted the colorful DSP butterflies to be the showcase of my page.

final 19.jpg
 

I just love the coordination of the dies cutting out the butterflies, I think this is fantastic selling featuring!

The colors in the Butterfly Bijou paper are Bermuda Bay, Blushing Bride, Calypso Coral, Just Jade, Magenta Madness, Mango Melody, Mint Macaron, Misty Moonlight, Poppy Parade and So Saffron! Isn’t that quite the list?

final 21.jpg

I layered a strip of the Natural Touch Specialty paper (it feels like a very thin wood veneer) onto my page followed by a Just Jade card stock photo mat, and two other pieces of DSP from the collection, offsetting them at different angles.

The stamp set itself does not have any sentiments, so I borrowed You are Amazing from the stamp set of the same name and You Mean so Much to Me from the In Bloom stamp set, both in the current January to June catalogue!

I hope this page has inspired you to consider this new product release. If you are not a current Demonstrator I would love to have your join my team if you live in Canada! You can do it with an easy click below or send me a message, I would love to chat with you about the opportunity!

join my team

Artisan Design Team January Share!

OMG friends! I can’t believe I can actually TYPE the word ARTISAN…its literally been a dream of mine for the last few years and a GOAL (big difference) over the last 18 months. I started my blog with the purpose of having a platform to apply for the team and to create a digital archive of things I love. Scrapbook pages, recipes, cards and experiences. I joined some blog hops which has been exciting and has helped me grow and develop, meet deadlines, improve my photography and so much more! My blog is a place where I can be somewhat interactive with you (I love comments) and I am still learning and wanting to add more features!

So when I got the call on September 16th, yes I know the date as it was my 20th wedding anniversary, I cried. Like ugly cry and was so so happy. My daughter was in the car with me and had no idea what was going on!!! Haha! My biggest hope for my kids is they can set a goal, work and strive toward it with vision and purpose and achieve it. It is actually quite amazing. So I am SO HAPPY to be on the 2021 team and to share my creations with you!

My very first Artisan project featured the In Bloom Bundle and Paper Blooms Designer Series Paper (from Sale-a-bration 2021).

My very first Artisan project featured the In Bloom Bundle and Paper Blooms Designer Series Paper (from Sale-a-bration 2021).

Let’s start with the fun pull out birthday card in the Love You Always Treat Boxes! As soon as I saw how these treat boxes worked I knew I wanted to create some kind of pull out project. I decided on a birthday card after seeing all the fantastic sentiments in the In Bloom stamp set.

The boxes are easy to assemble which is awesome. To create the pull out feature you need a piece of Basic White card stock measuring 3 1/2 x 11 1/4. Score at 2 1/4, 4 1/2, 6 3/4 and 9. Accordion fold it and add the Petal Pink panels on measuring 2 x 3 1/4. You need 5 panels.

Then you can stamp and embellish as desired!

The colors I used to create this pull out birthday card are Petal Pink, Calypso Coral, Sahara Sand, and Gold Foil accented with the Gilded Leafing. To add the Gilded Leafing to my flowers I used Heat’n Stick Powder with a finger dauber. The dauber allows you to have more control over where you want to apply the Heat’n Stick powder. Once you heat set the powder (do not over heat as it will lose the stickiness) press it into your Gilded Leafing and use the large Water Painter to brush off the excess and reveal the details.

Of course I also had to create a scrapbook page to feature this fantastic Paper Blooms Designer Series Paper and my sons 16th birthday!

Of course I also had to create a scrapbook page to feature this fantastic Paper Blooms Designer Series Paper and my sons 16th birthday!

I chose the dark pattern from the DSP because I thought the Night of Navy would really pop against a Basic White background. I flanked each side with strips of Calypso Coral card stock. I didn’t want to use 12x12 paper (I covet for page bases) so I cut the strips from 8 1/2 x 11 and pieced them together behind the photo mat. I also popped the Gold Foil photo mat up on Dimensionals.

You may notice some circles on the layout and those are cut with punches from the DSP.

I applied the same technique to the flowers on this page as the pull out birthday card with the Gilded Leafing.

final 3.jpg

This layout combines flowers cut using the Pierced Bloom dies, stamped flowers and flowers cut from the DSP. You will notice in this picture that I stamped the “You are Amazing” right on the circle cut from the DSP and embossed it in gold. I love this feature!

I used the new Resin Hearts, Gilded Gems and Gold Metallic Pearls as accents on the page. I love the fun bow cut with the dies and Gold Foil paper.

I hope you enjoyed my first official Artisan Design Team showcase projects! Make sure to check out Stampin’ Up!’s Facebook page to see everyone’s creations and follow me over on Instagram @stampwithbrenda

I hope you enjoyed my first official Artisan Design Team showcase projects! Make sure to check out Stampin’ Up!’s Facebook page to see everyone’s creations and follow me over on Instagram @stampwithbrenda

If you live in Canada and would love to create these projects yourself you can shop my Online Store or use the Hostess Code to have items sent direct to you! Just confirm it says “Shopping with Brenda Nelson” in the shopping bag :)

shop with me

Flip & Pull Mini Album Project

I wanted to share a mini album I made for my Mother in Law for this past Christmas. I took a class that my friend and fellow demonstrator Jessica, @jessbstamps, offered in November. We put this album together over 2 sessions and then were left to add photos and embellishments on our own. It truly is a one of a kind project and gift!

final 3.jpg

This completed album definitely has some weight to it. Because the album was so interactive with photo panels opening and flipping in every direction, I did have to be more aware of embellishing. So while I didn’t embellish to my typical avid standards I am happy with what I was able to add into the album. I think it will make a really great keepsake as it is pretty well constructed. We used a lot of Tear & Tape on this project!

I want to note that because I do not have this album in front of me anymore, I cannot exactly remember the order of the pages. So the way my photos are shared my not actually be how they are in the album! Disclaimer! And I have NO measurements or anything for you as I did not design this project.

We have so many fantastic stamp sets to choose from that I had no shortage of inspiration to embellish this album. I added in a variety of ribbons and Silver Metallic Pearls through out and kept the colors true to the Peony Garden DSP. The base of the album is Smoky Slate card stock and we almost used an entire package to make this album and almost the entire package of Peony Garden DSP.

We have a very large family on the Nelson side. 19 grand kids! My nephew recently married so we are now at 20, plus all of the adult adults! So this project was a perfect way to showcase everyone and reflect on the many amazing family memories we ha…

We have a very large family on the Nelson side. 19 grand kids! My nephew recently married so we are now at 20, plus all of the adult adults! So this project was a perfect way to showcase everyone and reflect on the many amazing family memories we have made so far.

My favorite aspect to this album are all of the fun pullout pages and the pages that lift up in every direction possible. Some flip up, some flip down! Pages pull out and fold it. Its actually quite spectacular!

There is so much to explore and see while looking through this project.

One of the gals that took this class with me called these little panels ‘Saloon Doors’, we all thought that was the perfect way to describe them!

One of the gals that took this class with me called these little panels ‘Saloon Doors’, we all thought that was the perfect way to describe them!

final 21.jpg

I hope this project has inspired you! I would love to make another one and fill it with memories of my family, but for now I know my Mother in Law and extended family, who live a province away, will enjoy looking at this mini album!