Color Fusers December 2021

How can it be? How can it really be December 2021? One thing that does remain constant is the passing of time…and my love of stamping! I am really excited about the color combo our team has this month!

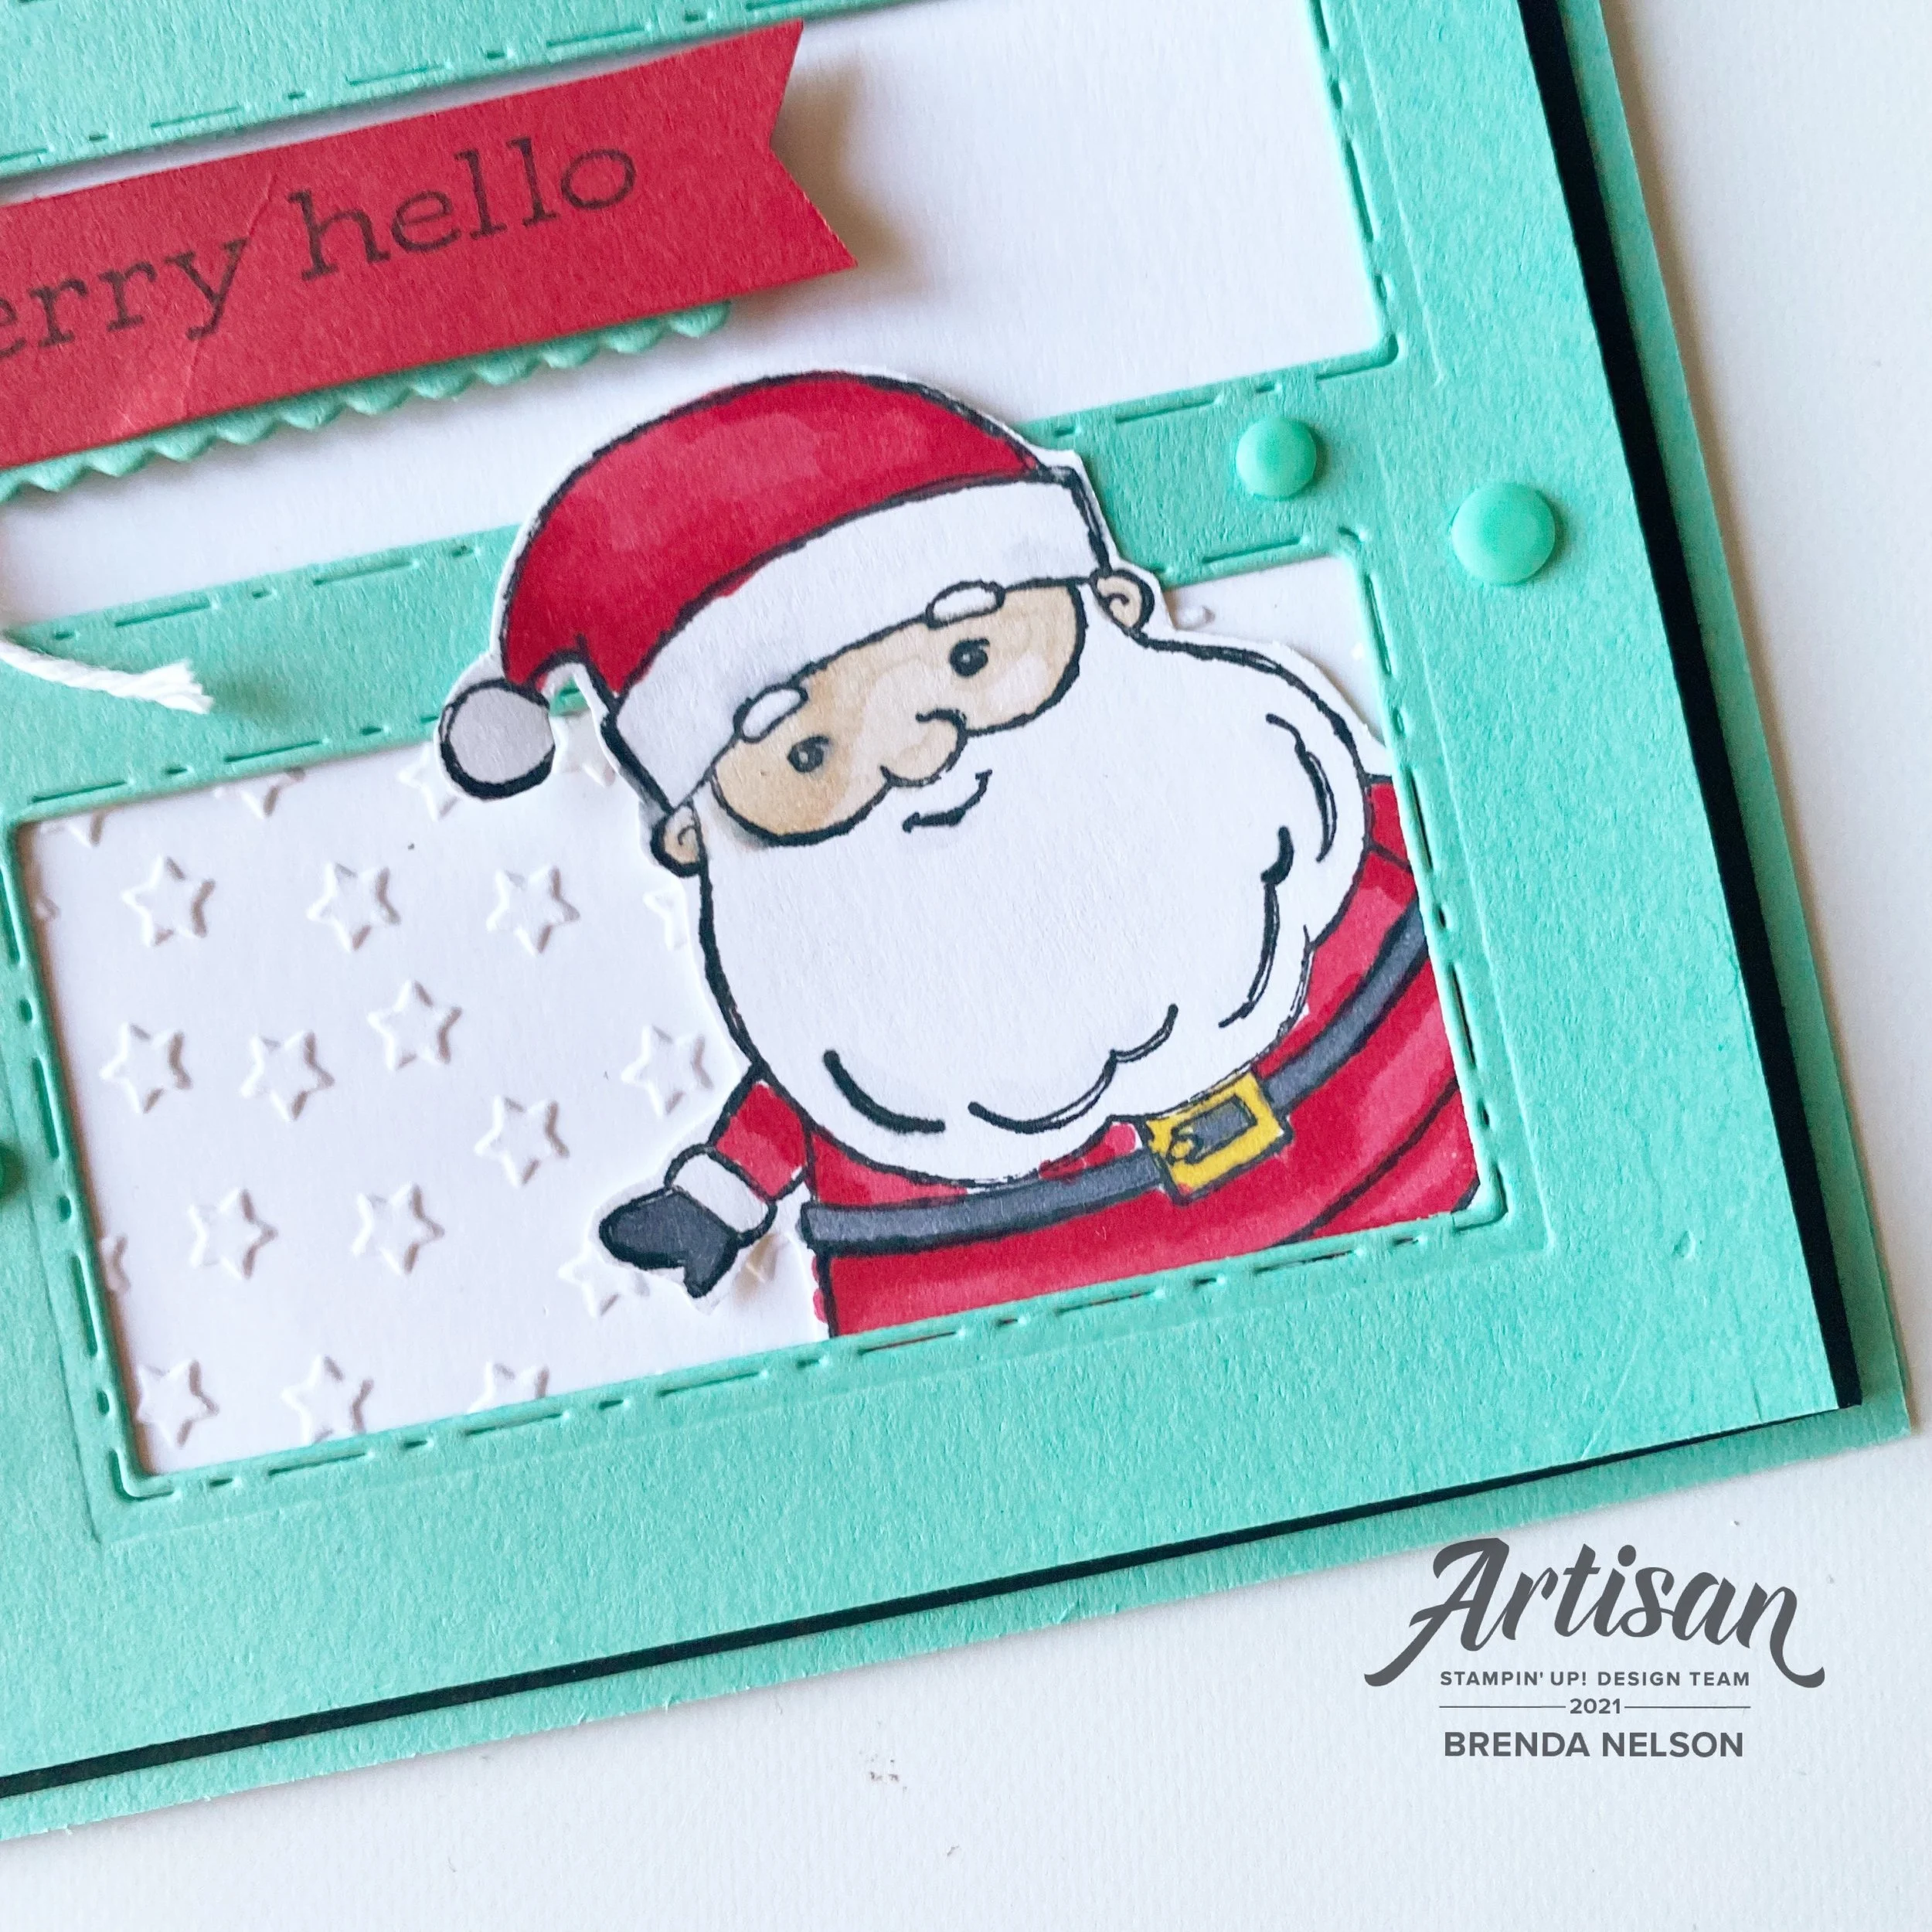
Isn’t this a unique color combo? I love pairing two dark deep colors with such a light soft pink! And because Petal Pink is one of my favorite pinks I decided to make it the base of my project and use the other two as accent colors!

I absolutely love this card and am excited to share it here and have some friends come over to make it too!

The base and first layer of my card are Petal Pink. I distressed the edges with my fingers and stamped a couple snowflakes from the Merry Snowflakes stamp set in the same color of ink on the background. I used the dies to cut out a snowflake in the same color. I love the stitched detailing on these snowflakes!

The sentiment is from the stamp set Encircled in Warmth and is stamped in Cherry Cobbler ink and die cut with the Layering Circles Dies. I brought attention to the sentiment by swiping my Blending Brush over “Christmas” with some Petal Pink ink to give it a little pop. It is probably my favorite aspect of this card!

The trio of trees is from the Cloche Dies and are now my favorite new thing! I can’t wait to incorporate them onto another project! They are die cut from Evening Evergreen card stock. I added this color in again behind the sentiment with the Evening Evergreen Chevron Weave Ribbon and some silver metallic cord from the Simply Elegant trim. A few little In Color Jewels and this fun whimsy Christmas card is complete!

Now aren’t you LOVING this color combo? I can’t wait too see how the rest of the gang incorporates these colors into their designs! You can go back to see what Melissa has designed and forward (next) to see what my friend Melanie has created! They are both so talented! Make sure to leave us some comments!

If anything catches your eye on my project and becomes a must have, please consider shopping my online store if you have not already! Thank you in advance! I love to do what I love!

Thank you for joining in and following along with our hop during 2021~ looking forward to sharing with you in the new year. Blessings to you and your family,

B.

Holly Jolly Santa

I was recently asked to be a guest designer for a super exciting Instagram account that I follow and many of you know and love! This is actually my OUTTAKE project as when they approached me and gave me a list of stamp sets to chose from, I choose this set—or so I thought! haha! Turns out I had my stamp sets mixed up! So this project is now going to be inspiration for you!

The best part is I spent quite a bit of time thinking about this card and the design, so I cannot let it go to waste! This was actually the first time I broke the seal on the Picture This Dies even though I have had them since June! Does that ever happen to you? You buy something and then get distracted from using it?

Well I do LOVE how this project came out in the end. I tried to create 3 little panels that felt unique. The base of the card is my favorite color Coastal Cabana. The first layer is black and then a layer of Basic White was added in after another layer of Coastal Cabana was die cut with the Picture This Die.

In the first panel I stamped the little star from the Be Jolly stamp set on the Basic White layer using Smoky Slate ink. My first Santa is stamped with Momento Ink and colored with the Stampin’ Blends markers in Real Red, Ivory, Basic Black and Petal Pink. I use the Petal Pink chubby tip to add a dot too each of Santa’s cheeks for a hit of rosy. I also use the light Smoky Slate Stampin’ Blend to add detail to his beard and hat pom pom.

I love how the Picture This Dies leave a stitched detail behind. And do throw away all the little bits that get cut out, those can definitely be used on a new project!

I like to add details to my sentiments so for this project I added a little bitty scalloped detail underneath the “A Merry Hello” by using a die from the Stitched So Sweetly Dies and a bit of white twine from the Bakers Twine Essentials Pack!

You can see just a hint of the bottom panel—I ran it though the Star-Crossed Embossing Folder, focusing just on the star half of the folder. I added a ton of Coastal Cabana Playing with Patterns Resin Dots to my card to play up the fun and whimsy feel! This Santa is colored with the same Stampin’ Blends and both are hand trimmed with paper snips to tuck into the little panels.

So even though this card is my OUTTAKE I think its pretty damn cute! And I am wondering why the heck it took me so long to use the Picture This Die set! You will definitely be seeing it in the future! I hope everyone has a merry day and if you are inspired to create your own project, please consider shopping my store if you live in Canada!


Comments are always welcome and appreciated!

Around the World on Wednesday--Let's Shake Things Up!

Our theme this month is NOT a shaker card, well it could be, but it is really to shake up your creativity by creating something new with a technique or such that you have not tried in the past. This was the perfect time for me to experiment with the Alcohol Stampin’ Blends technique that is super popular!

91442295_10216484369808661_2887014979863576576_n.jpg

I want to thank my friend Alanna Wharf as she shared how to create this technique during a recent Summer Stamp Camp that I was co-hosting and it inspired me to try it out! I wanted to use this Blends technique on a holiday card—tis’ the season! Okay, well it is still summer but you can never be too ahead for the holidays!

final (31).jpg

The base of my card is on Shimmery White and you must use Vellum to create this alcohol Blends technique. You also need a Stampin’ Blend in a color (s) of your choice, in my case I used Light Cherry Cobbler, and some Isopropyl Alcohol (or Rubbing Alcohol). I used an old Aqua Painter (I knew I kept those for some reason, haha!) to apply drops of the Isopropyl Alcohol. The internet is full of a ton of videos (not my specialty) on how you can execute this technique. It is surprisingly easy!

I created my little area and then cut the star shape from the Seasonal Swirls Dies in Cherry Cobbler card stock. I added some yellow stars from the Jolly Felt and Christmas Cheer Dies. I was so happy that felt returned to the Holiday Catalogue this year again!

“Jingle” is from the Holly Jolly Wishes stamp set—this is a fantastic stamp set full of holiday greetings!

Here is a close up of how fun this technique looks like.  I will definitely be experimenting with this technique again!

Here is a close up of how fun this technique looks like. I will definitely be experimenting with this technique again!

I wanted to create another fun little area at the top of my card and one of my favorite little dies as the moment is the ‘ticket’ die from the Bloom Dies in the Annual Catalogue. I used it to cut some of the Sweet Stockings DSP and then trimmed the ticket down in size. I found “Happy Christmas” in the Words of Cheer stamp set.

Another little felt star and some Matte Decorative Dots completed this fun little area!

Another little felt star and some Matte Decorative Dots completed this fun little area!

I don’t typically add anything to the insides of my cards, but I thought it would be fun in this case to add the complete ‘Jingle’ phrase and another star die cut.

final (32).jpg

I can’t wait to see what the rest of the Around the World Design Team creates based on this theme! I love how you can ‘Hop’ all over the world to see everyone’s unique styles! I live in Edmonton, Alberta, Canada! Tricia Butts is up next and resides in the United States. Click on the button below to hop to her page!


Around the World On Wednesday--CASE the Designer

Hello friends! Welcome to another fantastic blog hop! I love this hop because the talent of this group is so outstanding and this month our theme is to CASE (Copy and Share Everything) one of the Designers in the hop. I am happy that I am casing Tricia Butts from Colorado! It was actually really hard to pick a card to CASE as she had so many great designs to choose from!

91442295_10216484369808661_2887014979863576576_n.jpg

I decided to pick a project of Tricia’s to case that had stamping, coloring and used the Stamp Cut & Emboss machine. Tricia created a really beautiful card that featured Polished Pink and the Hand Penned Bundle, two brand new products that I just love. It came me the idea to create a card that featured a new Christmas Floral stamp set and embossing folder.

IMG_9744.jpg

I decided to keep as many elements of Tricia’s card in my design as well. So I started with a Basic White card base and a Poppy Parade layer that I ran through a new folder called Timeworn Type to mimic her Polished Pink embossed layer.

I love how Tricia used a scallop edge on her card design as an accent. It is one of my favorite things to do too! The one I chose is from the Peony Dies and Tricia used the Hand Penned Dies.

I love how Tricia used a scallop edge on her card design as an accent. It is one of my favorite things to do too! The one I chose is from the Peony Dies and Tricia used the Hand Penned Dies.

The central image on my card is from the Words of Cheer stamp set which is coming out in the new July-January (JJ) catalogue. This catalogue features Fall, Halloween and Christmas and you are going to LOVE IT! If you live in Canada and would like one, leave me a comment and I will make sure to get you one!

I colored this large poinsettia image with my Stampin’ Blends. The poinsettia is colored with Cherry Cobbler and the berries are with Poppy Parade. The greenery is colored with Old Olive. I added Wink of Stella over top of the poinsettia flowers too!

final (27).jpg

I loved how Tricia stamped her sentiment in White Craft Ink and embossed it so I decided to do the same with my sentiment “Wishing you a Joyful Christmas”. I wanted to bring a little gold into my card to accentuate the gold from the Wink of Stella so I added some gold metallic twine behind my sentiment.

A little strip of Gold Foil paper along the top was a little finishing touch to bring in a bit more gold.

I think this is SUCH a #goodcarddesign that can be repeated using any embossing folder and stamp set! I think you should give it a try yourself! Just make sure to give Tricia the design credit :)

To continue on the hop you are actually going to go and visit Tricia’s blog yourself! Just click on the link below! Thank you so much for coming by today! I hope you have to visit everyone on the hop for some fantastic inspiration!


A Card a Day in December--Merry Christmas!

Merry Christmas everyone! May your heart be full and full of gratitude for all that you have. I hope you all have a lovely holiday.

Now that my kids are getting a bit older I am taking some joy in creating a fancier Christmas table. This year I was inspired to make some personalized boxes for each person’s place setting. I am hoping to use these for a few years to come and will include a special gift inside each year.

final+%2824%29.jpg

I used the mini pizza boxes and created a wrap using the Heartwarming Hugs Designer Series paper. It is snug enough to stay on but easy enough to slip off and on.

I used the Wreath Builder dies in Mossy Meadow and Old Olive for the wreath and then added a banner in Real Red card stock. I cut everyone’s names with the Playful Alphabet dies and Foam Adhesive sheets. I added some sparkle with my Wink of Stella pen on top.

final (19).jpg

I wanted the mini pizza boxes to double as a gift card holder. We have entered that season of parenting when our kids have moved beyond toys and are happy to get clothes and gift cards. So each person will get a final gift card when we enjoy our family meal.

It easily attached the gift card with a glue dot and can reuse the lid again and again to add a gift card.


I am hoping this will become a new family tradition. I told my hubby to buy me a gift card and then had Summer sneak it inside so it will even be a bit of a surprise for me too!

I love personalized gifts and I think my kids will be excited to see their names on something!

I hope you are inspired! These could make cute place settings for any holiday occasion!

final (25).jpg
final (23).jpg