Merry Christmas Wreath
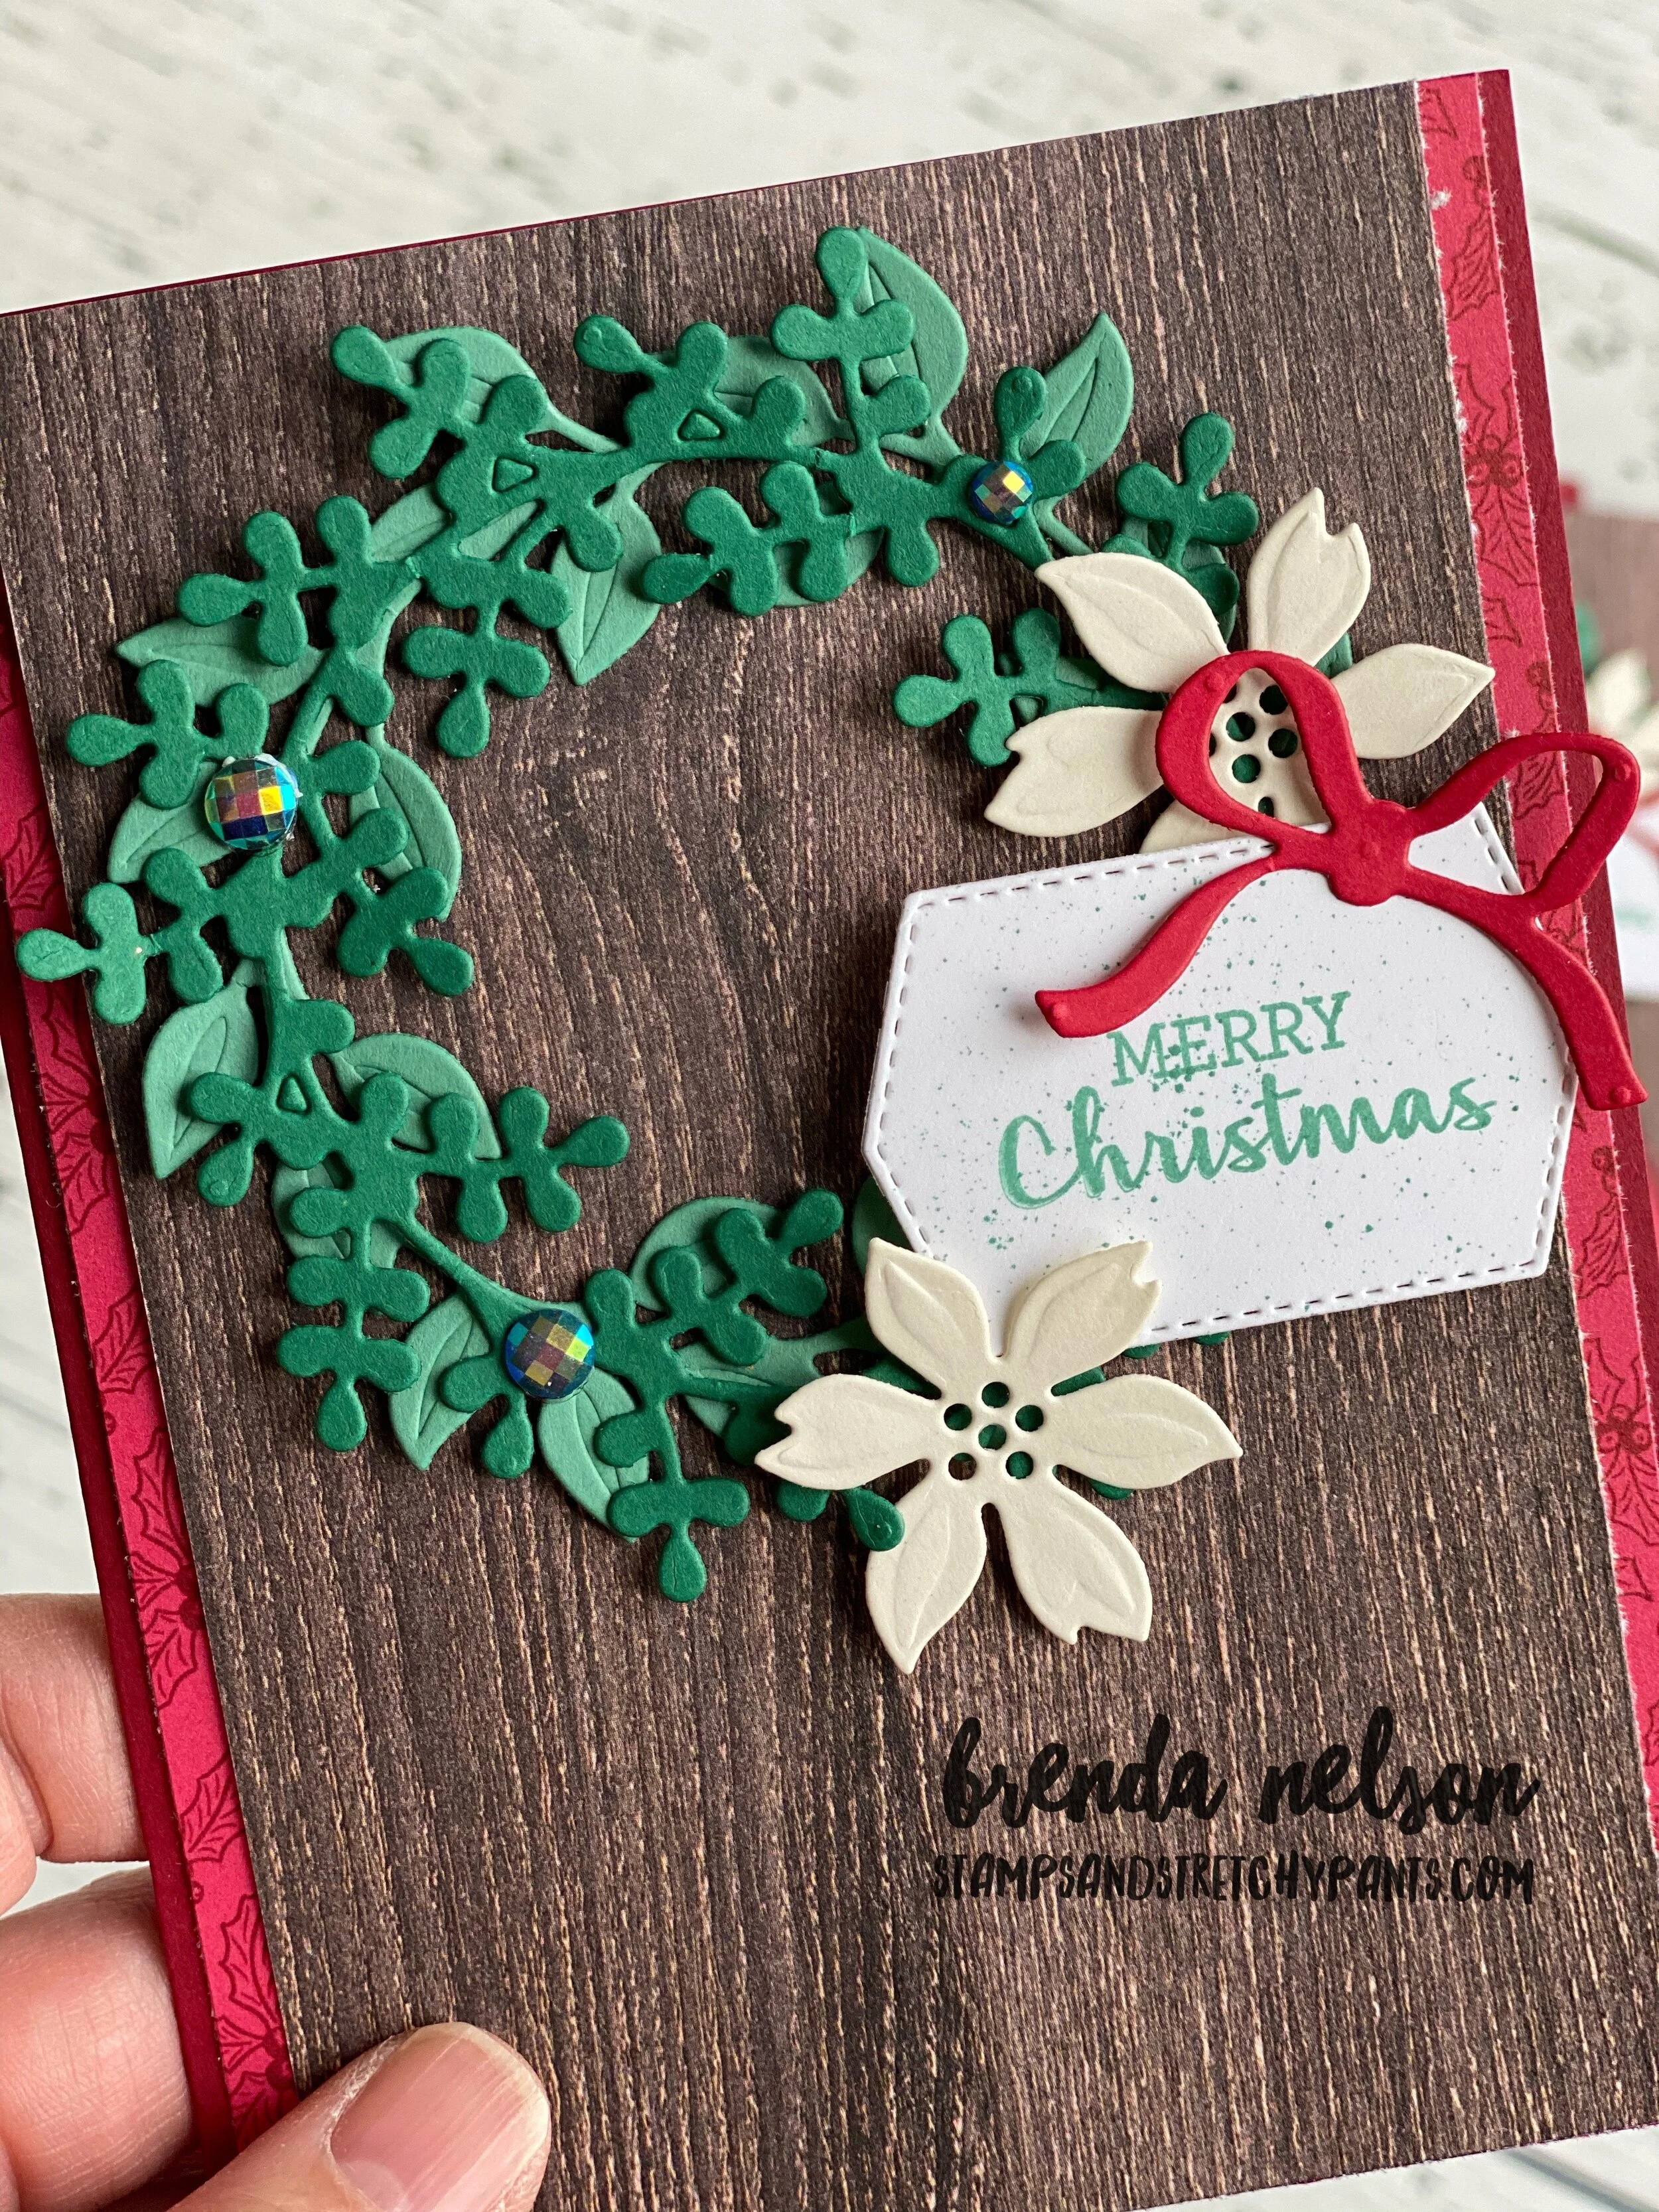
Okay, so I will admit that I am late to the game here with the Arrange a Wreath Bundle…and I LOVE it! I recently took advantage of a 50% off item to get this bundle and its so fabulous! I decided to pair up the wreath with the In Good Taste Designer Series Paper to mimic a rustic front door.

final.jpg

I loved this card so much I decided to make a bunch for a card swap I have on the horizon. I started by choosing Just Jade and Shaded Spruce to be my wreath colors and added in some Very Vanilla poinsettia’s , both cut from the Wreath Builder dies.

Merry Christmas is stamped in Just Jade ink with a bit of ink flicking done in the same color. I added some Blue Adhesive Backed Gems to the wreath as well. Don’t let the description fool you, these gems have a magical quality of reflecting the surface they are on, so you can see on the wreath how they pick up the green tones! Sometimes, the only way to figure these things out is by playing around.

final.jpg

You may notice I added another little strip of DSP to the side of the woodgrain DSP. It from the Tis’ the Season 6x6 stack and it combines Real Red and Cherry Cobbler together. The base of my card is Cherry Cobbler which helped that little strip just pop off the page.


I absolutely love how this finished card turned out. It is traditional holiday colors and Christmas feel to me and I hope you will give this bundle a try!

If you are in Canada, you can shop my online store by following the link below or using my host code on the side of my blog. I would love to send you a thank you card so make sure you don’t click NO CONTACT when you are ordering (unless you want to be anonymous).

Have a fabulous day!

final.jpg
shop with me

Man's Best Friend

Recently a dear friend of mine lost her beloved dog after many years of being a beloved family member. She asked me to create a scrapbook page in his memory.

She asked me to use the Playing with Patterns Designer Series paper and the new Playful Pets stamp set. I decided to add in a retired set, Happy Tails, into the design too because it has some really special elements. I also borrowed the phrase “We’re the Best of friends” from the Bird Ballad stamp set.

final.jpg

I chose the color palette of Misty Moonlight, Seaside Spray, and Crushed Curry but you could easily reproduce this page with more feminine colors using the same 6x6 stack (Purple Posy and Calypso Coral).

I cut a large heart using the Stitched Be Mine dies to be the focal point of where Jake’s name was to go. This could also be customizable too. I added lots of stamped hearts and paw prints. This page is an eclectic mix of new products, older favourites and retired stamp sets. Some sets you just can’t part with!


A few different ribbons helped create this focal area. I used the Bumblebee Gingham ribbon, the blue from the Playing with Patterns Ribbon Combo pack and some silver twine I had laying around.

I really loved the sentiment “ A Best Friend” and it worked perfectly right above the Seaside Spray heart.

final.jpg

I actually loved how this turned out so much that I decided to turn it into a card too. Do you ever do that? I often do when I create something I love.

final.jpg

To create the card, I kept many of the same elements as the scrapbook page, but decided to stamp and color with Stampin’ Blends the cute dog from the Pampered Pets stamp set in Smoky Slate with a Crushed Curry collar to coordinate. I kept the ribbons and added in a couple embellshments from the Frosted & Clear Epoxy Droplets collection.

I hope both of these projects inspire you today and I am blessed my friend asked me to create such a meaningful memento.


Stampin' For Christmas-Let's get Christmassy!

Stampin' For Christmas .jpg

Thank you for joining us on this monthly Christmas themed blog hop featuring the many fabulous Stampin’ Up! products we all have to choose from! Sometimes it is hard to pick just one set to focus on! I did narrow it down to the Coming Home Bundle as I am having too much fun colouring all of the houses and trees. Colouring can be so relaxing and its so easy with our Stampin’ Blends! This bundle is part of a larger suite called Trimming the Town.

final.jpg

This stamp set does not have any sentiments to it, which is sort of unique to Stampin’ Up! It is all images. So I pulled in a nice sized ‘Merry Christmas’ from the Tag Buffet stamp set.

I used Balmy Blue as my card base and stamped the sentiment in the same color. The house is coloured in Real Red with Crumb Cake accents and Balmy Blue on the windows. The trees are classic Old Olive and Crumb Cake.

final.jpg

I used one of the dies from the Home Together Dies that has the trees and the snow drift shapes. It created a great background and I stamped directly to this piece. The house and trees are layered over top.

I wanted the illusion of a snow storm too so I stole a snowflake from the So Many Snowflakes dies and added those in. I then created a spray with my Wink of Stella and Balmy Blue markers to add to the snowfall feel.

final.jpg

I think this is a great card that you could easily mass produce and enjoy the relaxing creative benefits of colouring!

You can visit Sue Allen’s blog next to see what her crafty Christmas creation is! I hope you hop all the way through so you do not miss anyone’s creativity!


Bountiful Blessings--Create with Connie and Mary!

Welcome to another Saturday edition of Create with Connie and Mary! This week our theme is Bountiful Blessings so I reached for a ‘tried and true’ stamp set from my collection, Country Home. Sometimes it is easy to get caught up in the ‘new’ stamp sets we have because they are fresh and feel exciting, but we still have fabulous returning favorites in our annual catalogue!


You can make these sets feel ‘fresh and new’ by pairing them up with new colors, embellishments and designer series papers like I have done here.

And sharing items from both of our catalogue publications is key to making sure people know about all of the fabulous products we offer!

fullsizeoutput_12d57.jpeg
final.jpg

I love to color and this set totally fills that need! I used a color palette of Cinnamon Cider, Mint Macaron, Pumpkin Pie, Mango Melody and Old Olive to color and develop this card.

The Mint Macaron layer has the tile image from the stamp set stamped in the coordinating ink color so you just get a glimpse. The main layer of the card is from the In Good Taste DSP collection. LOVE IT!

I wanted to fill out the milk jug a bit with extra foliage so I reached for the Forever Flourishing Dies (pg 110) to add in the little sprigs, they are the perfect itty bitty size to keep in scale with the stamped image!

I wanted to fill out the milk jug a bit with extra foliage so I reached for the Forever Flourishing Dies (pg 110) to add in the little sprigs, they are the perfect itty bitty size to keep in scale with the stamped image!


I wanted to add some gold accents to this card, as gold feels like a fall color to me. I used the Gilded Gems and some Gold Foil paper that I cut with a border die from the Autumn Essentials Die set. I really love die sets that have border options as I find I use them a lot to help highlight a sentiment or photo. And borders with a unique shape can be a great way to add in a subtle pop of color too!

A little Linen Thread bow finishes off the milk jug perfectly!

I really love the color palette of this card so you might see it in an upcoming scrapbook page too!

final.jpg

I hope everyone is soaking up the last few days of September! It went by so fast and now we are into a new month with my favorite holiday! Unless my own birthday can count as a holiday! hahaha!

Make sure you either hop forward to Connie’s blog (NEXT) or backwards to Melissa’s blog (BACK) to see what amazing creations they are sharing with us this week! And if this is your first time joining us, feel free to go back through my blog and see what we have been creating!

Coffee Carriers--not just for coffee!

The very first suite I ordered from the Handmade for You catalogue was the Heartwarming Hugs suite. Once I saw those mini coffee cups and that carrier I was SOLD! Hahaha! I have been crafting with them all month long in preparation for a display I was putting together and let me tell you, they are for so much more than coffee!

This cute little project is home to a little coffee bean plant! Isn’t that fun? I went to a local greenhouse and they told me it would maybe grow a bean in like a decade! hahaha! Keeping it alive for that long is actually more of a challenge!

final.jpg

To create the DSP wrap I sacrificed one of the cups by gently dismantling it. I then traced it onto the Heartwarming Hugs DSP so that the shape would be exactly the same to wrap around a cup. I used Tombow to keep things glued down. I love the color palette of this DSP as it allows you to bring in several brown and green tones and the patterns are so versatile and easy to mix together! I wrapped this carrier in DSP. I want to mention that you cannot wrap one strip of 12x12 around the carrier. It isn’t long enough so you need to cut individual pieces for the 4 sides. I wrapped it with the Real Red Braided Trim which is also a part of this suite.

I decided to add in a couple mini cards alongside my mini plant. I cut them to 2 1/2 inches wide so they could slip in the other side.


The Heartwarming Hugs Suite includes two stamp sets, Warm Hugs and Wrapped in Christmas. I used the Wrapped in Christmas set to make these mini cards and accented them with images from the Warm Hugs set.

The suite also includes two slim embossing folders which are great for adding in some texture like in this card shown.

final.jpg
final.jpg

Don’t all these patterns look awesome together? I love the Mossy Meadow Diagonal Stripe ribbon and the Glitter Star Ornaments in this suite. They help make the perfect tag! You can also see on this tag how fabulous the Warm Wraps Dies are as they have shapes that layer on top of each other! I always love when that is a component of a die set.

final.jpg

I actually ended up giving away both of these carriers as gifts so I wish the recipients luck in keeping these little coffee bean plants alive! hahaha! I also hope they are able to put the mini cards to good use and find themselves inspired.

I will be posting more coffee carrier projects so keep checking back so you don’t miss out! And if you need any supplies to make these projects, please shop my online store!

shop now