A Card a Day in May--Day 5!!

Dream it

〰️

Dream it 〰️

Its TRUE! I am manifesting seeing the ocean in 2022 and if you dream it hard enough, it can happen right? This also ties into the card I wanted to share today for my A Card a Day in May series. This was a card I created as an Artisan Design Team assignment and I love it. I mean really, who doesn’t love a good shaker card?

Fun Fact, the last time I saw the Ocean was in 2019…makes me sad inside but I am hopefully I can dip my toes in one in 2022.

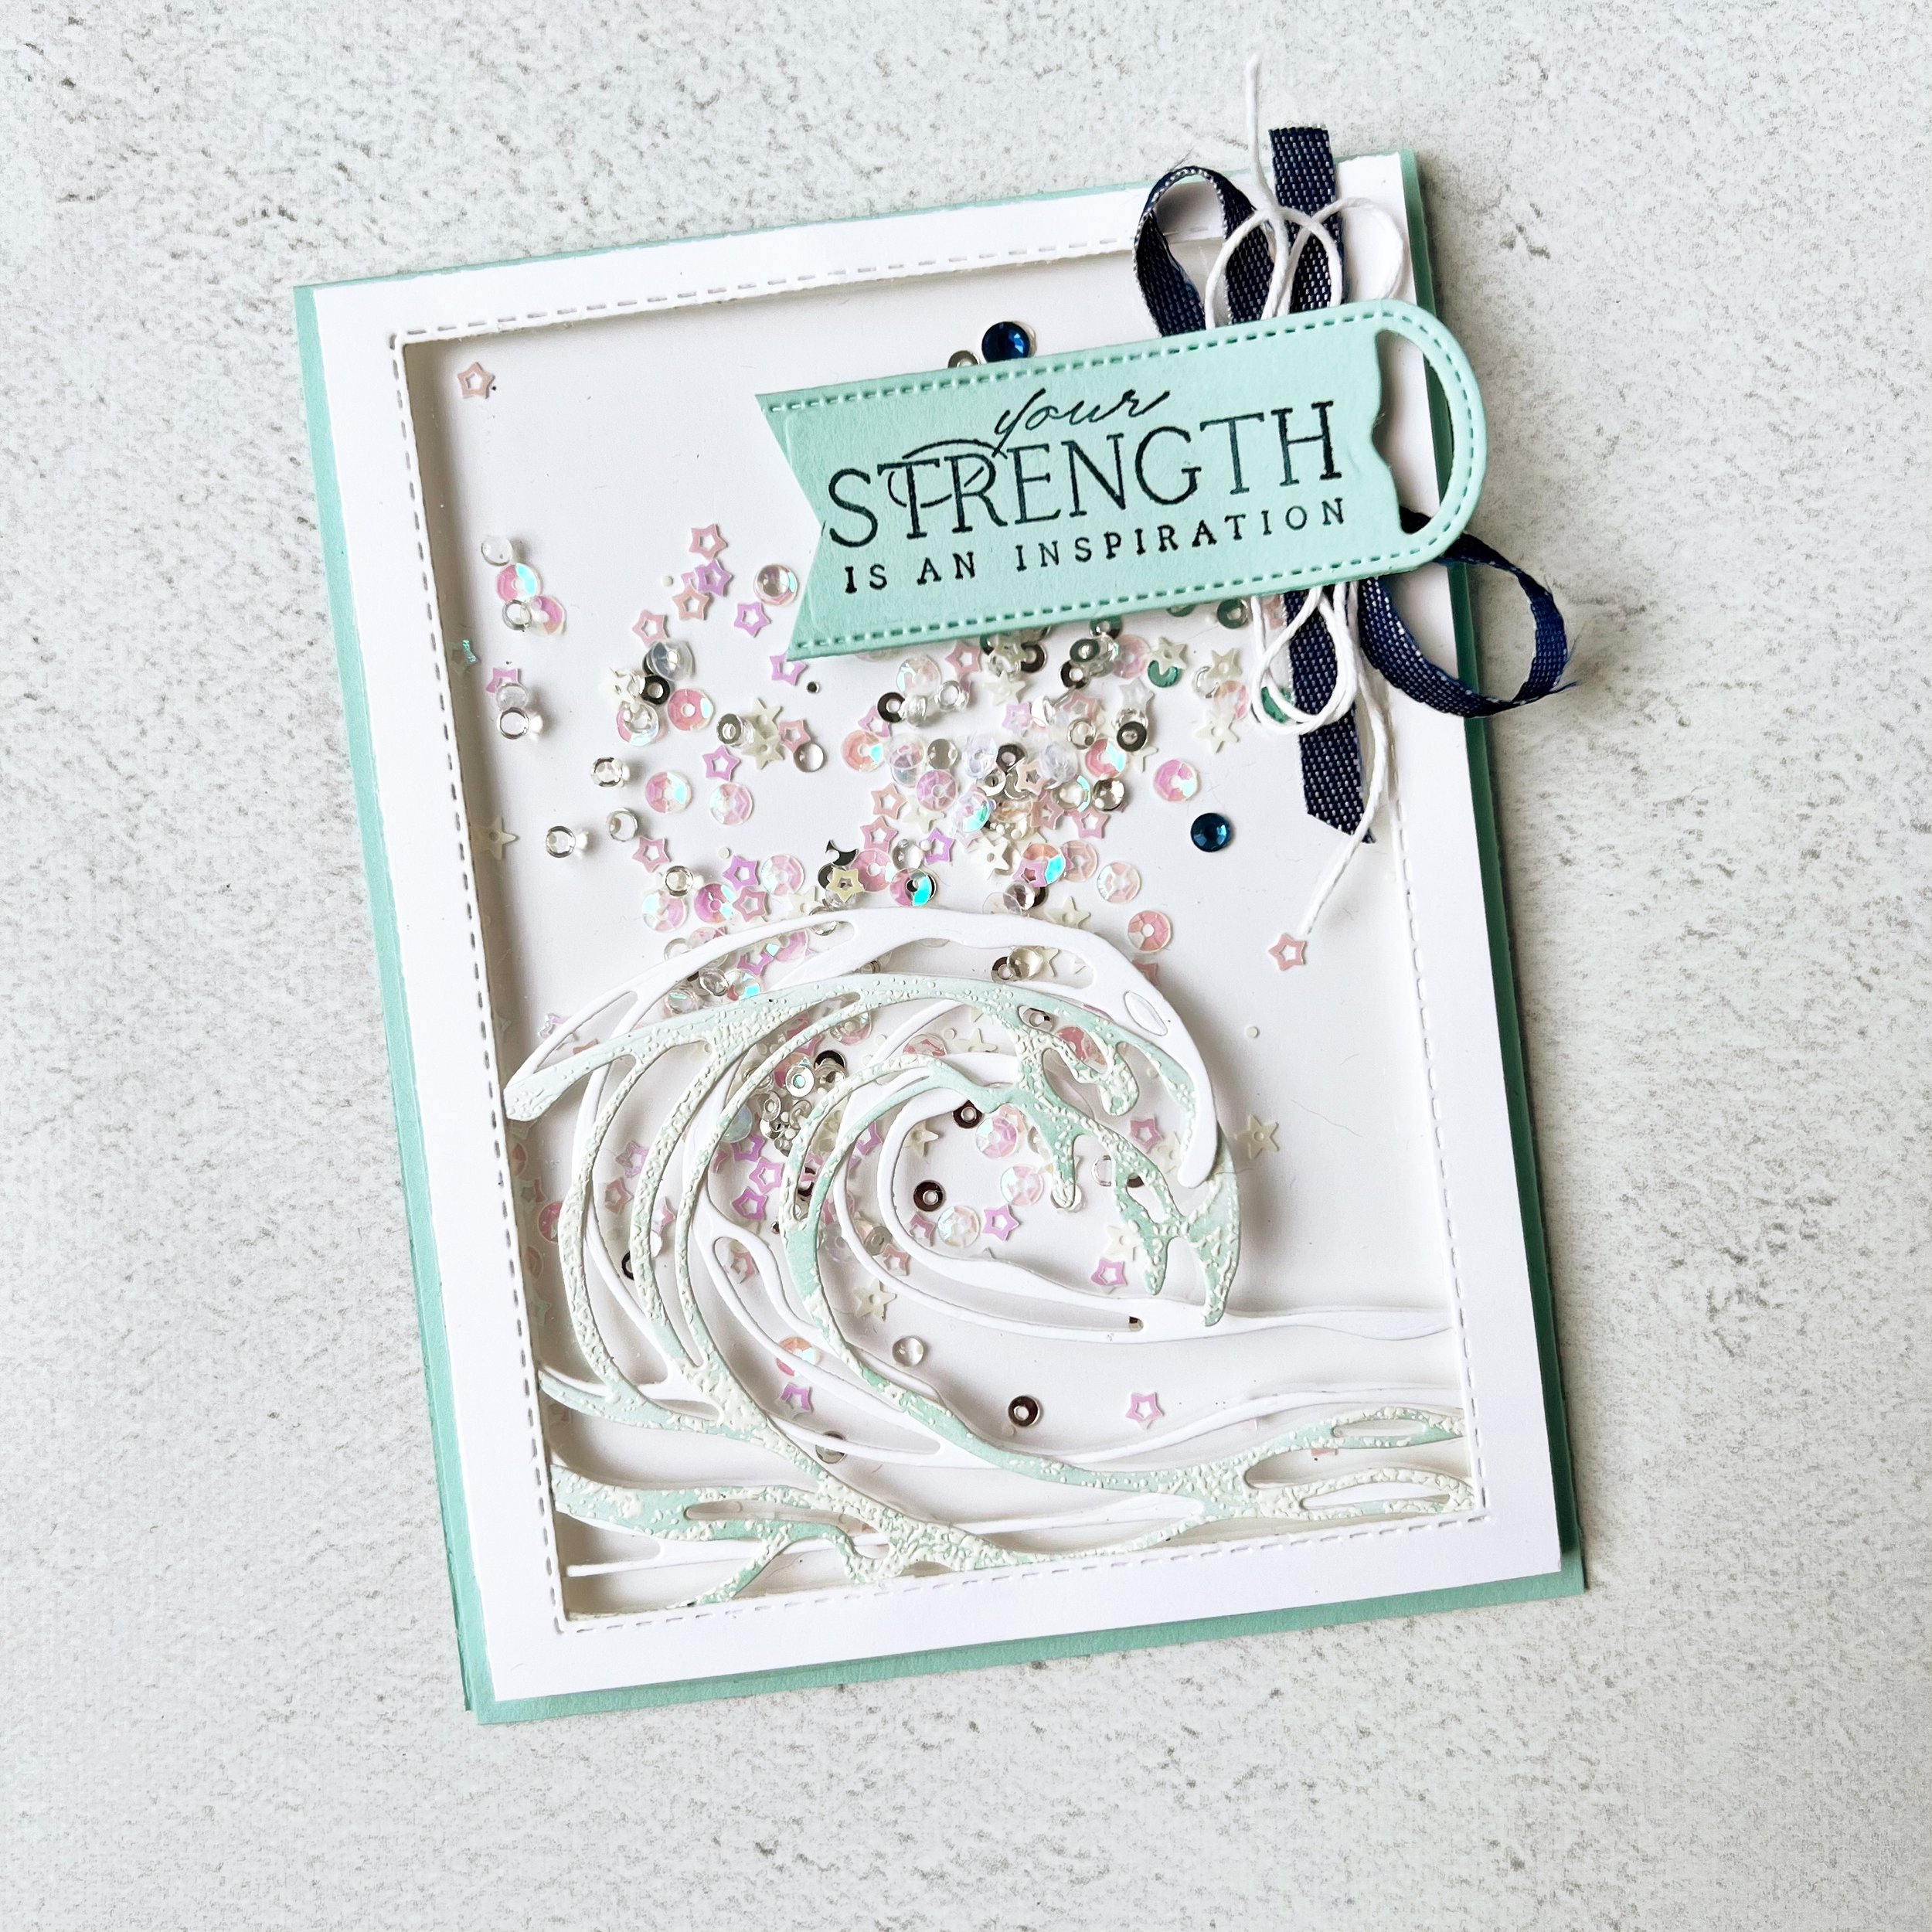
This card features the amazing Waves of Inspiration Bundle which was an early release and is a current offering in the new Annual Catalogue. It is such a unique and wonderful bundle and I had a fantastic time creating with it.

I used the Stitched Rectangle Dies and the Foam Adhesive Strips to create the ‘shaker’ aspect. You also need a Window Sheet and some kind of filler for your shaker card. I used the Sparkle & Shine Sequin Assortment from the JJ catalogue (still available to order from until June FYI).

My favorite part of the card is the waves that decorate the shaker window. I cut one wave die (you get two in the Waves Dies) out of Basic White cardstock. The second, I stamped and embossed with Whisper White ink and embossing powder and then used Pool Party ink and a Blending Brush over top for a embossed resist look. I then die cut that wave out. This gives it a little subtle color and texture!

Under the sentiment I added some of the Denim Ribbon that I cut in half and some of the White Bakers Twine. I few well placed sequins finished off the design.


To me this card just feels serene yet interesting at the same time and its one of my favorite Artisan projects I have created this term!


I had also created a scrapbook page using some similar elements so I will share that too! What is better than more inspiration right? This is a picture of my daughter Summer on the Thailand Incentive Trip a few years back. It makes my heart so happy to have that shared experience with her!

If you are inspired by anything I am sharing this month, please consider supporting me if you are Canadian. You can hit the button below or any product images to go straight to my store! Thank you!

Gumball Goodness!

Have you had a chance to play with the super fun and cute Gumball Greetings stamp set yet? I love this set as it makes the cutest kids birthday cards…or if I am being honest, what full sized human would not love to get one of these cheerful cards in the mail? I know I would!

This bundle can be found in the January to June Catalogue and it has endless possibilities! You can also add the Gumball Machine Shaker Domes and Frosted Beads Assortment to this cute product bundle. For my card below I turned my gumball machine into a traditional shaker card!

The base of the card is one of my absolute favorite colors, Coastal Cabana, and I layered on top a Flirty Flamingo striped DSP from the Hostess DSP collection, Pattern Party. I have gotten so much use out of this paper stack. It has definitely been one of my top Host picks!

I cut a piece of Basic White as the main panel and used the Gumball Machine dies to create the cut out for the shaker part. The base and top of the gumball machine is stamped on Flirty Flamingo card stock with the coordinating ink color and then die cut. I love the little details in this die set including the opening at the bottom where a gumball could roll out and the embossed details in the machines’s mechanism. I used some Silver Foil paper to cut that out. The dies even cut a little snit where you could add in your coin! So brilliant!

I also love how the die set includes a little die cut strip of hearts. You can use this as a border accent as I have here or to even die cut some bitty baby hearts to add into your shaker.

The easiest way to create a shaker card is to use our Window Sheets and the Adhesive Strips for a perfect seal around your shaker window!

I cut a piece of Basic White to lay behind the shaker window and stamped the gumballs and hearts from the stamp set in Gorgeous Grape and Pool Party. I then added a pinch of the Frosted Beads inside!

The sentiment was stamped twice, once in the base color of Gorgeous Grape and cut with our Layering Circle Dies. The second time was Coastal Cabana and I hand trimmed the word ‘sweetest’ and popped it up on a Dimensional to give the sentiment a fun touch. Adding a little coordinating Gorgeous Grape Sheer Ribbon behind also helps it pop.

And of course no card is complete with out BLING! Our Basic Rhinestones were the perfect addition here!

The Gumball Greetings includes great elements to complete the inside of your project as well. I added a few Coastal Cabana stripes to the Basic White layer. The sentiment is stamped in Gorgeous Grape and layered on a circle of Flirty Flamingo!

And just in case you missed my Artisan Design Team project from January—here it is again! I created two other cute cards with this fun bundle! You can see that the gumball machine is colored with Stampin’ Blends and uses the Gumball Machine Shaker Dome!

I hope you are inspired to give this fun bundle a creative go! I know I have enjoyed playing around with this fun bundle!

Thanks so much for checking out my blog today! I share way more creative content on my Instagram account so please go give me a follow @stampwithbrenda

Your support is so appreciated as it lets me continue to do what I love!

Gumball Goodness-Artisan Design Team Project

Hello friends! Welcome to a brand new year of Artisan Design Team projects! I am so happy to be a part of the team again for 2022. I think it took me most of 2021 to get my bearings so I am happy to have another opportunity! One area that I didn’t do the best at was creating a blog post to go with my monthly assignments. There are often lots of fun things to share with you that go along with our monthly posts that don’t always come across in the 2 photos we submit!

Fun fact, we submit 2 photos but I usually take like—30! hahaha! Then I narrow them down to the two best, edit them and all that jazz, and then fingers crossed they get approved! Sometimes we do have to make little tweaks and since I photograph my projects in natural light, even an hour difference can make the whole series of pictures look very different!

These cards feature the awesome Gumball Greetings Bundle from the new January to June Mini Catalogue—or the JJ catalogue!

My first assignment for 2022 was the Gumball Greetings bundle in the new JJ catalogue—the bundle can be found on page 12 and includes some really unique accents—the Gumball Machine Shaker Domes and the little Frosted Beads Assortment! I used these beads in two ways—-as filler for my gumball machine and as an accent or embellishment on my card front!

Now truth be told, I did actually struggle with this assignment! I spent alot of mental time thinking about my projects and ripped apart several attempts until I landed on these two cards. I think they are a good representation of the stamp set and the dies.

For the gumball shaker card I pulled in some DSP from the Pattern Party DSP Stack (a hostess benefit!) from the Annual catalogue. I then made my own striped accent with scraps of card stock in Granny Apple Green, Real Red and Pool Party as they were the focus colors of my project. I cut a strip of Basic White to 1 x 5, covered it in Tombow Multipurpose Glue and then added the strips of card stock on a diagonal.

This close up view shows you all of the fun things I added into the Gumball Machine Shaker Dome!

On the other side of my DSP panel I have used a die cut included in the Gumball Machine Dies that cuts out a strip of mini itty bitty hearts! The bottom of the machine is stamped in Momento Ink on Basic White, colored with Stampin’ Blends in Real Red and Grey Granite. It is then die cut. The topper of the gumball machine is stamped with Momento Ink on Real Red card stock and then I added a bit of detail with the coordinating Blends.

To add a realistic feel too the coin spinner, I added the little die cut handle and a shape from the Adhesive Backed Hexagons to the center!

The dome shape is cut with a die from the DSP and layered behind it, I stamped the dome filler. I added some stamped gumballs in Read Red, then I stamped and die cut some more in Pool Party. I added these with Mini Dimensionals inside the shaker dome area. I also stamped and die cut some hearts in Granny Apple Green and added some of the mini die cut hearts from the die strip in Real Red and Pool Party. Finally I added in some of the Frosted Beads in green and red. All of these elements made for some fantastic gumball machine filler!

I added a cute #tammybow using the new Real Red Faux Linen ribbon that was cut in half plus a few little gumballs rolling out of the bottom of the machine for some extra touches!

Each month we also need to incorporate a tip or technique into our project. I thought it would be fun to color the inside of the dome with a Dark Pool Party Stampin’ Blend to give a soft blue hue to the dome. Think of how cool this could look if you turned the Gumball Shaker Dome into fish bowl!

My second project uses the little mini gumball machine stamp as a background stamp which I love! I stamped them randomly in Pool Party ink on the coordinating paper. My favorite part of this card is how I used the heart border die as an accent behind the sentiment! I also used my Tombow Multipurpose Glue to add some of the green Frosted Beads to the card front as an embellishment, along with some stamped hearts and hearts from the die cut strip!

The sentiment is stamped in White Craft Ink with embossing powder to help the white pop on the Granny Apple Green. A little distressing of the edges and this card came together pretty quickly! I think its a fun one to give with a gift card inside!

Thank you for following along on my Artisan Journey again this year! I appreciate all of your comments and LIKES and if you live in Canada and my projects have inspired you, please consider shopping my online store!

Beyond the Tombstone

Aren’t these Tombstone Treat boxes just the best? Did you know that you can cut a little window out for a sneak peek at your treat?

final (12) 5.jpg

I love a good Halloween treat, especially one that is easy to assemble! When you need to make multiples for classroom treats or to give to coworkers this is important. I think that SU nailed the design of these boxes. The best part is there are so many fun ways you can dress them up! Spooky style that is!

For this box I wanted to create a peek a boo window of sorts so I used the Painted Labels Dies from the Annual Catalogue as the shape was similar to that of the tombstone.

TIP: the two box pieces look very similar so make sure you are die cutting through the top piece!

Once you have cut your window take a rectangle of Window Sheet and using Stampin’ Seal+ add it to the backside of the box. Now you have created your fun window to look through! I added some chocolate pumpkins to the inside of my box as a fun treat!

Trick or Treat is stamped using the Little Delights stamp set and die cut with a circle on Rich Razzleberry Cardstock. I used the same color Stampin’ Blend to customize the Black & White Gingham ribbon. I just love when we can do things like that to make our projects more special.


The sentiment is labeled on a black label shape from the Frightful Tags Dies and rotated on the vertical.

I added a spooky owl die cut from the same set and filled in the eyes with some black scrap paper!

I think this makes such a spooky-licious treat to give away!

Please feel free to shop with me if you are in Canada! I would love your support so I can keep loving what I do!

final (12) 5.jpg

Happy Halloween everyone! The countdown is ON only one week to go!

Skull Shaker Card

I love a good shaker card, but what I love even MORE is an EASY shaker card and this one delivers on both!

To make this EASY shaker card you will need one of our clear envelopes found in the Annual Catalogue. They are self sealing but I do add some tape to the back as you will need to fold over the edges a bit. The clear envelope is designed to fit a regular card so you can see how it is folded a bit smaller. Some tape on the back works perfectly when you get to that step!

The base of this card is Highland Heather and has Basic Black layer that is 4 x 5 1/4.

The ‘shaker’ layer is Grey Granite. I stamped the skull faces from the Cute Halloween set along with some little spiders.

 
final (5) 3.jpg

The stamp set has two different faces that you can stamp for the skull as well. I stamped them randomly in the background in the matching ink color along with some spiders. Once you have this piece stamped you are going to slip it into the clear envelope. Set it aside for now as you will need to make your filler!

You can really use whatever you like for a shaker card. For this one here I used some skulls that were stamped on Basic White and hand trimmed. I stamped a few Candy Corn as well (from the Cute Halloween Set) and added some Subtle Shimmer Sequins. Once you have added all of this to the clear envelope you will want to seal it up. Make sure you leave a little air so that things can shake around. If its too tight of a seal things won’t really move around freely.

final (5) 3.jpg

Every card needs a sentiment so I added ‘Hey, Boo!’ from the Cute Halloween set. I stamped a few Candy Corns in Pumpkin Pie ink on the same color of card stock and then used the Layering Circle Dies to cut it out along with a scallop circle in Highland Heather.

I layered a bit of the Black & White Gingham in between the layers too—since its such a fun ribbon! See wasn’t this easy to create? I really love this simple style of shaker cards!

If anything has inspired you to make a purchase I would love your support if you live in Canada. You can shop directly with my store by clicking this button!