Around the World On Wednesday--Fancy Folds!

Welcome friends! So happy to be back with this crew this month, especially because our design theme is ‘Fancy Folds’ and I always love the challenge of creating one! While my design skills might be strong, math is not my forte! So while the ‘Fancy Fold’ looks amazing, it is not complicated and is something that can be replicated!

91442295_10216484369808661_2887014979863576576_n.jpg

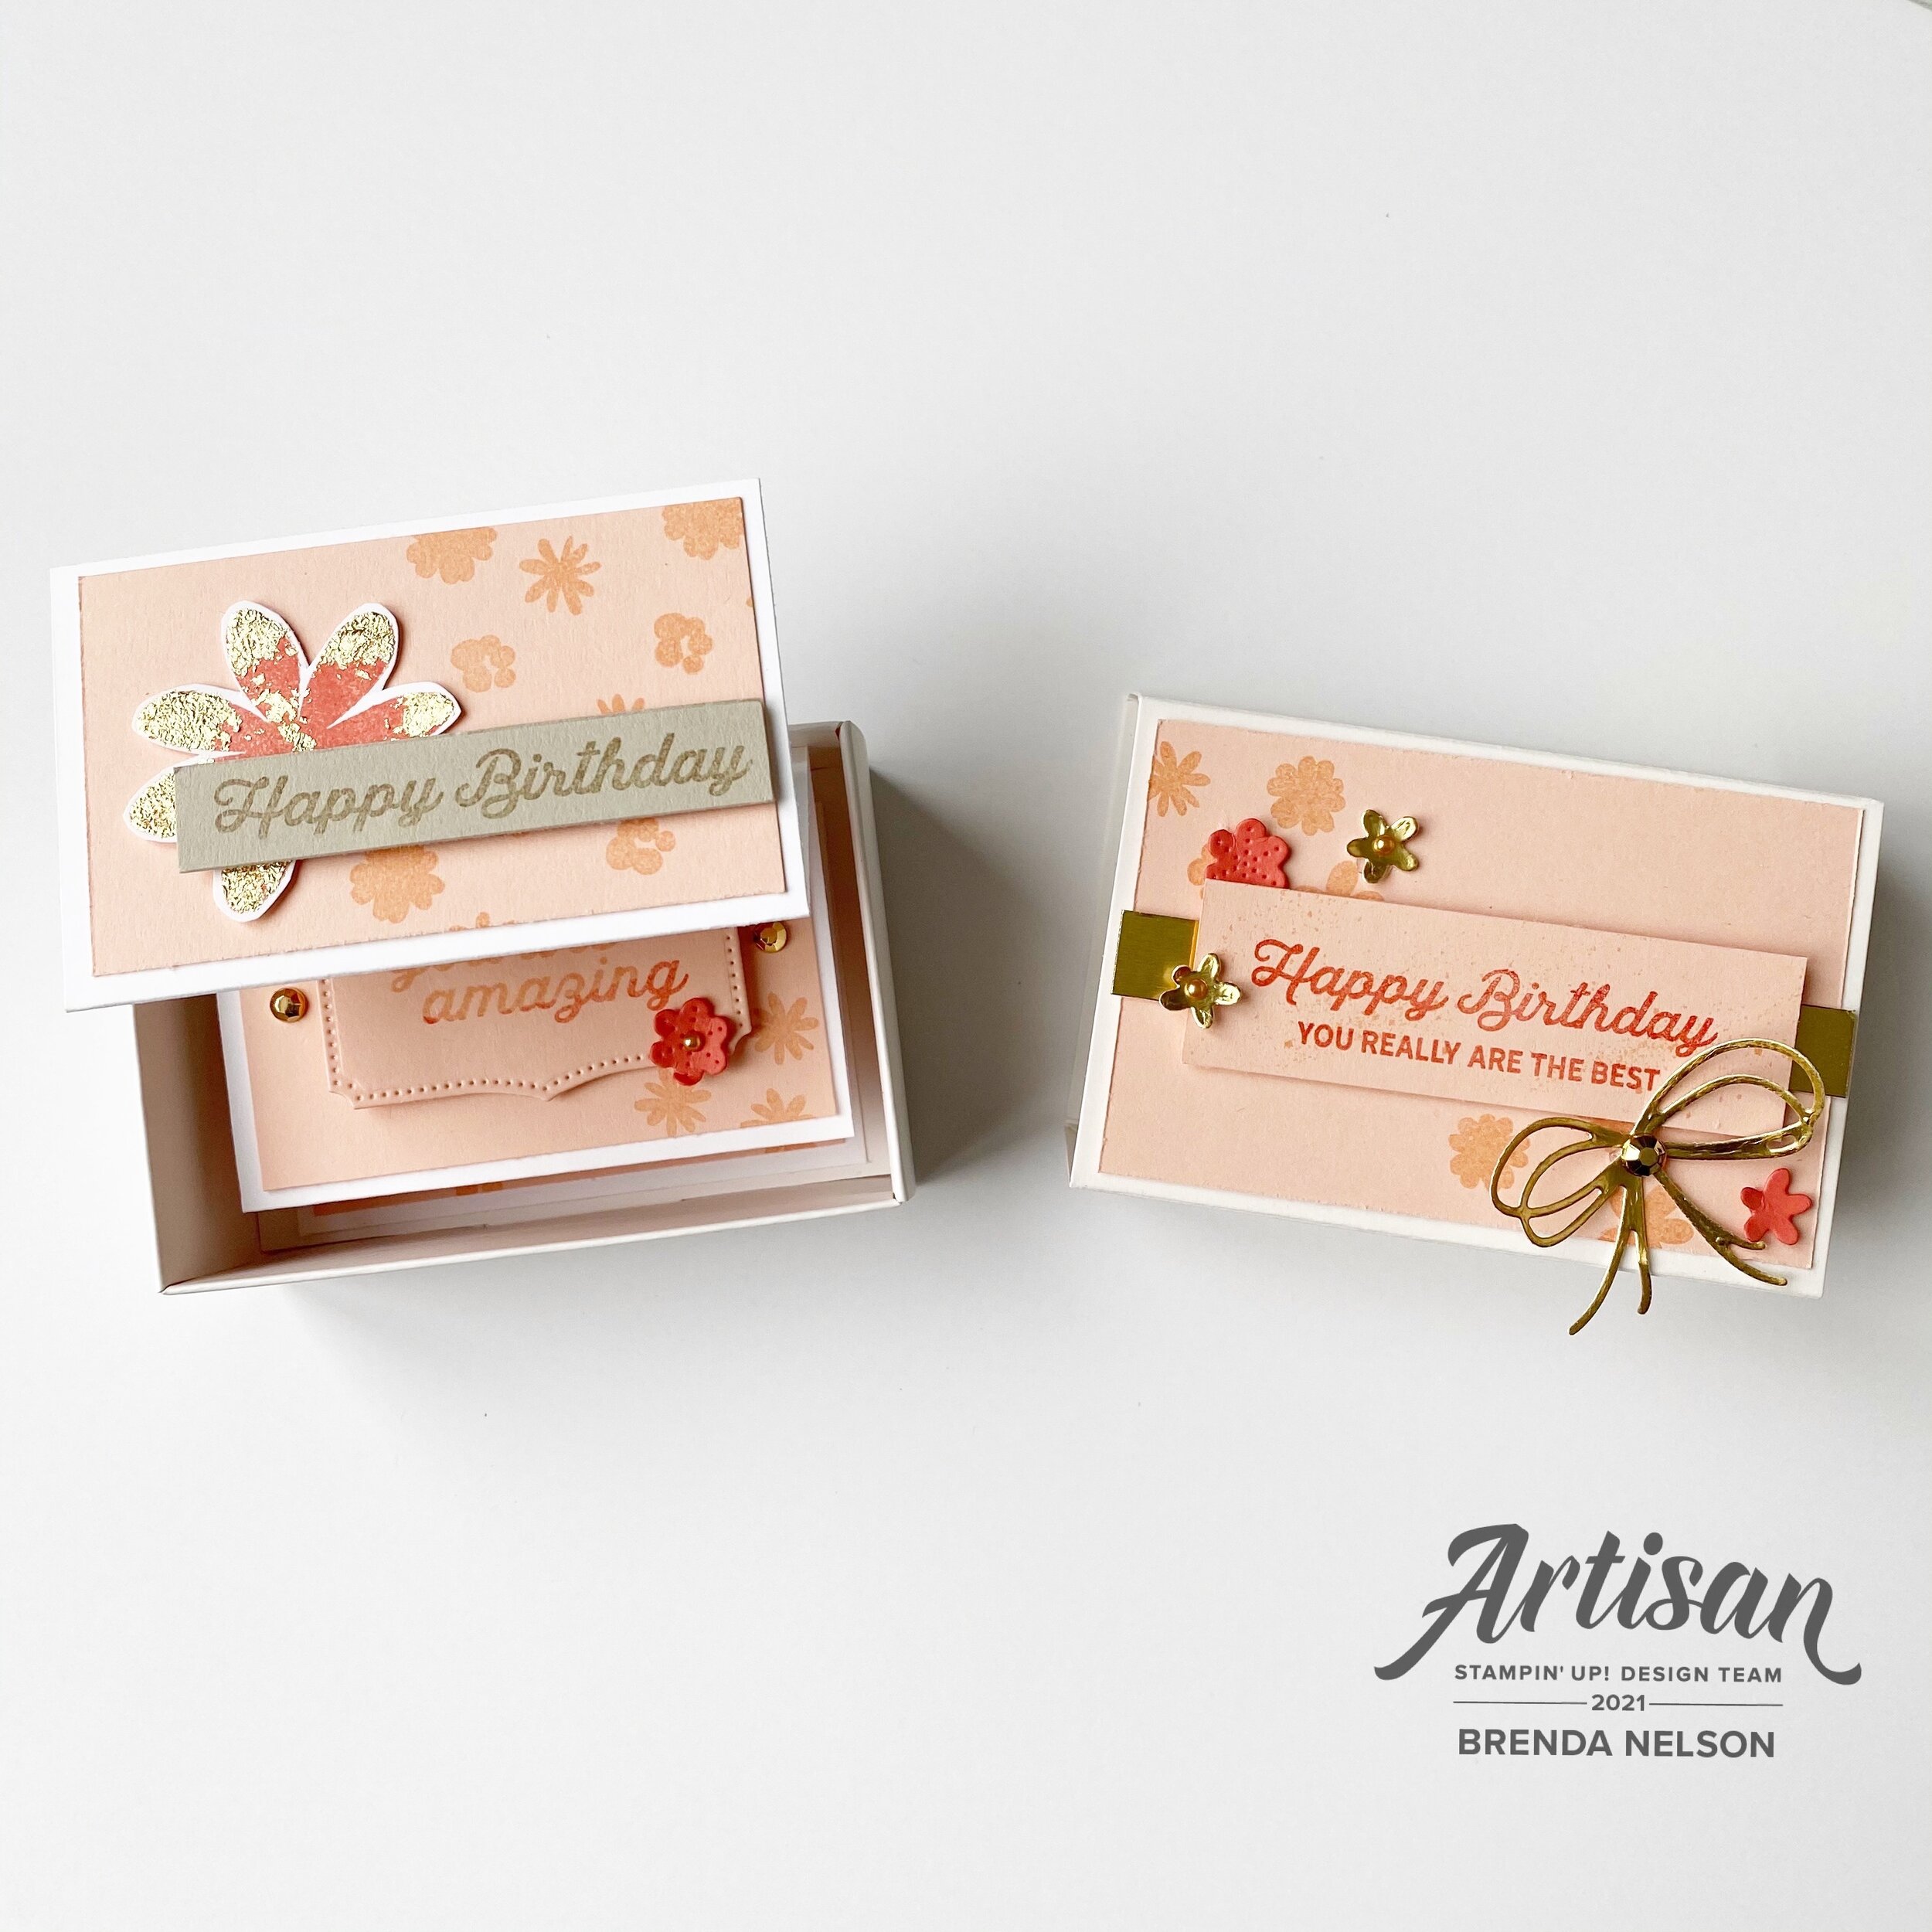
As soon as I saw the Pansy Patch Bundle and coordinating Pansy Petals DSP I knew I wanted to try making a Pop Up Box card again. It has been a while but I was familiar with this card style and I could envision a bunch of flowers popping out of a box. You could recreate this project using any of our amazing flower dies.

final 28.jpg

What made this project extra awesome was that I was able to cut all of the flowers from the Designer Series Paper with the coordinating dies! I love when Stampin’ Up! developes amazing product coordination!

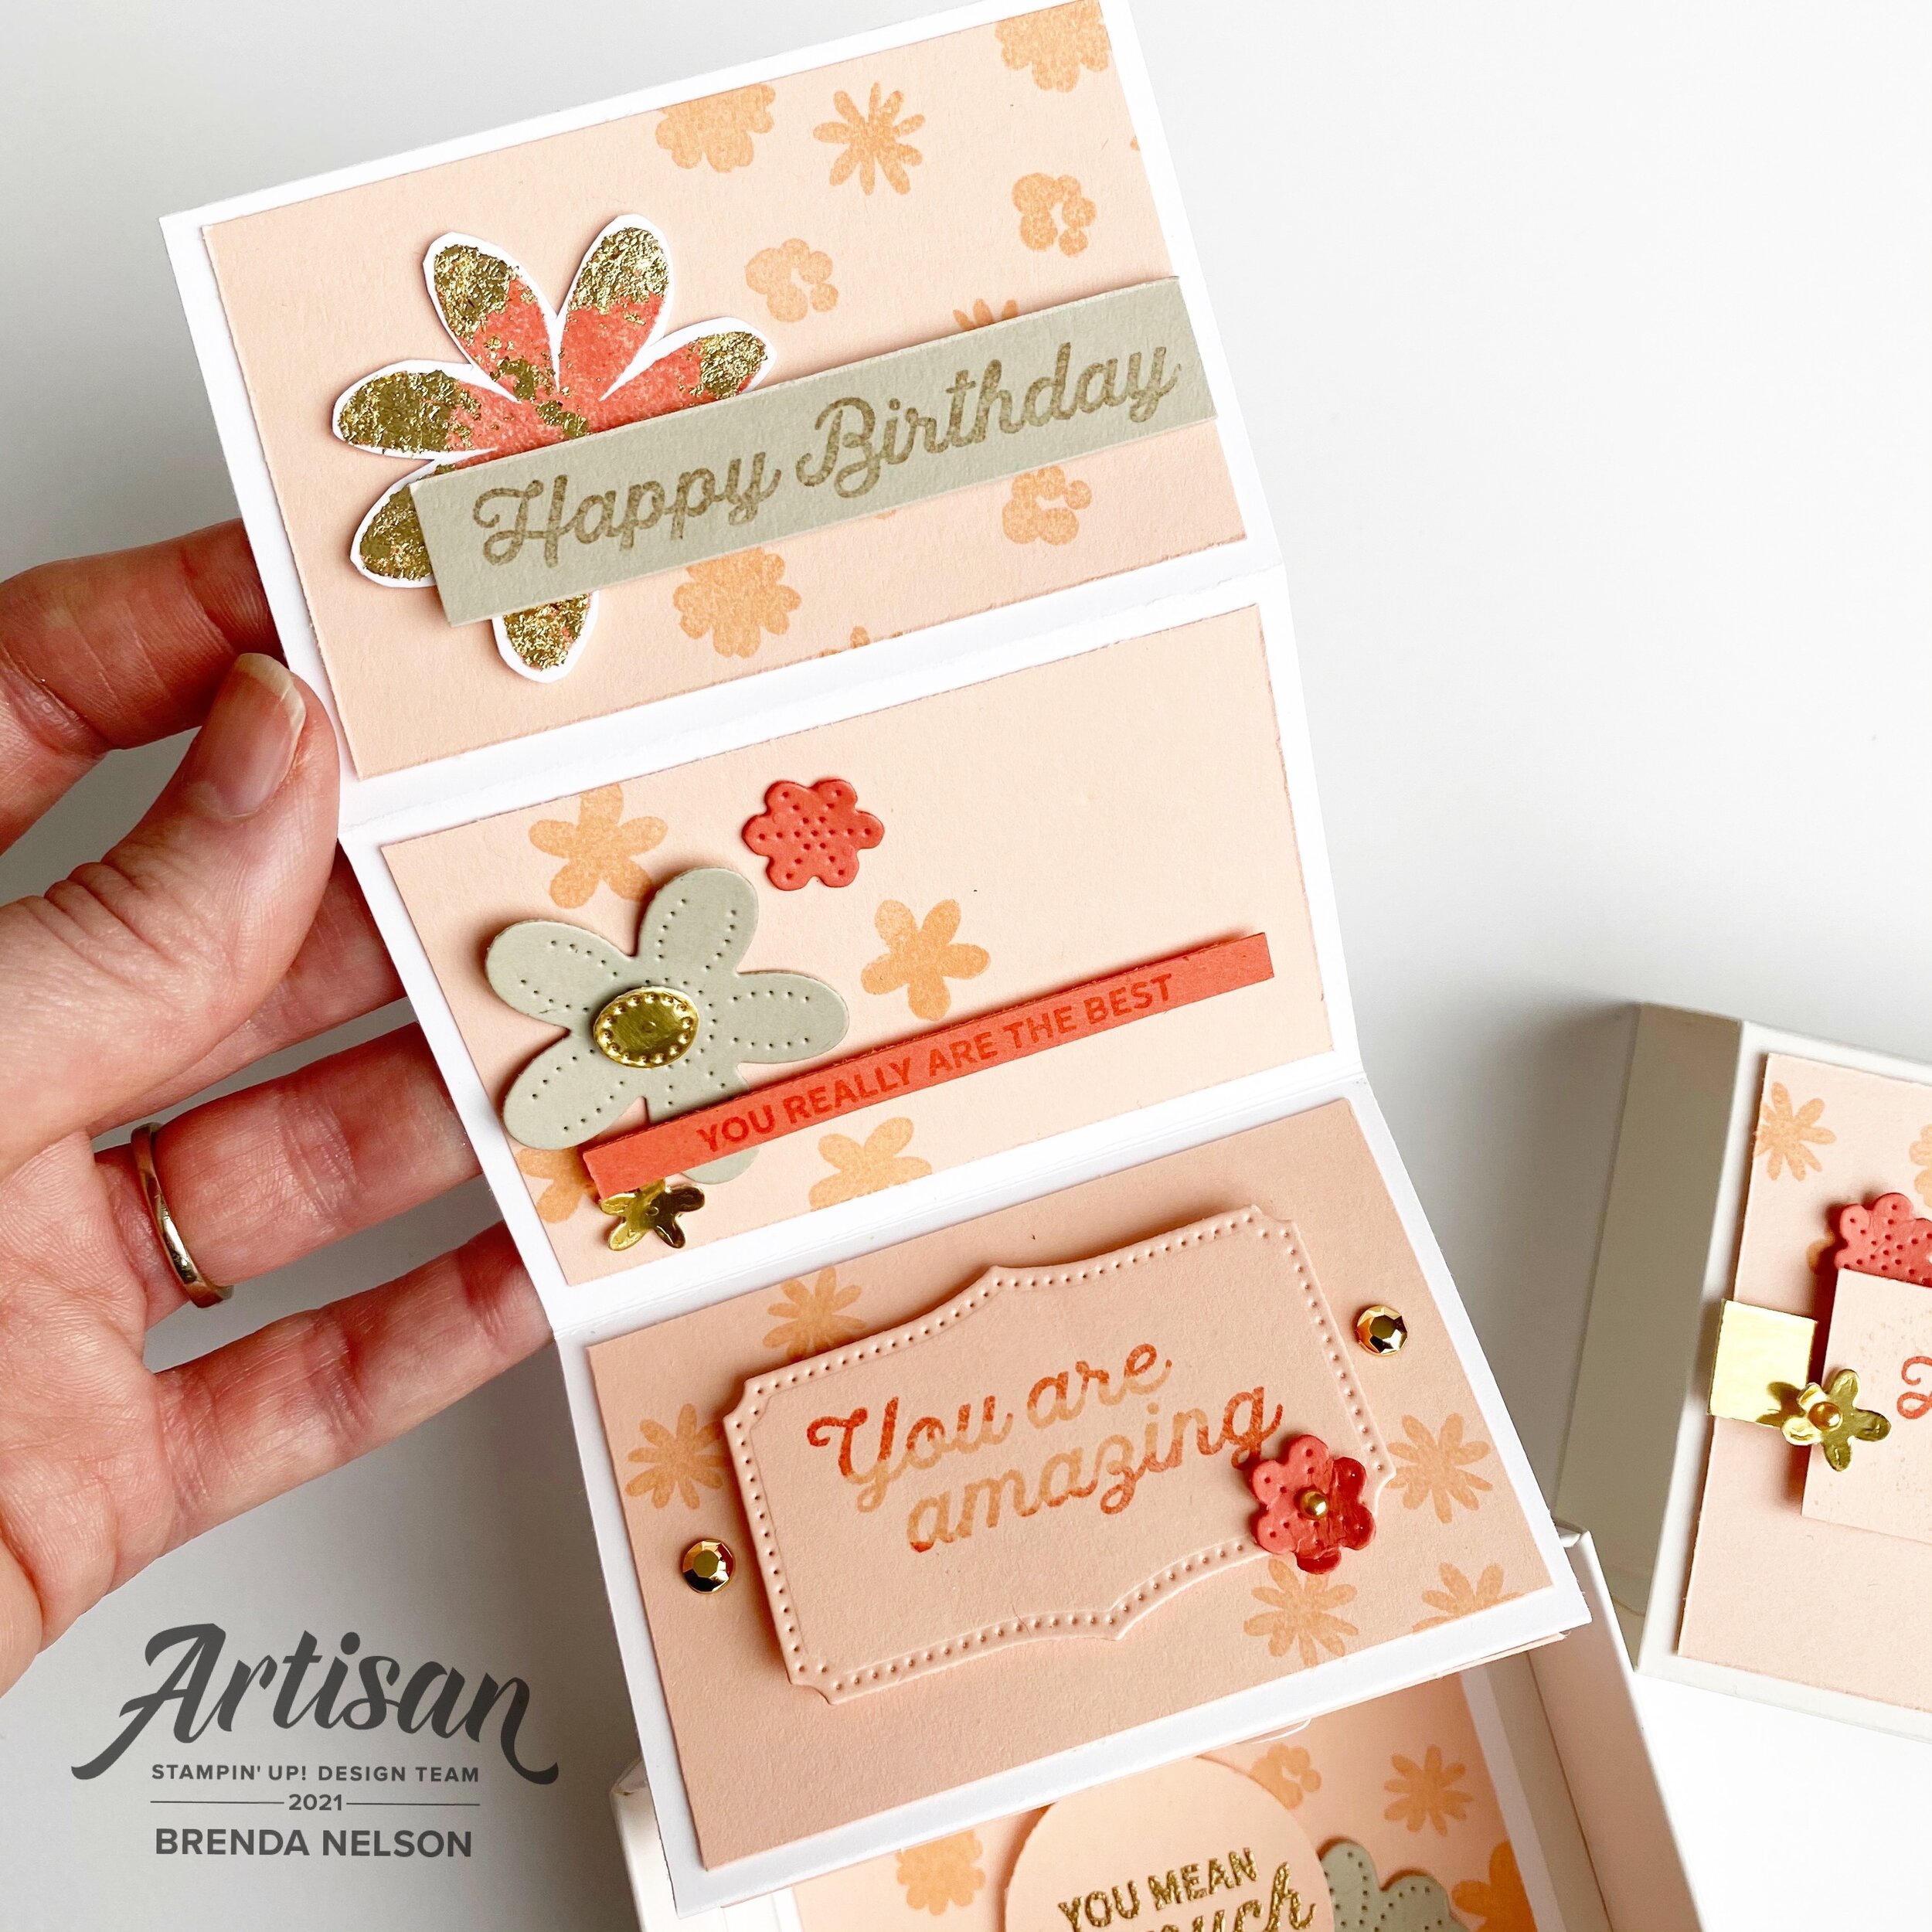
The sentiment is stamped in Calypso Coral ink from the Pansy Patch stamp set and punched into a 2 inch circle.

final 26.jpg

What makes this Pop Up Box card so great is that it folds or squishes flat so you can send it in an envelope. When the recipient opens it it will pop open into the box shape. It is also a really adorable project to have on display in your craft room. And, extra bonus, you can make two cards from one 8 1/2 x 11 piece of card stock.

final 29.jpg
 

To create the Pop Up Box card cut your card stock to 4 1/4 x 8 1/2. Score on the long side at 2, 4, 6 and 8. On the short side score at 2 1/4. On the 2 inch side, trim away a small portion from the 1/2 inch section to create a flap. This is how your will seal the box shut.

You can see from this angle there is no bottom to this project.

The flaps can be decorated. I decided to add a layer of Crumb Cake card stock to the two side flaps that I ran through the Dots folder from the Checks & Dots set.

final 32.jpg

As you can see the back ‘flap’ is not folded, you leave it standing straight to create a back to the project. I added some DSP from the Pansy Petals to this back panel measuring just under 2 inches by 3 inches.

On the bottom of the box I also added the same DSP.

Now let’s talk about the inside! To anchor the pansies you will need two things—Window Sheets, cut into teeny tiny strips and two pieces of coordinating card stock, in this case, Crumb Cake, cut to .5 x 3 inches scored on each end at .5. You will then use Glue Dots to anchor each little tab to the inside of the box.

The strips of Window Sheet are used to attach to these card stock anchors and the flowers. You can cut them to different heights to create a floral arrangement.

final 31.jpg

I hope this project inspires you to try creating your own Pop Up Box card. You can search Pinterest for inspiration or a visual for the directions, there is a lot out there!

Next up is Tricia Butts, I can’t wait to see what she has designed as a ‘Fancy Fold’ for us this month!


Hey Chick!

Hello friends! This month the Artisan Design Team is sharing projects that feature the Hey Chick and Hey Birthday Chick bundles, the Sand & Sea suite and the Cactus Medley with the Succulent bundle! My assignment was to create some fun projects featuring the CHICKENS! Such a fun and cute couple of sets to work with!

2021_BLOG_BADGE.jpg

As soon as I saw the big chubby chicken and the little chicks I knew I wanted to showcase them with a Diorama Card! This is such a unique card style to showcase a ‘scene’ and its a throwback to those fun shoebox diorama projects I loved make as a kid for a school project.

IMG_3494.jpg

To recreate these projects you will need some Stampin’ Blends to add a hint of color to your chickens. The secret weapon and fun tip with this project is to take the wood stump die and the fence die and add extra details and dimensions to them by pressing them into the Cinnamon Cider ink pad prior to running them through the Stampin’ Cut & Emboss Machine. The ink on the die will press into the card stock and transfer, giving the recessed area some ink detail!

I also used the Wired Up background stamp set with my projects. I inked it up, keeping it right in the stamp case, with Grey Granite and then lightly touched my surfaces to the stamp. By not fully pressing it I was able to just add the chicken wire detail in a few places. Its a faint but awesome detail.

I think the bright colors of Poppy Parade, Coastal Cabana, and Daffodil Delight really added to the whimsical feel of these projects. I was really happy with how cheery and fun the finished projects turned out!

I think the bright colors of Poppy Parade, Coastal Cabana, and Daffodil Delight really added to the whimsical feel of these projects. I was really happy with how cheery and fun the finished projects turned out!

The Daffodil Delight card is a traditional card fold. I added die cut chicken wire poking out from each side of the main panel for a fun detail. The sentiment in Coastal Cabana at the top of the card is the sign trimmed to look like a board instead of a sign post. I always look for ways to change how a die works and this was easy! I added a light coloring detail to the chicken on this card with Poppy Parade, Daffodil Delight and Mango Melody Stampin’ Blends.

IMG_3580.jpg

To create the Diorama card you will need a large die to cut the window in the front. I used the largest circle die from the Circles Dies in the Annual Catalogue (a crafters must have set!).

The base of the Diorama card is 6 3/4 x 4 1/2. You want to score this at 3/4, 1 1/2, 5 1/4 and 6. You want to peek and valley fold these score lines to create the raised up front area.

The Basic White background piece is lightly stamped with the Chicken Wire background stamp and measures 4 1/4 x 4 1/2. You can attach this and then piece in the chubby bowtie chicken and fence. I found this was easier as I knew exactly where to place it instead of adding it to the Basic White first.

I then added a Coastal Cabana back piece to the card which measures the same as the Basic White, 4 1/4 x 4 1/2. This also gives the card a bit of weight and makes it easier to stand up.

The little chick on the left hand side is attached with a Glue Dot on his one leg. This gives him the illusion of popping out. The two streamers are cut in Pumpkin Pie and Mango Melody card stock and are attached to the inside of the window. This also contributes to the diorama style and feel.

IMG_3579.jpg

I finally I just love the belly band on the Mini Paper Pumpkin box. I just love these boxes. They are the perfect size for giving Gift Cards and little treats and fit our Basic White Notecards perfectly!

I created the Poppy Parade belly band to be 2 inches wide and stamped ‘Hey Chick’ in the coordinating ink randomly along the band. I used the chicken wire die again, this time in Coastal Cabana cards stock to add a bit of detail. The chicken with the balloon is colored with Stampin’ Blends and I couldn’t resist giving him a little bowtie! I love that the Birthday Chick dies have a die that cuts Happy Birthday! It was a fantastic addition to this project with the little cupcake trimmed from the Hey Chick stamp set.

If any of these projects have inspired you and you live in Canada, please consider shopping with me. I would love to get to know you and help in your creative stamping journey! I teach a lot of classes and facilitate a number of monthly groups!

Around the World on Wednesday--3D projects!

Hello friends! I love when I can participate in a 3D Design Challenge because I loosely interpret 3D as anything but a card—-so the sky is the limit with what you can create! I can’t wait to see what everyone has designed this month!

91442295_10216484369808661_2887014979863576576_n.jpg

The days are getting sunnier and the snow is melting here in Edmonton, where I live! So I have definitely been feeling those spring vibes and I wanted to create a wreath for my front door to welcome in the change in season!

IMG_4631.jpg
 

I picked up a twig style wreath from my local craft store. Typically these are pretty inexpensive wreaths that have a lot of creative options.

I used hot glue to pretty much assemble the entire project from the flower construction to adhering everything to the wreath itself.

IMG_4625.jpg

The Butterfly Brilliance Bundle is really exciting and new right now so I knew that I wanted my spring wreath tot have some butterflies on it. I stamped them with Momento Ink and colored them with a light hand using the Water Painters and the following ink colors—Calypso Coral, Mango Melody, Just Jade and Mint Macaron. I also added Wink of Stella over top of the butterflies to give them a little glimmer.

I love that you can stamp all these butterflies ONE TIME and then die cut them all in one go! It makes creative projects like this so much faster to put together.

IMG_4628.jpg

I cut the word SPRING out using the Playful Alphabet Dies and the Foam Adhesive Sheets. The letters are cut from the Butterfly Bijou Designer Series Paper and are placed on a Stitched Oval that is stamped with some of the butterflies from the Butterfly Brilliance stamp set in Soft Seafoam. Behind the sentiment I created an oversized bow with the Fine Art Ribbon from the Art Gallery Suite.

The large Calypso Coral flower is created using the Heart Builder Punch. The inside is just a strip of Bumblebee card stock that I cut little slits into and rolled up to add to the center. When its rolled you just fan it out!


I used both of the daisy punches (original and medium) along with the Perennial Petals Dies to fill in my wreath. I stamped some medium daisy’s in Pool Party from the Daisy Lane stamp set.

The Blushing Bride and Calypso Coral flowers shown beside are created by cutting the flower 5 times and then stapling them together. You can then fold and squish them together and add a smaller flower into the center to hide the staple.

IMG_4626.jpg
IMG_4627.jpg

I love how the Perennial Petals Dies layer up so well to create so much dimension! The Pool Party flower shown here has 4 layers with an Elegant Faceted Gem in the center.

I am really happy with how this spring wreath project turned out and I can’t wait until I can display it on my door full time. Living here you never know when 3rd, 4th or 5th winter might kick in again! Hahaha! Probaby after May long weekend we should be safe.

Next up on the hop you will be visiting the awesome Tricia Butts in the United States! I love how our hop takes you all around the world!


Create with Connie and Mary-Valentine's Favors!

I am super excited for Valentine’s Day this year and I plan on spoiling some of my favorite Galentine’s with a super cute project! Valentine’s favors happen to be the theme for this week’s Create with Connie and Mary challenge!

Design Team.jpg
final 15.jpg

I was super excited about the Hearts & Kisses stamp set in the January to June catty as I loved the sentiments “Happy Galentine’s Day” and “You go, Girl!. I knew right away I wanted to make a special gift with this set.

I honestly think the stand out feature of this card is the True Love Designer Series Paper—don’t these hand trimmed flowers look AMAZING when paired agains the blended Flirty Flamingo background? This paper has unlimited potential as you can feature black & white imagery on literally anything or color this paper with thet variety of color tools we have at our disposal.

For the background, sentiment tag, and heart border (cut with the Floral Heart Dies) I used Flirty Flamingo ink with our new fabulous Blending Brushes.

I tied Blushing Bride twine around the front panel with a Heart Charm attached (LOVE!) and added some Matte Black Dots. This entire product suite is phenomenal!

final+%281%29+8.jpg

My coordinating Love You Always Treat Box is my favorite of this duo. I am going to fill this box with some of my Reese’s Valentines Surprise Cookies that I shared on my blog last Valentine’s Day! You can click this link to go to my recipe or click on my Lifestyle Tab and then Favorite Recipes and you will find it there! Your welcome in advance, these cookies are AMAZING!

I wrapped the box with another pattern from the DSP and added some more of the flowers that I hand trimmed from the paper. This time I also used my Blending Brush to add a pop of color with the Flirty Flamingo ink.

I added some Blushing Bride Metallic Ribbon and some sliver metallic thread to the back of my label. The sentiment is from the Always in my Heart stamp set and the tiny heart is cut using the Kangaroo dies.

I love this project combo and cannot wait to deliver these to some of my special Galentine’s this year!

I love this project combo and cannot wait to deliver these to some of my special Galentine’s this year!

To see what Melissa has created you can click BACK and to see what Connie designed this week you can go NEXT. I hope you hop the whole way through so you don’t miss anything!

Artisan Design Team January Share!

OMG friends! I can’t believe I can actually TYPE the word ARTISAN…its literally been a dream of mine for the last few years and a GOAL (big difference) over the last 18 months. I started my blog with the purpose of having a platform to apply for the team and to create a digital archive of things I love. Scrapbook pages, recipes, cards and experiences. I joined some blog hops which has been exciting and has helped me grow and develop, meet deadlines, improve my photography and so much more! My blog is a place where I can be somewhat interactive with you (I love comments) and I am still learning and wanting to add more features!

So when I got the call on September 16th, yes I know the date as it was my 20th wedding anniversary, I cried. Like ugly cry and was so so happy. My daughter was in the car with me and had no idea what was going on!!! Haha! My biggest hope for my kids is they can set a goal, work and strive toward it with vision and purpose and achieve it. It is actually quite amazing. So I am SO HAPPY to be on the 2021 team and to share my creations with you!

My very first Artisan project featured the In Bloom Bundle and Paper Blooms Designer Series Paper (from Sale-a-bration 2021).

My very first Artisan project featured the In Bloom Bundle and Paper Blooms Designer Series Paper (from Sale-a-bration 2021).

Let’s start with the fun pull out birthday card in the Love You Always Treat Boxes! As soon as I saw how these treat boxes worked I knew I wanted to create some kind of pull out project. I decided on a birthday card after seeing all the fantastic sentiments in the In Bloom stamp set.

The boxes are easy to assemble which is awesome. To create the pull out feature you need a piece of Basic White card stock measuring 3 1/2 x 11 1/4. Score at 2 1/4, 4 1/2, 6 3/4 and 9. Accordion fold it and add the Petal Pink panels on measuring 2 x 3 1/4. You need 5 panels.

Then you can stamp and embellish as desired!

The colors I used to create this pull out birthday card are Petal Pink, Calypso Coral, Sahara Sand, and Gold Foil accented with the Gilded Leafing. To add the Gilded Leafing to my flowers I used Heat’n Stick Powder with a finger dauber. The dauber allows you to have more control over where you want to apply the Heat’n Stick powder. Once you heat set the powder (do not over heat as it will lose the stickiness) press it into your Gilded Leafing and use the large Water Painter to brush off the excess and reveal the details.

Of course I also had to create a scrapbook page to feature this fantastic Paper Blooms Designer Series Paper and my sons 16th birthday!

Of course I also had to create a scrapbook page to feature this fantastic Paper Blooms Designer Series Paper and my sons 16th birthday!

I chose the dark pattern from the DSP because I thought the Night of Navy would really pop against a Basic White background. I flanked each side with strips of Calypso Coral card stock. I didn’t want to use 12x12 paper (I covet for page bases) so I cut the strips from 8 1/2 x 11 and pieced them together behind the photo mat. I also popped the Gold Foil photo mat up on Dimensionals.

You may notice some circles on the layout and those are cut with punches from the DSP.

I applied the same technique to the flowers on this page as the pull out birthday card with the Gilded Leafing.

final 3.jpg

This layout combines flowers cut using the Pierced Bloom dies, stamped flowers and flowers cut from the DSP. You will notice in this picture that I stamped the “You are Amazing” right on the circle cut from the DSP and embossed it in gold. I love this feature!

I used the new Resin Hearts, Gilded Gems and Gold Metallic Pearls as accents on the page. I love the fun bow cut with the dies and Gold Foil paper.

I hope you enjoyed my first official Artisan Design Team showcase projects! Make sure to check out Stampin’ Up!’s Facebook page to see everyone’s creations and follow me over on Instagram @stampwithbrenda

I hope you enjoyed my first official Artisan Design Team showcase projects! Make sure to check out Stampin’ Up!’s Facebook page to see everyone’s creations and follow me over on Instagram @stampwithbrenda

If you live in Canada and would love to create these projects yourself you can shop my Online Store or use the Hostess Code to have items sent direct to you! Just confirm it says “Shopping with Brenda Nelson” in the shopping bag :)