Tasteful Touches Fun Fold

Sometimes you just need a good card fold, design and elements to make a really awesome card! Today I am sharing a ‘fun fold’ card that is simple but packs a punch!

You start with your standard card base of 4 1/4 x 5 1/2. Mine is Purple Posy. You can get 4 card bases out of one sheet of card stock too which is awesome. You will then cut your second ‘card’ base to 3 x 11 and score at 5 1/2. Once you have these two pieces you can stamp a pattern along the edges of the Purple Posy. I used one of the images from the Tasteful Touches stamp set and stamped in Highland Heather. Attach the white card to the Purple Posy base and then embellish as desired.

final.jpg
final.jpg

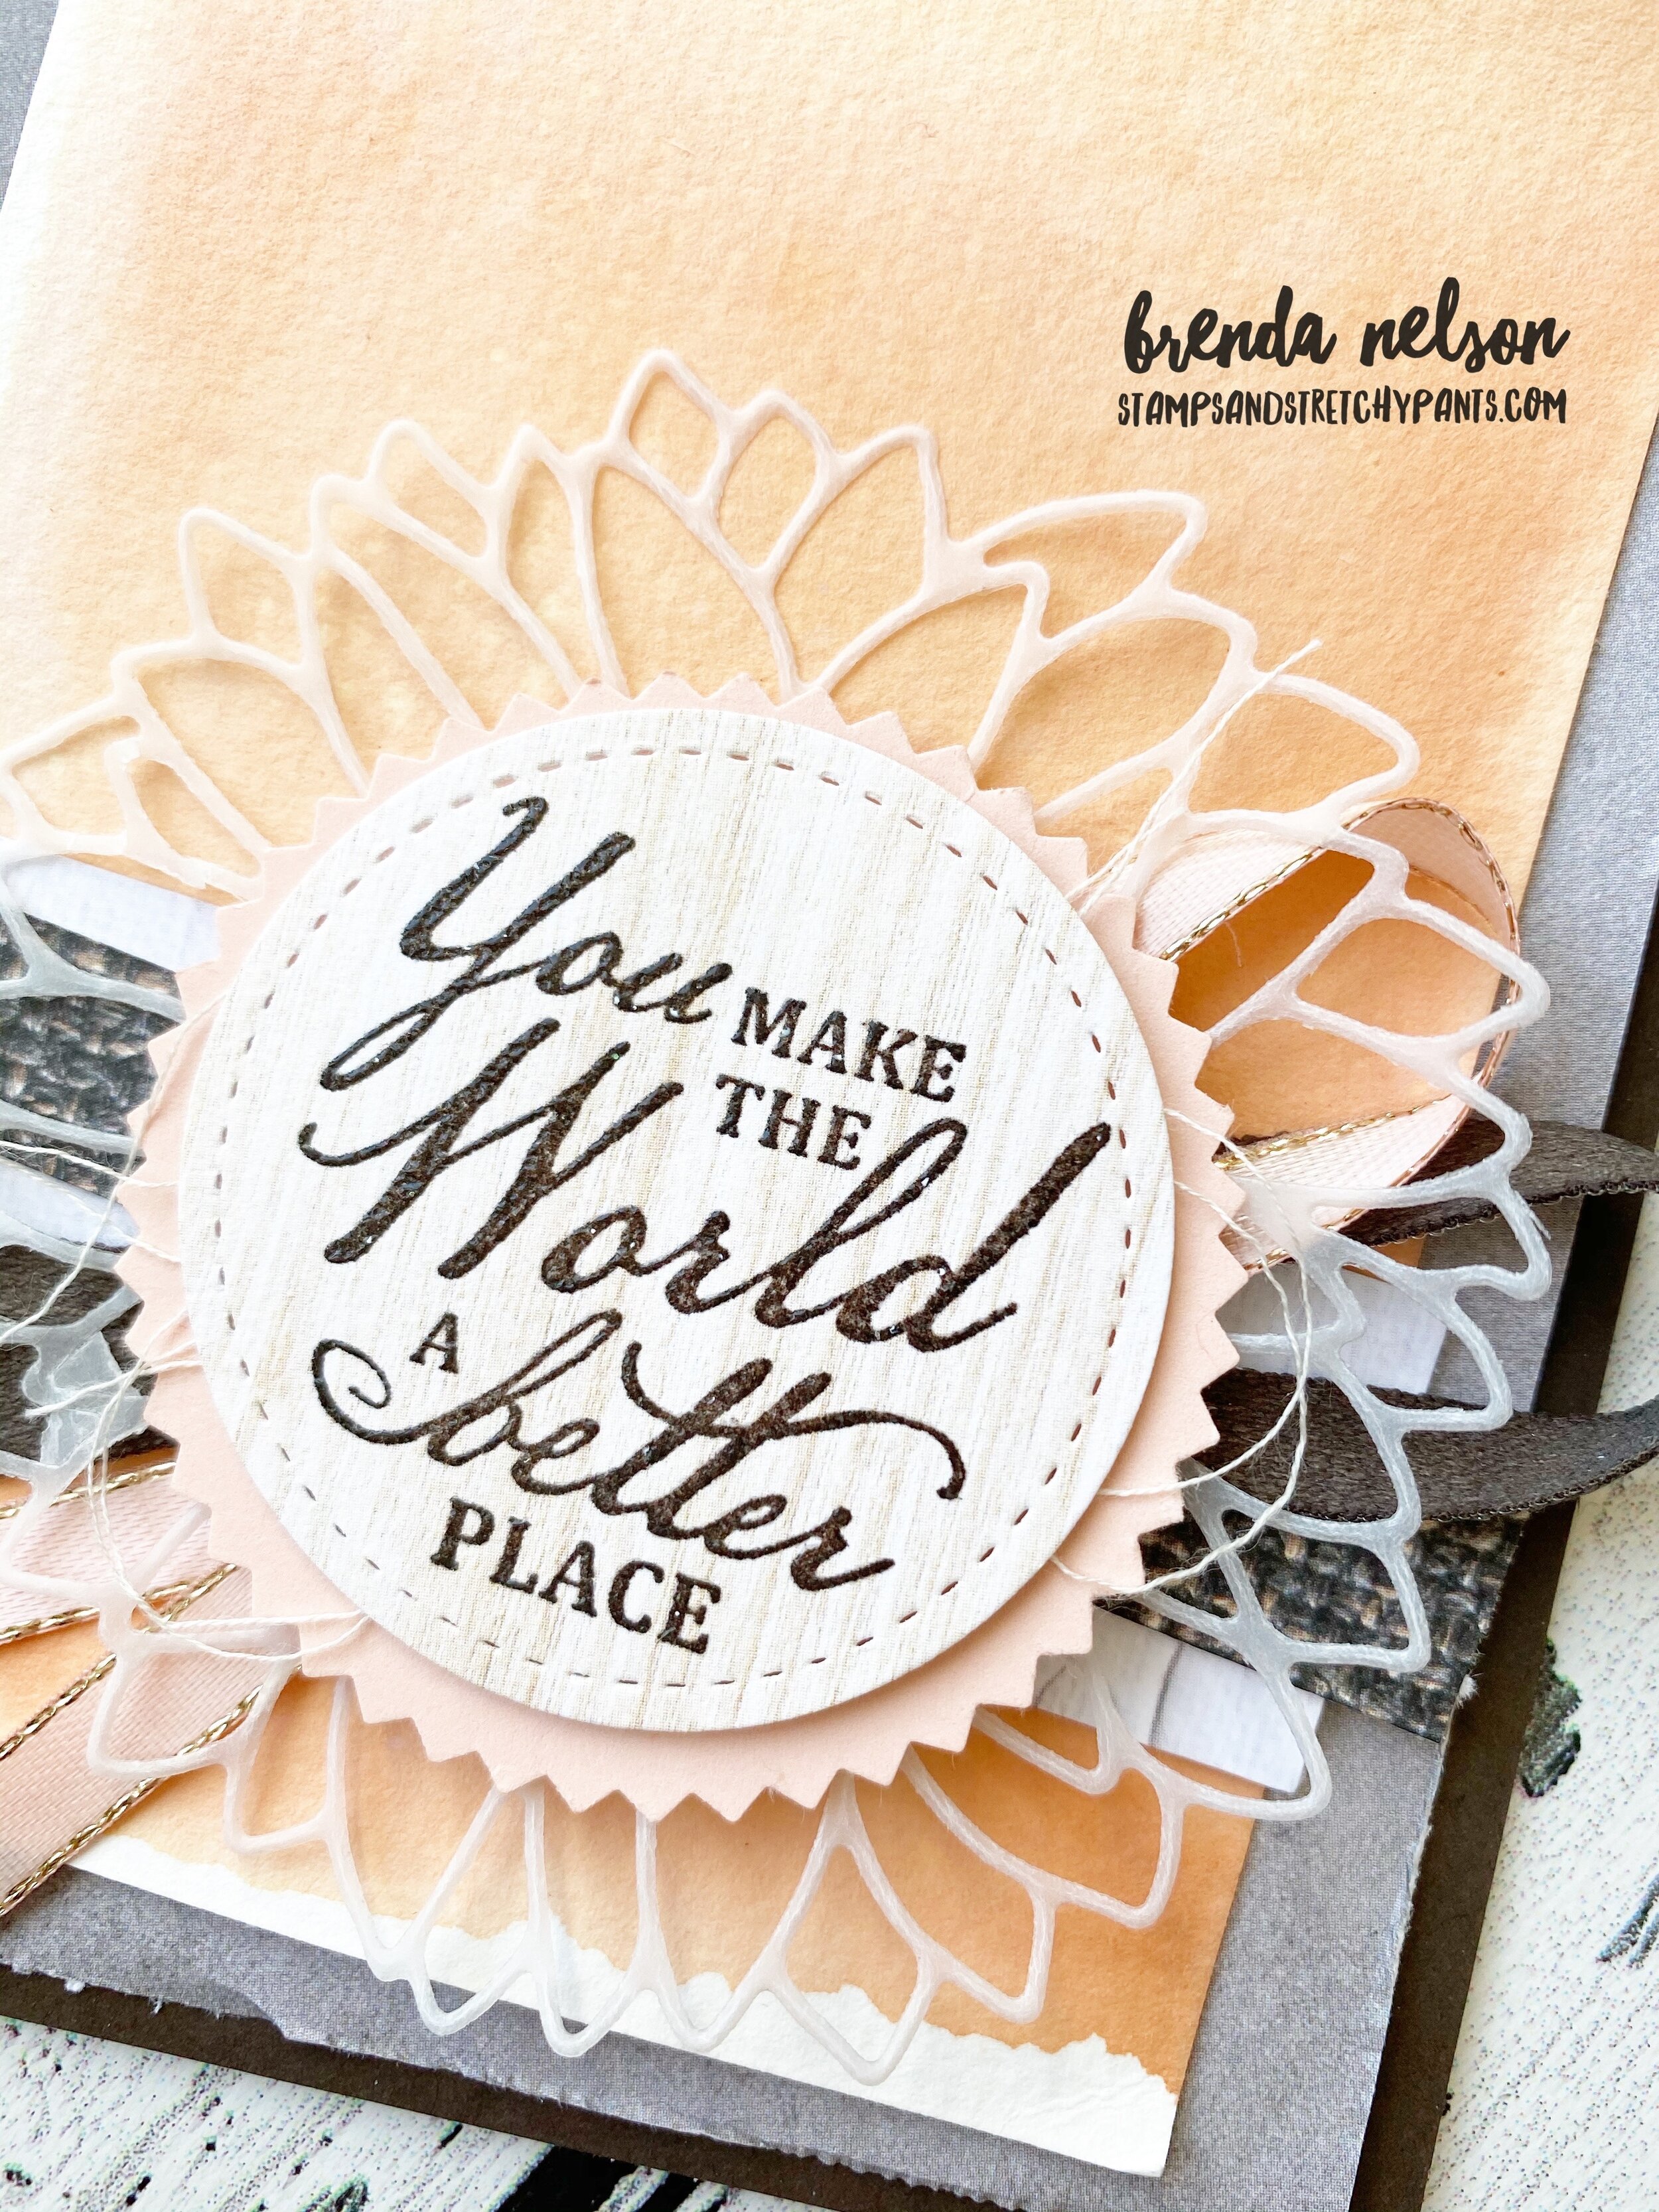
I used the Tasteful Touches stamp set as the focal point of this card. I absolutely LOVE the feathers. I stamped them in Bumbleebee on Whisper White card stock. I inked the feather once and stamped it three times to get three different tones of the ink. These are then hand cut.

The sentiment, You are the Best, is actually stamped twice. I stamped it once and then layered a 1 inch strip of card stock over top as a mask. I then stamped my sentiment again to get the second half ‘The Best’ to line up underneath this strip. I then added a DSP strip from the Flowers for Every Season 6x6 stack overtop in place of where the mask was.

I added a bit of linen thread and some of the shapes from the In Good Taste Wooden Elements. The Misty Moonlight scallops along the white base edges come from the Budding Blooms dies. And of course I had to flick my Purple Posy marker across the Whisper White base! Its the best trick out there to take away the feeling of too much blank space.

I hope you will give this ‘fun fold’ a try! Have an awesome day!

Create with Connie and Mary--Birthday Celebrations!

This week’s theme is birthday and I think its because a special someone (hint: Connie) is celebrating a birthday! So naturally we are celebrating by sharing birthday cards with everyone. I used the new Playing with Patterns Suite to create this easy peasy card!

I love the colors in this suite and tried to incorporate little snip-its of them all on one card! The base is Purple Posy and I stamped the polka dots from the Pattern Play stamp set in Highland Heather. I cut and scored this card base like a normal card ( 4 1/4 x 5 1/2) and then trimmed off an Inch. This lets a little peek a boo option happen to highlight this striped patten paper from the Playing with Patterns DSP. I used the Stitched So Sweetly dies to cut the scallop rectangle from a Crushed Curry patterned designer paper found in the DSP.

I love that the ribbon for this suite is a trio of colors and textures. You get a skinny piece of Night of Navy, a shimmery Coastal Cabana option and a Purple Posy/White wide ribbon all in one set! You can find it in the catalogue on pg 161, along with a bunch of new amazing ribbon options.

I stamped the sentiment on Seaside Spray card stock with the new Misty Moonlight In Color and cut it out using a die found in the Stitched So Sweetly collection. I stamped it again in Calypso Coral on the same card stock and cut by hand ‘Cue The’ to add in that color to the design. A few of the Playing with Patterns Resin dots and voila! An easy peasy card!

Image 2020-04-27 at 6.31 PM (1).jpg
This card came together so effortlessly with the elements of this amazing suite!

This card came together so effortlessly with the elements of this amazing suite!

final.jpg

Did you notice the cute little 3x3 acetate boxes in the new catalogue? I made a little mini card and coordinating envelope to go with my full size card. It would be cute to stash a little treat behind the card in the box.

The HB is cut out using the Playful Alphabet Die which is a part of the Pattern Play Bundle on pg 102 of the catalogue. If my projects have inspired you with this suite (see my blog post from Wednesday) you can use my Monthly Hostess Code to place a…

The HB is cut out using the Playful Alphabet Die which is a part of the Pattern Play Bundle on pg 102 of the catalogue. If my projects have inspired you with this suite (see my blog post from Wednesday) you can use my Monthly Hostess Code to place an order!

You can hop backwards to check out Melissa’s project or you can go on to our birthday girls blog post! Enjoy your day, I hope you get to stamp something!

Splish Splash! Joy of Sets Blog Hop!

The theme for June is Splish Splash and what a better way to introduce you to this amazing new product suite, Whale of a Time. The whale punch is literally so cute I can’t even handle it! Everything I used on these two cards are new so let me take you through it!

I wanted to created a water background so I used watercolor paper with our new Water Painters. The brushes come in 3 tip sizes and before you twist the brush on super tight, twist in REVERSE, to get the brush tip off to add water! I added a drop of re-inker in three colors, Pool Party, Coastal Cabana, and Pretty Peacock, to an acrylic block. I took the widest brush tip (shown below) and dripped a drop or two of water onto the block. I mixed the re-inker around and then added it to my watercolour paper in a horizontal brush stroke. I then took the medium water brush and dripped some water on top to give sort of a bubble finish. I let those dry and while waiting put together the whale using the builder punch. I stamped a bit of detail to his back and top fin in Shaded Spruce. When the background was dry I used the same color to add in the sea weed.

When I looked through the Whale of a Time Designer Series Paper I knew immediately that I wanted to cut the ‘wave’ design apart and layer it on my card to create more 3D feeling waves. I was able to get two cards out of one piece of DSP. I added some of the Whale of a Time sequins into the sea weed for a bit of whimsy. The sentiments are stamped and embossed with White Embossing powder on Pretty Peacock card stock and then just cut by hand and added onto the cards with Mini Dimensionals.

The card bases are Pretty Peacock and Mint Macaron and both have a Shaded Spruce layer which was ran through the new Seabed embossing folder.

 
final.jpg
IMG_3659.JPG
Isn’t the detail in these DSP waves amazing? It was my inspiration for the color pallet of this card. I think these cards would be super cute to give my kids next week when they finally finish their online schooling.Narelle is next on our blog hop t…

Isn’t the detail in these DSP waves amazing? It was my inspiration for the color pallet of this card. I think these cards would be super cute to give my kids next week when they finally finish their online schooling.

Narelle is next on our blog hop today, I absolutely love her style! I can’t wait to see her fabulous creation with this unique theme!


Yellow Balloon Project

My last card in my “A Card a Day in May” challenge is dedicated to my friend Michelle who lost her battle with cancer earlier this month. We met while working at lululemon and her impact on me as in individual will last the rest of my days. I had never met anyone like Michelle before. She did not let her illness define her in any way. She lived a big full life and was so positive and resolute in her efforts to stay alive. She loved her dogs and her husband Aaron was the center of her universe. They were the ultimate team. When a health challenge came her way she would say ‘Aaron and I will discuss a plan’. She always believed there was something she could be doing or trying to keep her cancer at bay. Michelle was generous, and kind, funny and a believer. The legacy Michelle leaves behind is how blessed we all are for knowing her. She made my life better and brought such a wonderful light to this world.

One of her wishes was to have yellow balloons released on her birthday which was shortly after she passed away. So we did that, all across Canada, friends and family of Michelle’s got together and released balloons in the spirit of connection to Michelle and tagged it #yellowballoonproject.

One way I felt I could stay connected to Michelle was to send her cards so that is why I am sharing this #yellowballonproject inspired card with you today. This stamp set is called Above the Clouds and that is where you are Michelle. I know you will continue to shine your light and your love down on us. Thank you for being you.

final.jpg
I will be your friend forever Michelle, I will continue to think of you and strive to approach my challenges in the same way as you, with light and grace. Until we meet again. XOXO

I will be your friend forever Michelle, I will continue to think of you and strive to approach my challenges in the same way as you, with light and grace. Until we meet again. XOXO

In case you missed any of the projects I shared this month I have collaged them all here! Take a look back through my blog to get more up close photos and the crafty details! It was a challenge for me to create a new card every day and to stretch my design muscles. Looking back I am really proud of all of my stampin’ in May. I am looking forward to a new month with a new catalogue!

E2777CCF-7F88-4104-A249-BCD18FBE35CA.jpg
299A3A6A-A6D8-4FB3-B8D9-A2B9B080F03D.jpg
80B22593-0C5E-450B-AAF4-78FEBDB5A888.jpg
A1E5B265-1C19-4971-93F9-7A88CD5F316B.jpg

Create with Connie and Mary--Favorite NEW product!

This week we are sharing our favourite new PRODUCT from the demonstrator pre-order. I have to say that it is hands down the In Good Taste Designer Series Paper. This paper is unique as its photographic paper, meaning the 12 x 12 pages are actual photographs of different woods, tiles, textiles and fabrics that have such a real deep feel to them. I have been wanting 12x12 wood grain paper for YEARS! I had to resist making a scrapbook page for the hop as I am committed to making 31 different cards this month for my person “A Card a Day in May” challenge. This is my 30th card of the MONTH!

The sentiment is from the Beautiful World stamp set that will be available on June 3rd

The sentiment is from the Beautiful World stamp set that will be available on June 3rd

Image 2020-04-27 at 6.31 PM (1).jpg

The card base is Early Espresso and then I chose a piece of DSP from the collection that looked like concrete to add in a grey tone. I knew I wanted to share an easy water color background technique and a couple more strips of the DSP to show you how easy it is to mix and match these great patterns. The sentiment is stamped on one of the light tone wood grain options in Early Espresso and then I added clear embossing powder on top so it would have a bit of shine. The new Faux Suede Trim is also at the top of my favourites list (I actually have a list on my blog, Brenda’s Top 10 that you can see all the things I am loving in this new catalogue). Follow the link here to see my list:

And of course I think its obvious from some of my other posts this month that I love the Sunflowers Dies so I found a way to add that onto this card too by pairing it with some vellum.

Here is a really easy way to color your water color paper. Cut a piece of watercolor (or shimmery white) paper to fit your card. Choose an acrylic block that is slightly bigger in size. I used Block E. You will need an ink pad and a water spritzer. Spritz the water color paper. Press the ink pad onto the block to ink it up. Lightly sprite the block and press it onto the watercolor paper. The trick is to let it SIT and absorb the ink. I usually let it sit there for a couple of minutes. When you remove it you get an awesome easy water color background!

Look how great this light pink watercolor background looks!

Look how great this light pink watercolor background looks!

I can’t wait to see what the other girls are loving this week! Hop back to see Melissa’s favourite new product and forward to see Connie’s!