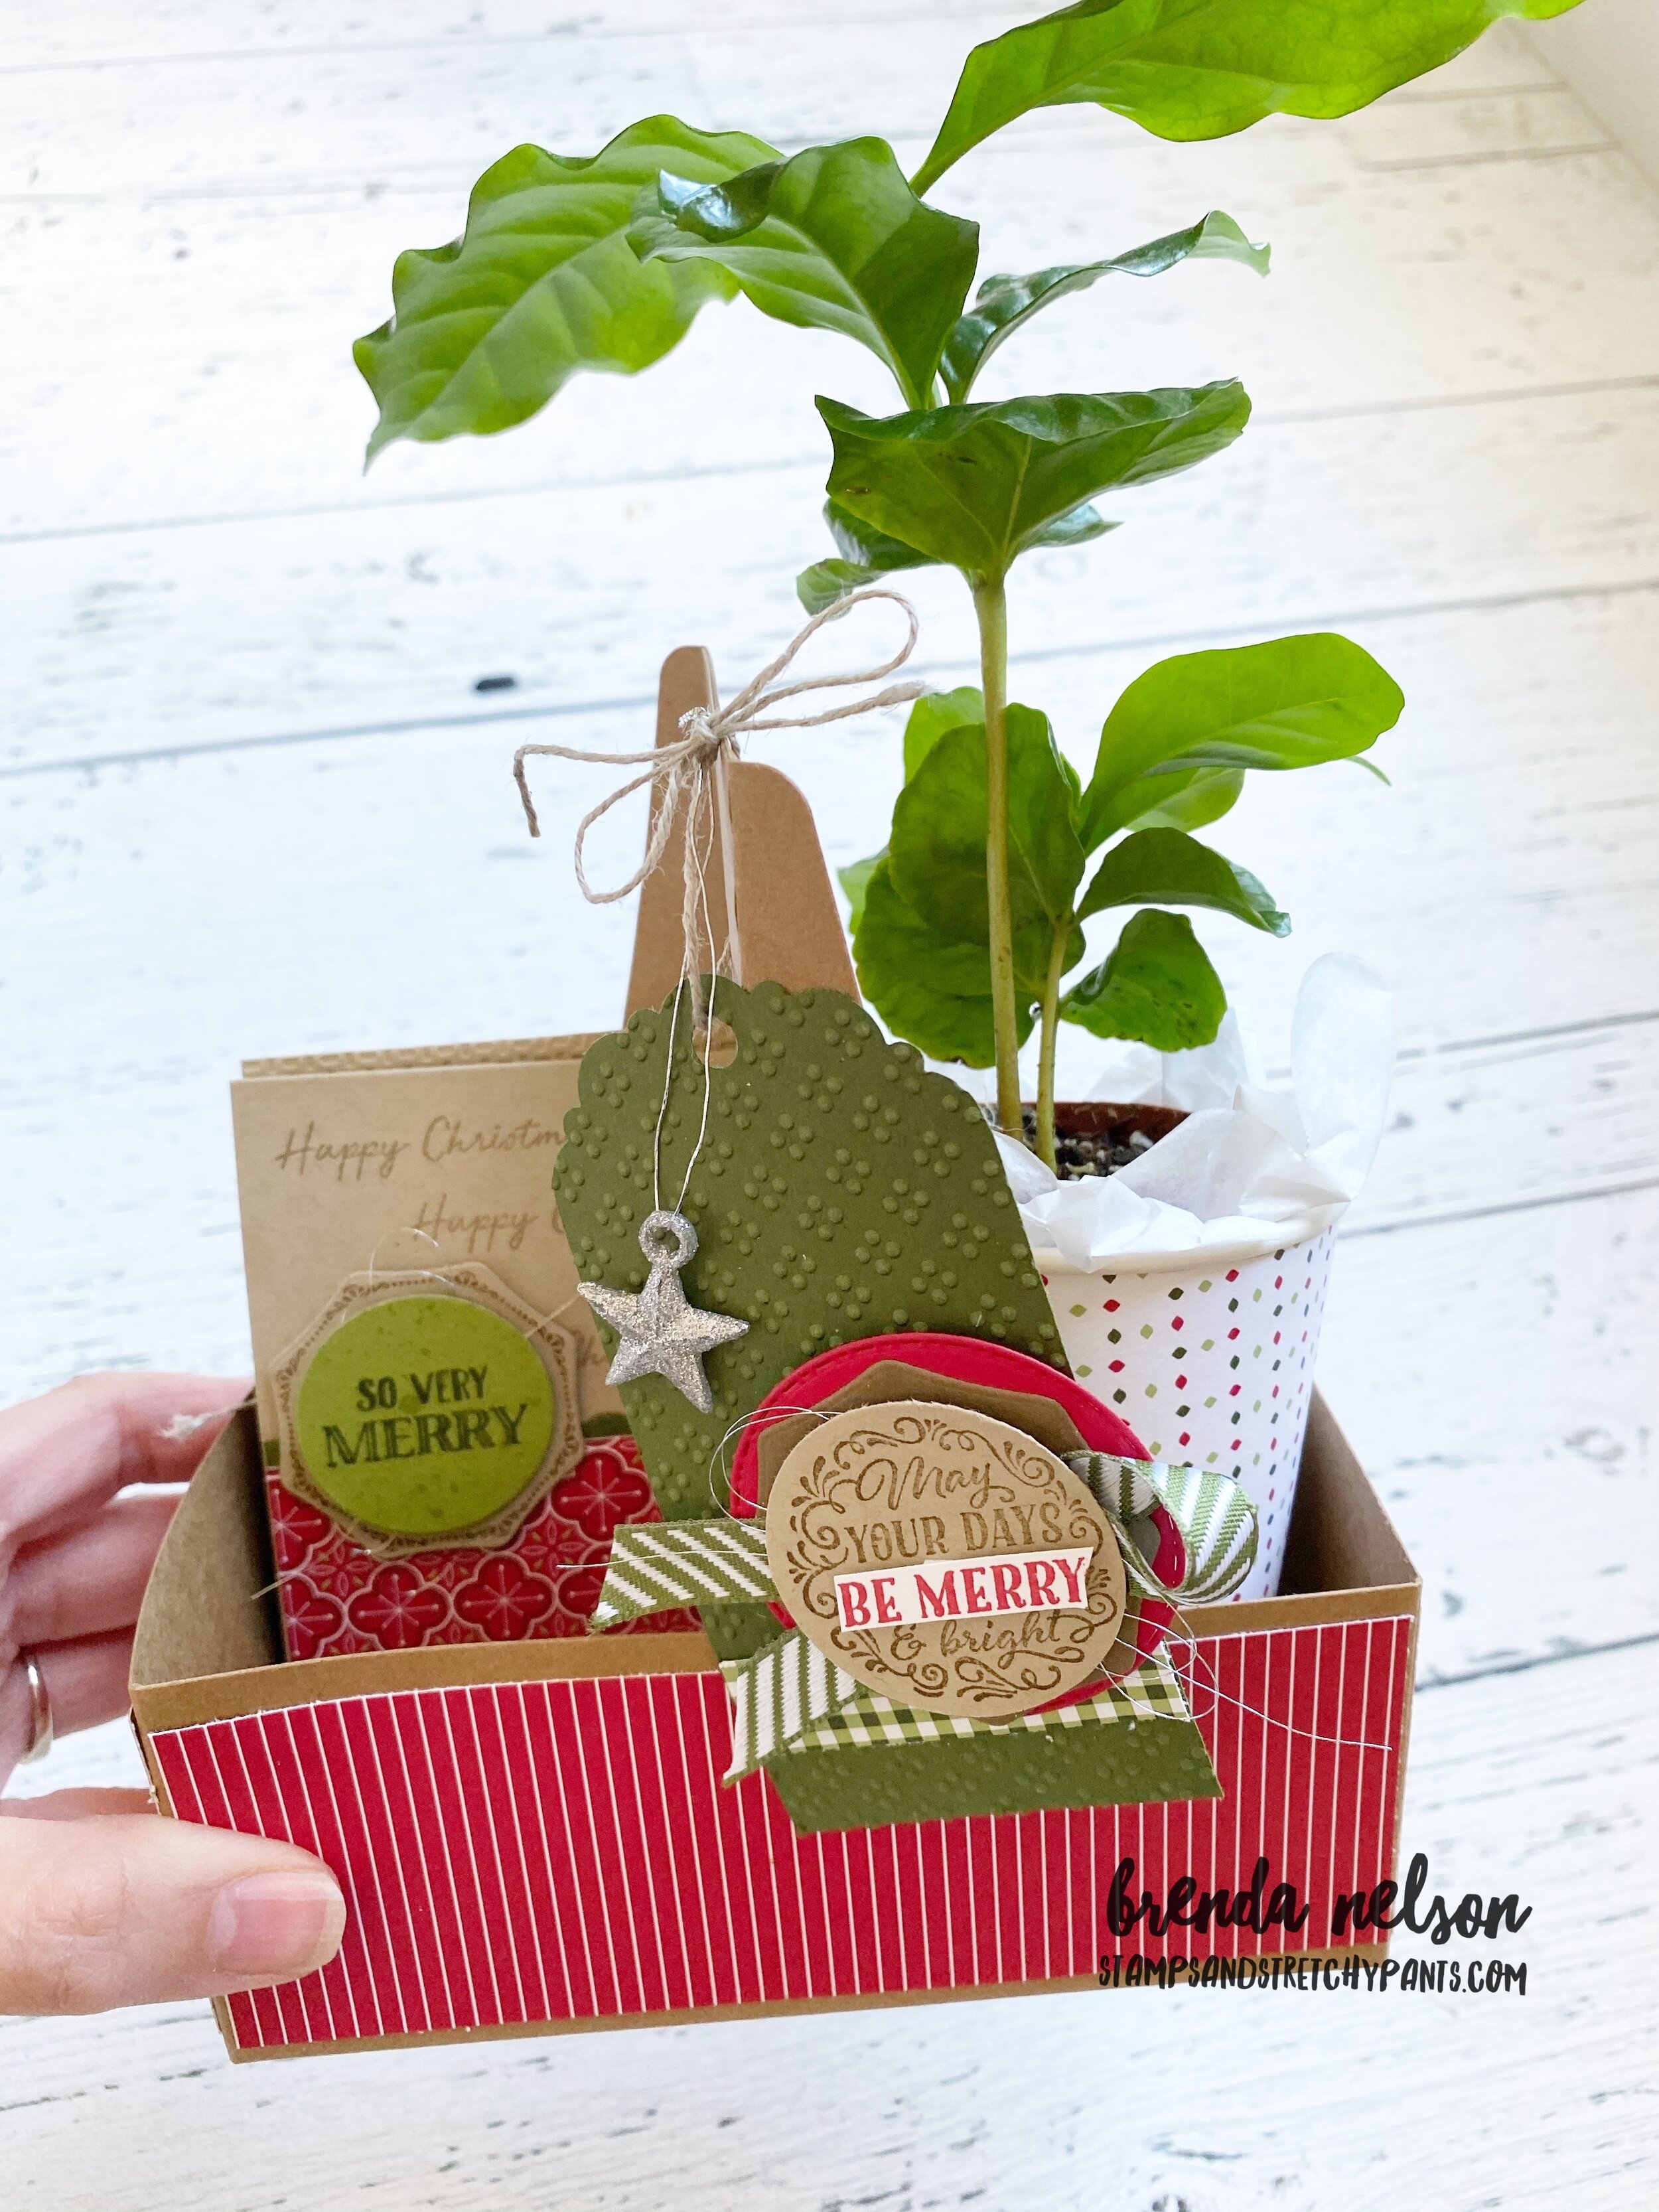
Christmas Coffee Explosion Box

This project is definitely in my top ten favourite things I have EVER made! I just couldn’t love it any more and definitely know its the gift I am making for my kids teachers this Christmas!

If you haven’t tried making an explosion box, don’t be intimated, its actually quite simple. You can look at each panel as a mini card and let your design inspiration go from there! This overhead shot shows you what it looks like once you take off the top and the sides ‘explode’ down.

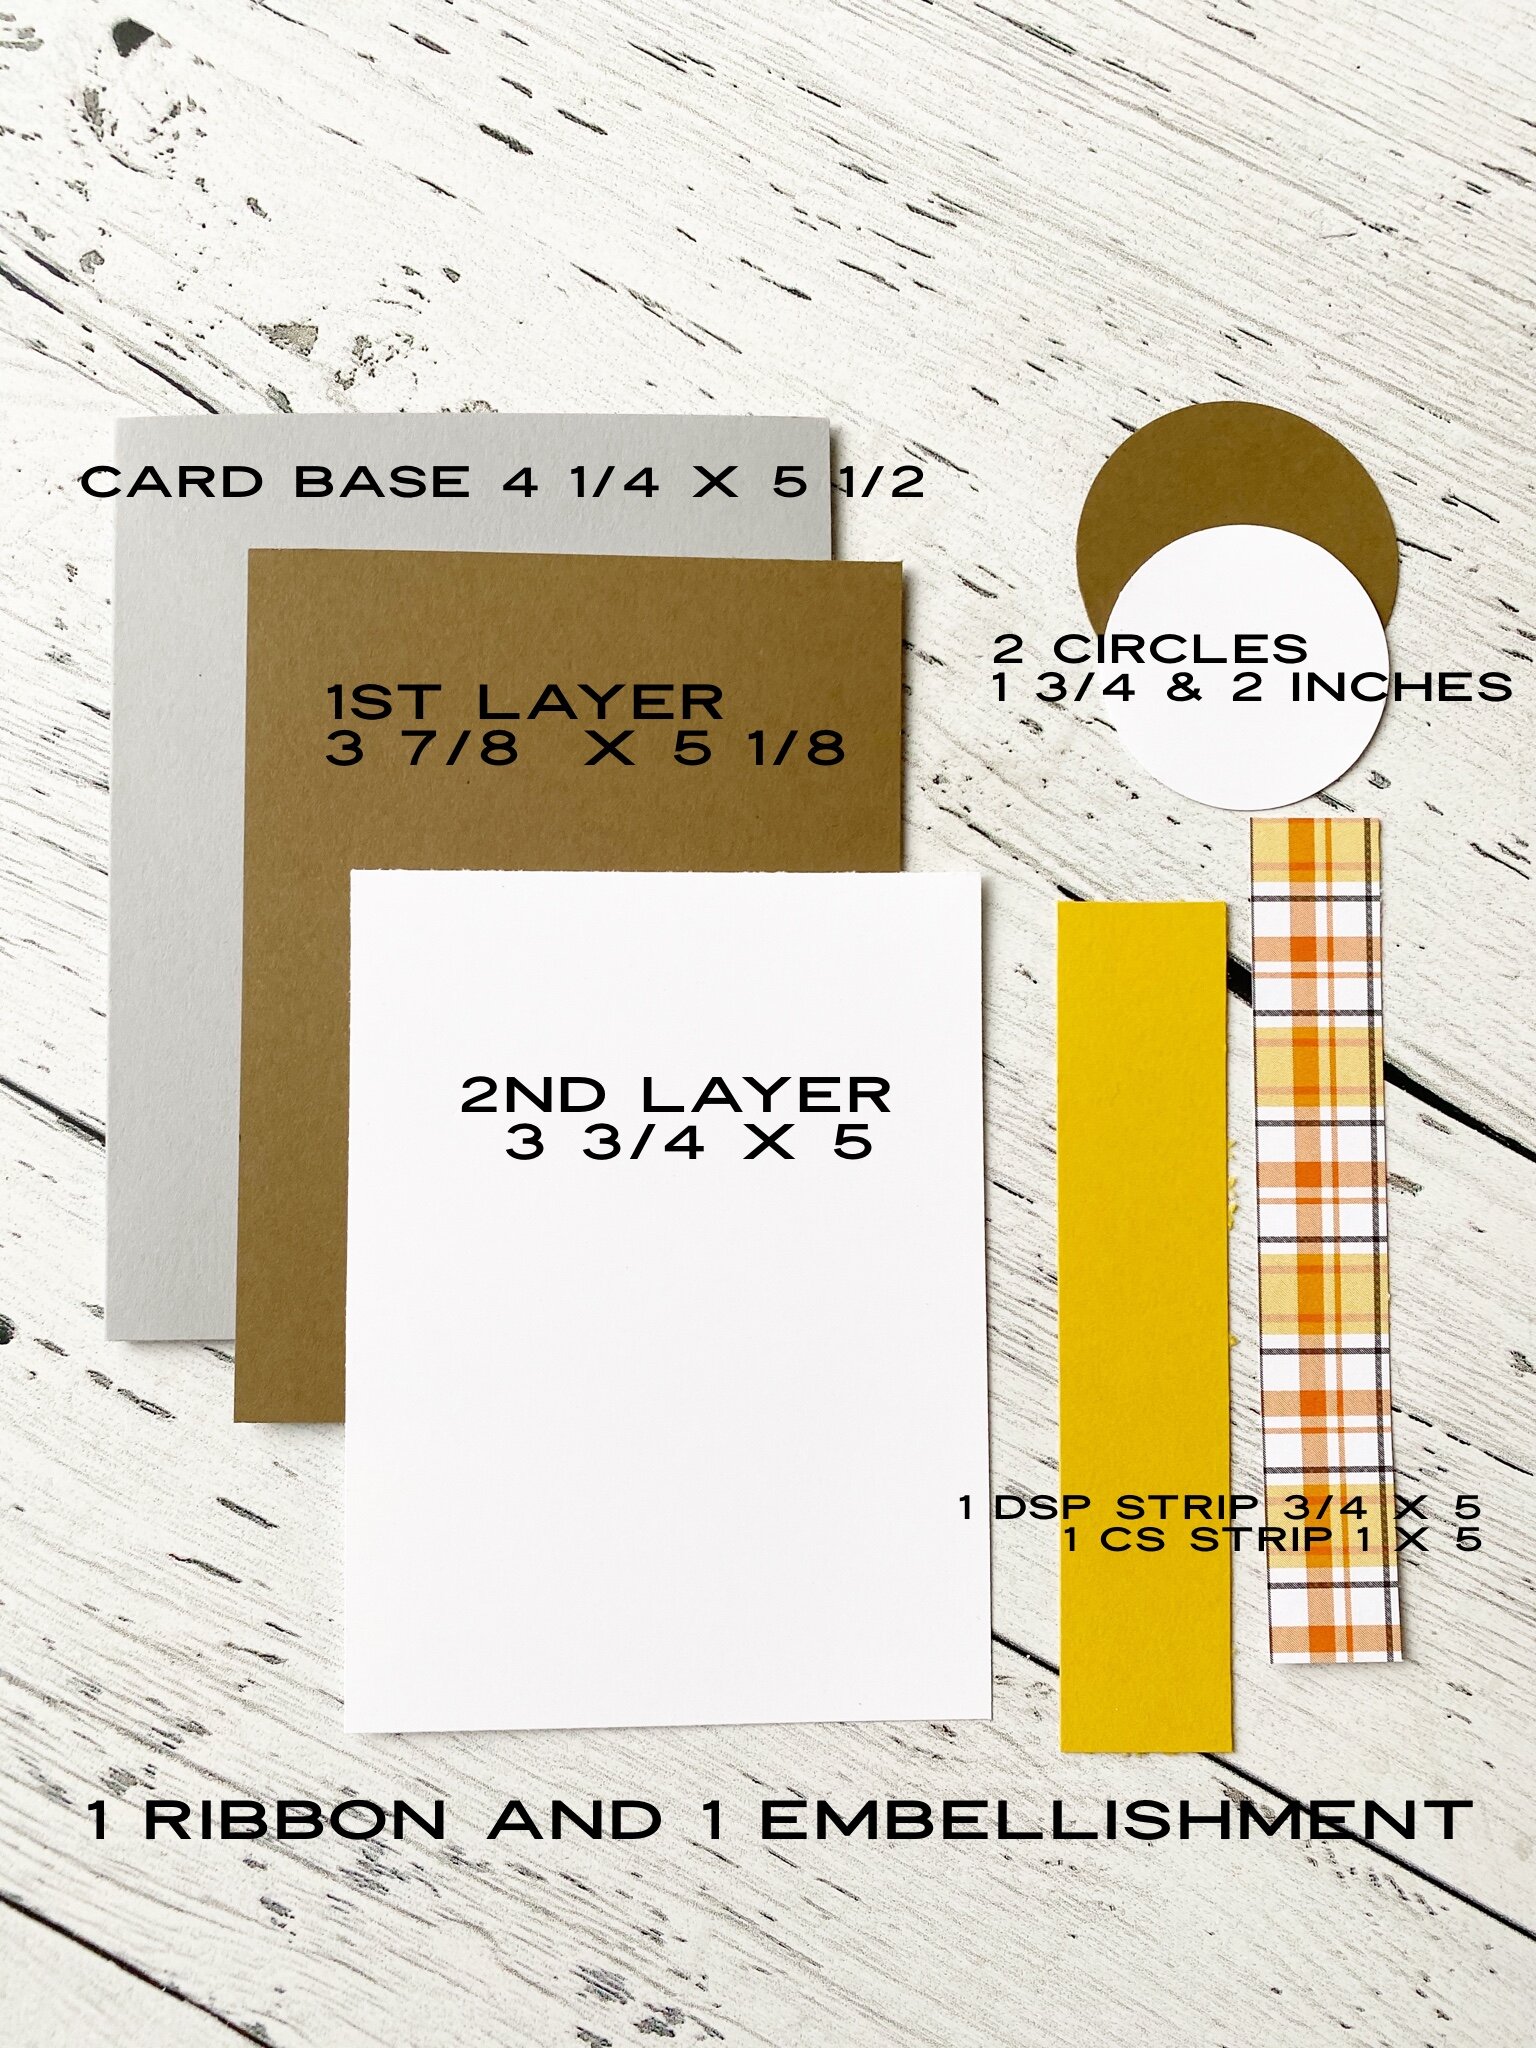
There are tons of tutorials out there and almost all of them start with a 12x12 piece of card stock which is what I used here. I scored it at 4 inches on all sides and then cut some of the panels at a diagonal to create the two ‘pocket’s. I wanted a couple spots to add in some gift cards (one for coffee, one for booze!).

final.jpg

I used the two stamp sets Warm Hugs and Wrapped in Christmas from the Heartwarming Hugs Suite to decorate and embellish this project. These two sets work so well together!


This is the top of the box. I just love this mini coffee cup that fits inside the For You… it gives a little hint of what might be inside.

You can also use the Glitter Star Ornaments as a stationary embellishment by cutting the string and tucking the hook behind something.

final.jpg

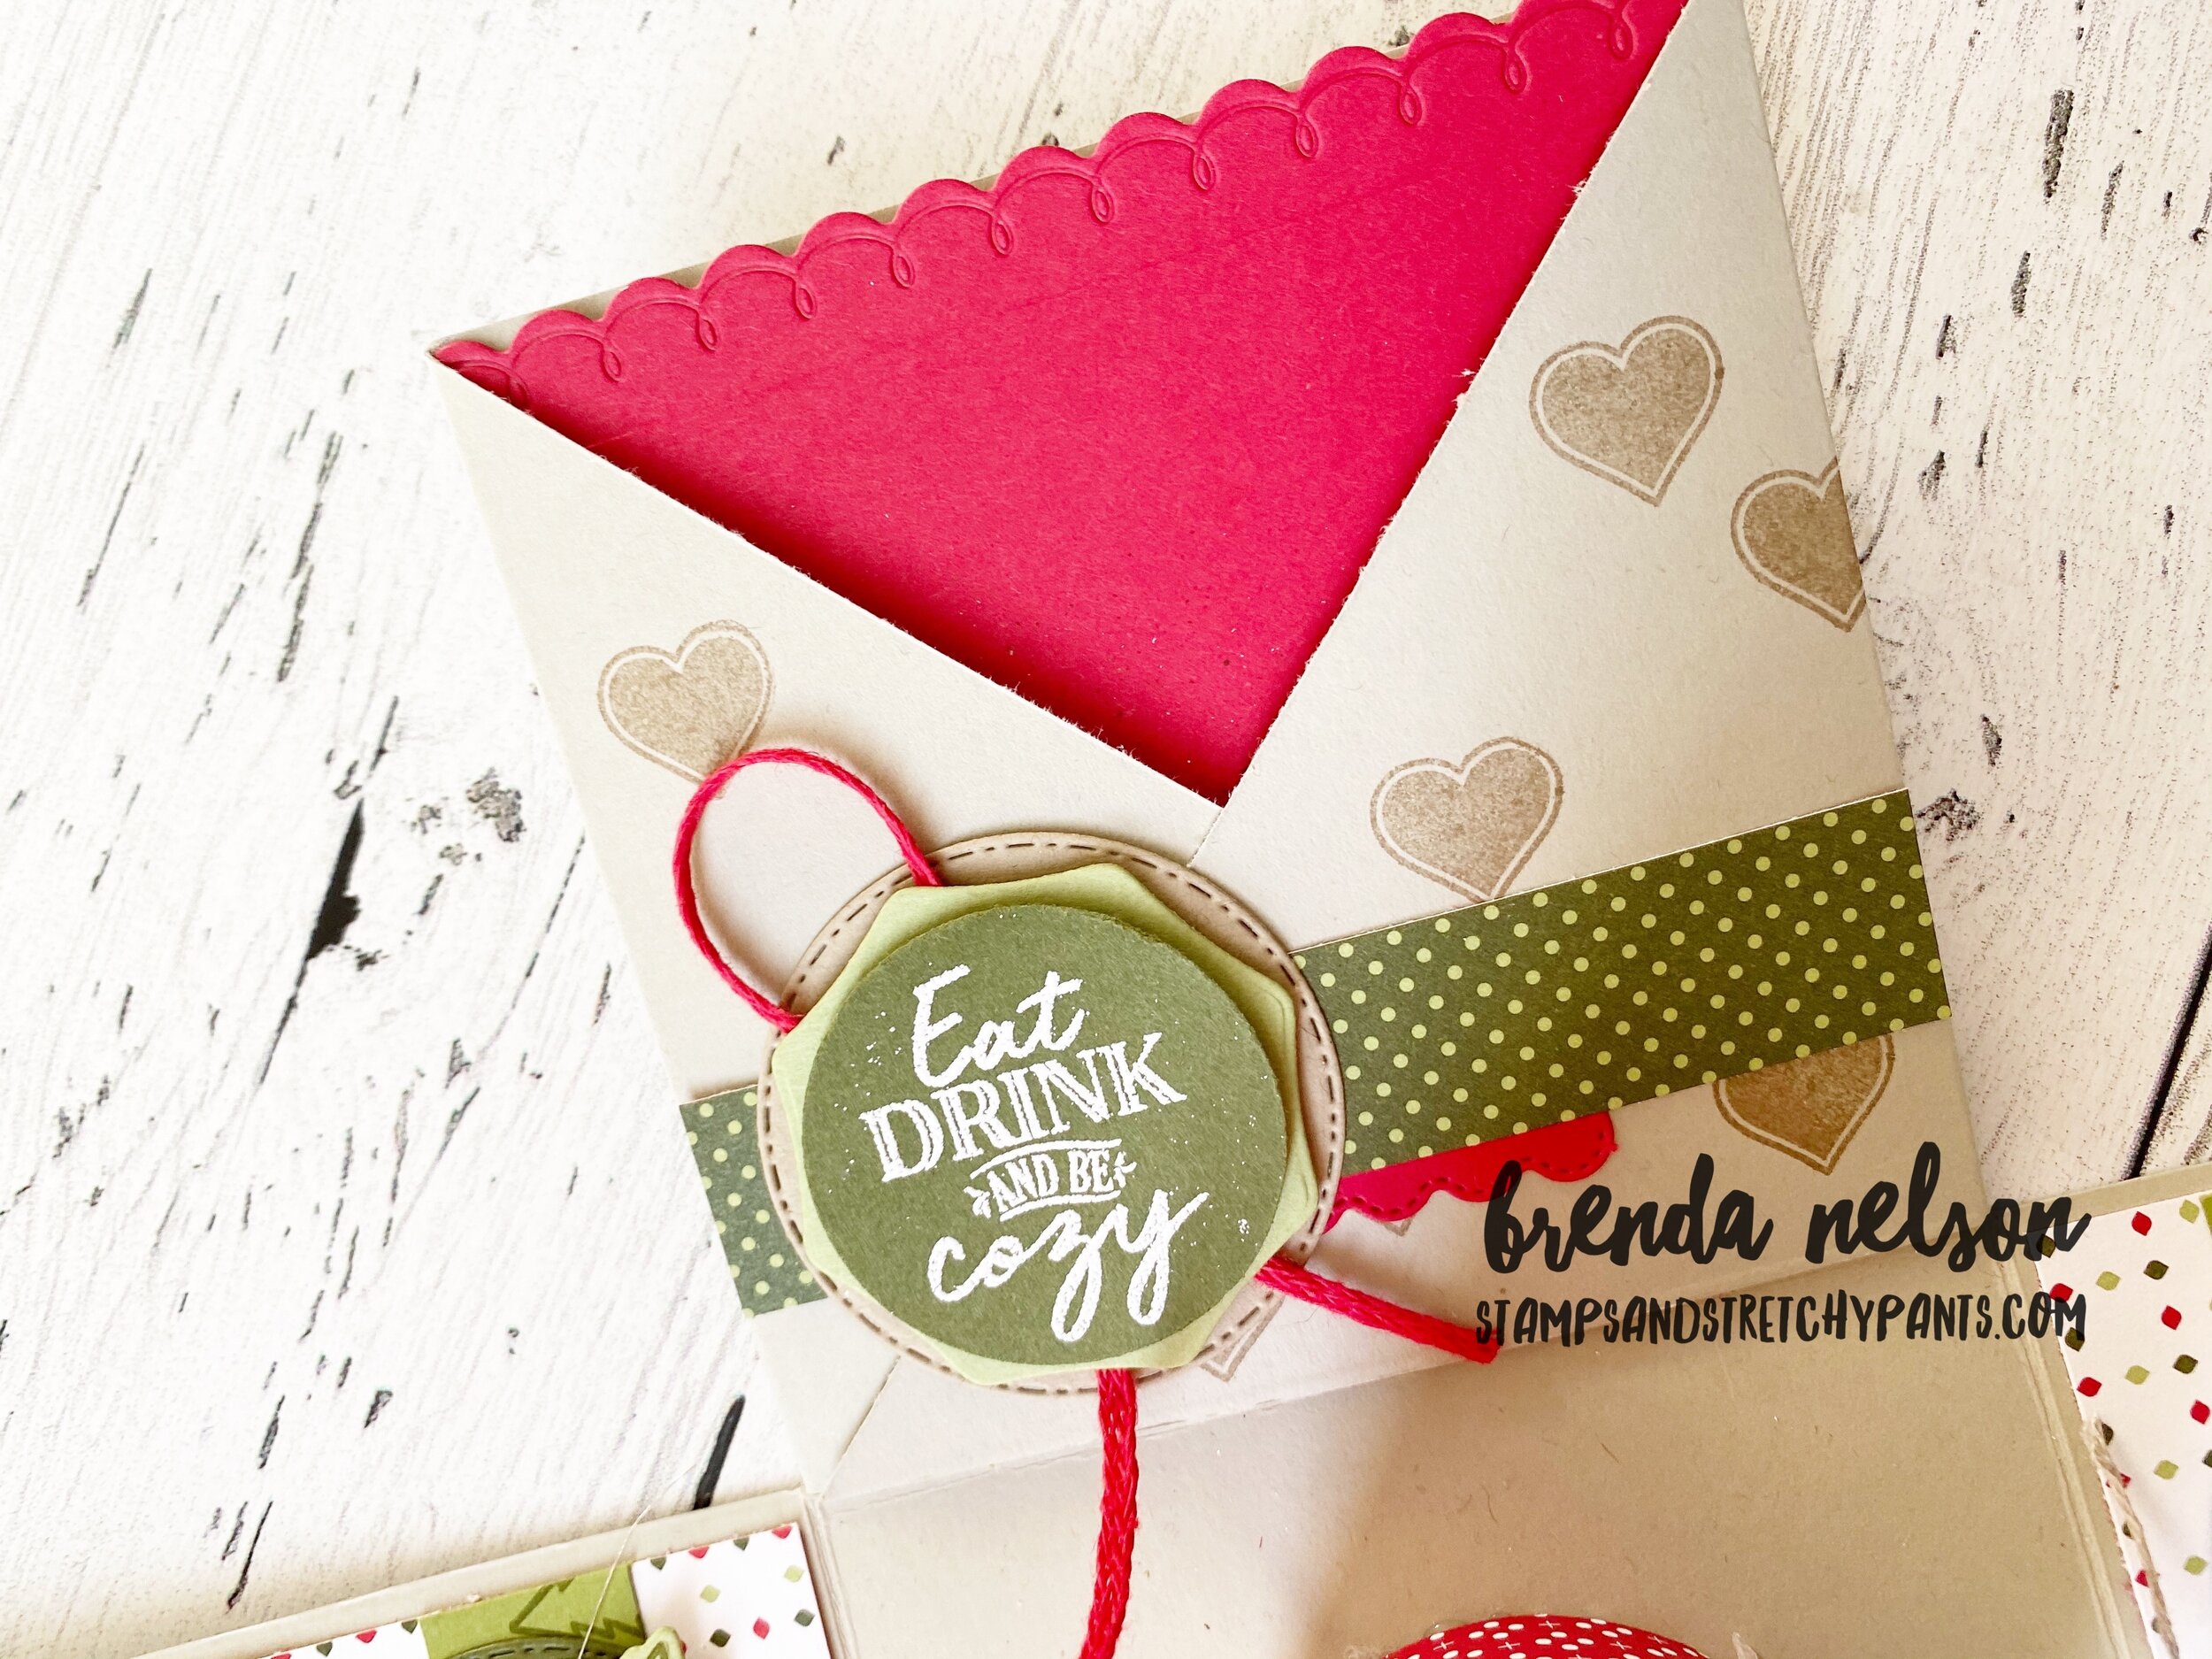
I used the Heartwarming Hugs DSP and used the same pattern on the lid and on the inside panels and decorated the box with colors that coordinate with the DSP. I love the options of using Mossy Meadow, Old Olive, Crumb Cake, and Soft Suede. I used white embossing powder on many of the sentiments to help them ‘pop’.

The pull out pockets also have some stamping and you easily have enough to add a gift card.

I sacrificed one of the cups by carefully taking it apart to trace it onto the DSP so that the shape would be perfect to wrap around the cup. I used Tombow adhesive so it would stay adhered until the end of time! I decided to hot glue the cup to the base of the box. This way you can add some little treats inside the cup too and won’t move around in the explosion box.

I love how the Warm Wraps dies have such great layering options. The top of the coffee cup illustrates this perfectly and I used this layering option on all of the panels.

final.jpg

I would love to share this project with you! I will be offering it as a class on October 21st at 12:30 and October 23rd at 7pm. If you are in the Edmonton area please feel free to reach out if you would like to come stamp with me, or order any of the supplies by following the link to my store. Click on the button below to contact me to sign up for this class!


Coffee Carriers--not just for coffee!

The very first suite I ordered from the Handmade for You catalogue was the Heartwarming Hugs suite. Once I saw those mini coffee cups and that carrier I was SOLD! Hahaha! I have been crafting with them all month long in preparation for a display I was putting together and let me tell you, they are for so much more than coffee!

This cute little project is home to a little coffee bean plant! Isn’t that fun? I went to a local greenhouse and they told me it would maybe grow a bean in like a decade! hahaha! Keeping it alive for that long is actually more of a challenge!

final.jpg

To create the DSP wrap I sacrificed one of the cups by gently dismantling it. I then traced it onto the Heartwarming Hugs DSP so that the shape would be exactly the same to wrap around a cup. I used Tombow to keep things glued down. I love the color palette of this DSP as it allows you to bring in several brown and green tones and the patterns are so versatile and easy to mix together! I wrapped this carrier in DSP. I want to mention that you cannot wrap one strip of 12x12 around the carrier. It isn’t long enough so you need to cut individual pieces for the 4 sides. I wrapped it with the Real Red Braided Trim which is also a part of this suite.

I decided to add in a couple mini cards alongside my mini plant. I cut them to 2 1/2 inches wide so they could slip in the other side.


The Heartwarming Hugs Suite includes two stamp sets, Warm Hugs and Wrapped in Christmas. I used the Wrapped in Christmas set to make these mini cards and accented them with images from the Warm Hugs set.

The suite also includes two slim embossing folders which are great for adding in some texture like in this card shown.

final.jpg
final.jpg

Don’t all these patterns look awesome together? I love the Mossy Meadow Diagonal Stripe ribbon and the Glitter Star Ornaments in this suite. They help make the perfect tag! You can also see on this tag how fabulous the Warm Wraps Dies are as they have shapes that layer on top of each other! I always love when that is a component of a die set.

final.jpg

I actually ended up giving away both of these carriers as gifts so I wish the recipients luck in keeping these little coffee bean plants alive! hahaha! I also hope they are able to put the mini cards to good use and find themselves inspired.

I will be posting more coffee carrier projects so keep checking back so you don’t miss out! And if you need any supplies to make these projects, please shop my online store!

Around the World on Wednesday--Tag Team!

91442295_10216484369808661_2887014979863576576_n.jpg

Hello Friends! Welcome to another Around the World On Wednesday, we are so happy to have you hopping along with us as we explore TAG TEAM projects! I immediately knew that I could take a card design and great some other projects with similar elements.

I have been doing some Mystery Card designs with my team lately as a way for us to create together even though we can’t be together! So this was a design I came up with for our last team meeting.

The strip of DSP is from the Plaid Tidings collection and my card stock colors are Smokey Slate, Soft Suede, Whisper White and Crushed Curry.

The large maple leaf is stamped in Pumpkin Pie and then I took my Water Painter and brought the ink from the edges inside for some easy breezy colouring. You can find this image in the Gather Together which is a returning favorite in the Handmade for You catty. You will need to do this step immediately after stamping. Since I had ink on the brush I flicked it across the back ground for a little spray of color.

Happy Fall Y’all is from the stamp set Banner Year along with the little tiny leaf. I added in some Linen Thread, Bubble Bee Gingham ribbon and the Champagne Rhinestones.

So this card was the first element of my ‘Tag Team’ idea…sometime cards are the best jumping off point!

I knew that I could take the card elements and create some tags to use on some treats that I wanted to give away! I stamped the leaf in same way, colouring in the image so it felt a little more solid. I kept the sentiment in its original form, on my card I broke it into two lines using the Soft Suede marker, and I punched it out with the Classic Label punch.

I used a different ribbon as I am really embracing the USE IT UP mantra! I kept the Champagne Rhinestones and a couple banners from the Plaid Tidings DSP.

I really hope you enjoyed my take on TAG TEAM, I can’t to see what the rest of the team has came up with. You can hop forward to see what Tricia Butt’s has created for us!


Create with Connie and Mary--Hug in a Mug

Well its officially September so we can start talking cozy sweaters, scarves and Pumpkin Spice latte’s! Who has had one already? I know I have! Our theme this week is Hug in a Mug and I immediately reached for the Press On stamp set from the Handmade for You catalogue.

fullsizeoutput_12d59.jpeg

I created this really fun card and coffee treat combo in a fun soft color pallette—it doesn't say fall AT ALL! Because even though its September I want to live in denial for another week or two! I used Soft Seafoam, Coastal Cabana and Petal Pink.

The little to go coffee cups were the perfect image to create a background. I used the coffee beans stamp on the label for the card and the front of the coordinating coffee treat pouch. And I used the big to go coffee cup image on both projects to keep project continuity.

Wouldn’t you LOVE to give this cute little gift to someone? Or receive it yourself?

Wouldn’t you LOVE to give this cute little gift to someone? Or receive it yourself?

final.jpg

Its so so easy to make this cute little coffee pouch. Cut a piece of card stock to 2 3/4 x 5 1/2 and score on the long side at 3 inches. I folded it it up and used a couple mini staples (hidden by the Pool Party ribbon) to keep it closed. Decorate the front and voila, a fun treat pouch!

The Petal Pink shape is from the Hippo & Friends die set and its been a regular in my crafting these past couple of weeks. So much so that I haven’t even put it away yet! The little strip of DSP and banners on the coffee treat holder are from th…

The Petal Pink shape is from the Hippo & Friends die set and its been a regular in my crafting these past couple of weeks. So much so that I haven’t even put it away yet!

The little strip of DSP and banners on the coffee treat holder are from the Peony Garden Designer Series paper.

Let’s see what the other gals have created this week! If you are starting here you can hop backwards to see Melissa’s creation or you can go forward to see what Connie has made. Either way I know you will be inspired! Thanks for visiting today!

C is for Cookie...

And it’s good enough for me, oh C is for Cookie and its good enough for me because COOKIE COOKIE COOKIE COOKIE starts with C!

Hahaha! How many of you learned your ABC’s from Sesame Street? Can you guess who my favourite character was? Cookie Monster! And ya, maybe I still do eat my cookies like he does! hahahaha! I also really liked Grover and when they occasionally showed you glimpses inside Oscar’s garbage can…man, that was a good day!

So needless to say I love the Nothing's Better Than bundle and could not wait to make a fun cookie treat. I will be giving these out to everyone who places an order with me next month and I absolutely cannot wait!

final.jpg

I have to say the best thing about having a tweet is their willingness to do things for money, so I employed my daughter to cut out 48 ‘cookie’ words for me the other day. Then we worked together to cut the other parts and I stamped the ‘Today’s Plan Consume’ in Soft Suede on Sahara Sand card stock and flicked the background with a Water Painter and Sahara Sand ink. I added some retired Baker’s Twine (use that stash up) between the stitched circle and scallop circle layers and added the labels to a package of Dad’s Cookies (bough at Costco!).

I can’t wait to share these with all of my group members in September! Ask me about joining one of my monthly groups if you live in the YEG area!

I can’t wait to share these with all of my group members in September! Ask me about joining one of my monthly groups if you live in the YEG area!